- •Contents
- •Introduction
- •Acknowledgments
- •The Goals of ASP.NET 2.0
- •Developer productivity
- •Administration and management
- •Performance and scalability
- •Device-specific code generation
- •Additional New Features of ASP.NET 2.0
- •New developer infrastructures
- •New compilation system
- •Additions to the page framework
- •New objects for accessing data
- •New server controls
- •A New IDE for Building ASP.NET 2.0 Pages
- •The Document Window
- •Views in the Document Window
- •The tag navigator
- •Page tabs
- •Code change status notifications
- •Error notifications and assistance
- •The Toolbox
- •The Solution Explorer
- •Lost Windows
- •Other Common Visual Studio Activities
- •Creating new projects
- •Making references to other objects
- •Using smart tags
- •Saving and importing Visual Studio settings
- •Application Location Options
- •Built-in Web server
- •Web site requiring FrontPage Extensions
- •The ASP.NET Page Structure Options
- •Inline coding
- •New code-behind model
- •New Page Directives
- •New attributes
- •New directives
- •New Page Events
- •Cross-Page Posting
- •New Application Folders
- •\Code folder
- •\Themes folder
- •\Resources folder
- •Compilation
- •The New Data Source Controls
- •The SqlDataSource and GridView Controls
- •Reading data
- •Applying paging in the GridView
- •Sorting rows in the GridView control
- •Defining bound columns in the GridView control
- •Enabling the editing of rows in the GridView control
- •Deleting data from the GridView
- •Dealing with other column types in the GridView
- •Selecting which fields to display in the DetailsView control
- •Using the GridView and DetailsView together
- •Updating, inserting, and deleting rows
- •XmlDataSource Control
- •ObjectDataSource Control
- •SiteMapDataSource Control
- •DataSetDataSource Control
- •Visual Studio 2005
- •Connection Strings
- •Site Maps
- •The PathSeparator property
- •The PathDirection property
- •The ParentLevelsDisplayed property
- •The ShowToolTips property
- •Examining the parts of the TreeView control
- •Binding the TreeView control to an XML file
- •Selecting multiple options in a TreeView
- •Specifying custom icons in the TreeView control
- •Specifying lines used to connect nodes
- •Working with the TreeView control programmatically
- •Applying different styles to the Menu control
- •Menu Events
- •Binding the Menu control to an XML file
- •SiteMap Data Provider
- •SiteMapViewType
- •StartingNodeType
- •SiteMap API
- •Why Do You Need Master Pages?
- •The Basics of Master Pages
- •Coding a Master Page
- •Coding a Content Page
- •Mixing page types and languages
- •Specifying which master page to use
- •Working with the page title
- •Working with controls and properties from the master page
- •Nesting Master Pages
- •Container-Specific Master Pages
- •Event Ordering
- •Caching with Master Pages
- •Using ASP.NET 2.0 Packaged Themes
- •Applying a theme to a single ASP.NET page
- •Applying a theme to an entire application
- •Applying a theme to all applications on a server
- •Removing themes from server controls
- •Removing themes from Web pages
- •Removing themes from applications
- •Creating Your Own Themes
- •Creating the proper folder structure
- •Creating a skin
- •Including CSS files in your themes
- •Having your themes include images
- •Defining Multiple Skin Options
- •Programmatically Working with Themes
- •Themes and Custom Controls
- •Authentication
- •Authorization
- •ASP.NET 2.0 Authentication
- •Setting up your Web site for membership
- •Adding users
- •Asking for credentials
- •Working with authenticated users
- •Showing the number of users online
- •Dealing with passwords
- •ASP.NET 2.0 Authorization
- •Using the LoginView server control
- •Setting up your Web site for role management
- •Adding and retrieving application roles
- •Deleting roles
- •Adding users to roles
- •Getting all the users of a particular role
- •Getting all the roles of a particular user
- •Removing users from roles
- •Checking users in roles
- •Using the Web Site Administration Tool
- •The Personalization Model
- •Adding a simple personalization property
- •Using personalization properties
- •Adding a group of personalization properties
- •Using grouped personalization properties
- •Defining types for personalization properties
- •Using custom types
- •Providing default values
- •Making personalization properties read-only
- •Anonymous Personalization
- •Enabling anonymous identification of the end user
- •Working with anonymous identification events
- •Anonymous options for personalization properties
- •Migrating Anonymous Users
- •Personalization Providers
- •Working with the Access personalization provider
- •Working with the SQL Server personalization provider
- •Using multiple providers
- •Building Dynamic and Modular Web Sites
- •Introducing the WebPartManager control
- •Working with zone layouts
- •Understanding the WebPartZone control
- •Explaining the WebPartPageMenu control
- •Modifying zones
- •Caching in ASP.NET 1.0/1.1
- •Output caching
- •Partial page caching
- •Data caching using the Cache object
- •Cache dependencies
- •ASP.NET 2.0 unseals the CacheDependency class
- •Enabling databases for SQL Server cache invalidation
- •Enabling tables for SQL Server cache invalidation
- •Looking at SQL Server
- •Looking at the tables that are enabled
- •Disabling a table for SQL Server cache invalidation
- •Disabling a database for SQL Server cache invalidation
- •Configuring your ASP.NET Application
- •Adding more than one table to a page
- •Attaching SQL Server cache dependencies to the Request object
- •Attaching SQL Server cache dependencies to the Cache object
- •Customizing the side navigation
- •Examining the AllowReturn attribute
- •Working with the StepType attribute
- •Adding a header to the Wizard control
- •Utilizing Wizard control events
- •Working with images from disk
- •Resizing images
- •Displaying images from streams
- •The MMC ASP.NET Snap-In
- •General
- •Custom Errors
- •Authorization
- •Authentication
- •Application
- •State Management
- •Advanced
- •ASP.NET Web Site Administration Tool
- •Home
- •Security
- •Profile
- •Application
- •Provider
- •Managing the Site Counter System
- •Generics
- •Iterators
- •Anonymous Methods
- •Operator Overloading
- •Visual Basic XML Documentation
- •New Visual Basic Keywords
- •Continue
- •Using
- •Global
- •Index
Working with Master Pages
Visual inheritance is a great new enhancement to your Web pages provided by new additions to ASP.NET 2.0. In effect, you can create a single template page that can be used as a foundation for any number of ASP.NET content pages in your application. These templates, called master pages, increase your productivity by making your applications easier to build and to manage after they are built. This chapter takes a close look at how to utilize master pages in your applications to the fullest extent. But first, I explain the advantages of master pages.
Why Do You Need Master Pages?
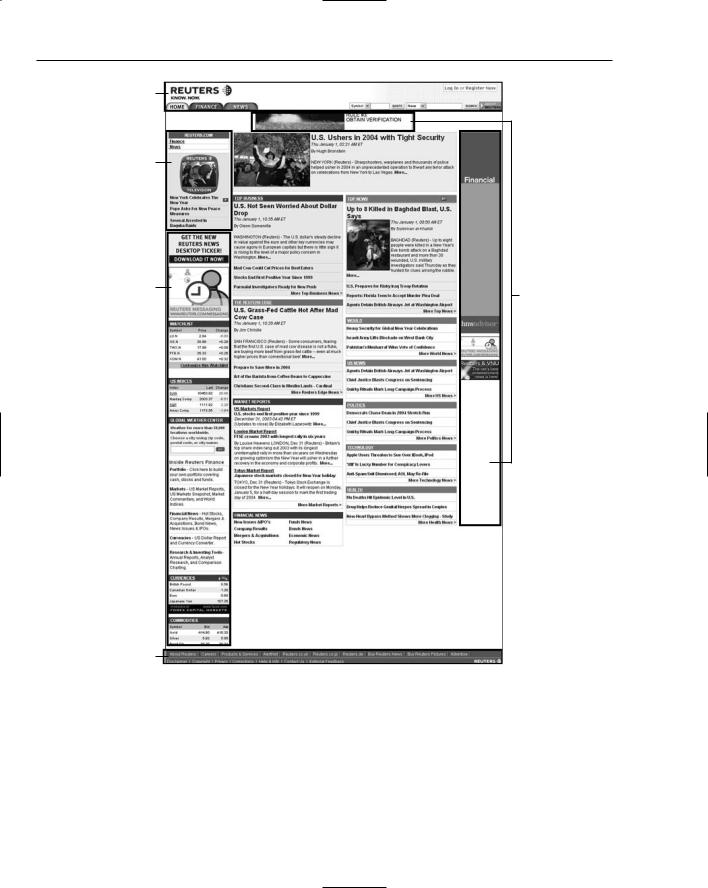
Most Web sites today have common elements used throughout the entire application or on a majority of the pages within the application. For instance, if you look at the main page of the Reuters News Web site (found at www.reuters.com), you see common elements that are used throughout the entire Web site. These common areas are labeled in Figure 6-1.
screen shot, notice a header section, a navigation section, and a footer section on the page. In fact, pretty much every page within the entire application uses these same elements. Even before master pages, you had ways to put these elements into every page; but in most cases, these other means posed difficulties.
Some developers simply copy and paste the code for these common sections to each and every page that requires them. This works, but it’s rather labor intensive. And if you use the copy-and- paste method, whenever a change is required to one of these common sections of the application, you have to go into each and every page to make the change. That’s not much fun!
In the Active Server 3.0 days, one popular option was to put all the common sections into what was called an include file. You could then place this file within your page like this:
<!-- #include virtual=”/myIncludes/header.asp” -->
Chapter 6
Header
Secondary
Navigation
Common |
|
Page |
|
Items |
Ad Space |
Footer
Figure 6-1
In this The problem with using include files was that you had to take into account the HTML tags in the header include file. These tags had to be closed in the main document or in the footer include file. It was usually difficult to keep all the HTML tags in order, especially if multiple people worked on a project. Web pages sometimes displayed strange results because of inappropriate or nonexistent tag closings or openings. It was also difficult to work with include files in a visual designer. Using include files didn’t allow for the developer to see the entire page as it would appear in a browser. The developer ended up developing the page in sections and hoping that the pieces would come together as planned.
174
Working with Master Pages
With the introduction of ASP.NET in 2000, developers started using user controls to encapsulate common sections of their Web pages. For instance, you could build a Web page that included header, navigation, and footer sections by simply dragging and dropping these sections of code onto each page that required them. This approach is shown in Figure 6-2.
This technique worked, but it also raised some issues. First, as you can tell from the screen shot, user controls cause problems similar to those related to include files. When working in the Design view of your Web page, the common areas of the page display only as gray boxes in Visual Studio .NET. This makes it harder to build a page. You cannot visualize what the page you are building actually looks like until you compile and run the completed page in a browser. Another problem with user controls was that you have to open and close HTML tags properly just as you did with include files. I personally like the use of user controls better than include files, but they aren’t always perfect template pieces for use throughout an application.
In light of these issues, the ASP.NET team has come up with the idea of master pages — an outstanding new way of applying templates to your applications. These pages keep a more distinct line between the common areas that you carry over from page to page and the content areas that are unique on each and every page. Working with master pages is easy and fun. Take a look at some of the basics of master pages in ASP.NET 2.0.
Figure 6-2
175
Chapter 6
The Basics of Master Pages
Master pages are an easy way to provide a template that can be used by any number of ASP.NET pages in your application. In working with master pages, you create a master file that is the template to be used by a subpage or content page. Master pages use a .master file extension and the content pages use the .aspx file extension, but are declared content pages within the file’s Page directive.
Anything that you want to encapsulate within the template should be put into the .master file. This can include the header, navigation, and footer sections that are used across the Web application. The content page then contains all the page content except for the master page’s elements. At runtime, the ASP.NET engine combines these elements into a single page for the end user. Figure 6-3 shows a diagram of how this process works.
Master Page |
Content Page |
MyMaster.master |
Default.aspx |
M |
C |
M C
Combined Page
Default.aspx
Figure 6-3
One of the nice things about working with master pages is that you can visually see the template in the IDE when you are creating the content pages.
Because you can see the entire page while you are working on it, it is much easier to develop any content pages that use this template. When working in this manner, all the templated items are shown in shaded gray and are not editable while you are working on the content page. The only items that can be altered are clearly shown in the template. These workable areas, called content areas, are also defined in the master page itself. Within the master page, you specify the areas of the page that the content pages can use. You can have more than one content area in your master page if you want. Figure 6-4 shows the master page with a couple of content areas shown.
176