

Visual CSharp 2005 Recipes (2006) [eng]
.pdf168 C H A P T E R 5 ■ F I L E S, D I R E C TO R I E S, A N D I / O
// Wait to continue. Console.WriteLine(Environment.NewLine); Console.WriteLine("Main method complete. Press Enter."); Console.ReadLine();
}
}
}
5-14. Work with Relative Paths
Problem
You want to set the current working directory so that you can use relative paths in your code.
Solution
Use the static GetCurrentDirectory and SetCurrentDirectory methods of the System.IO.Directory class.
How It Works
Relative paths are automatically interpreted in relation to the current working directory. You can retrieve the current working directory by calling Directory.GetCurrentDirectory or change it using Directory.SetCurrentDirectory. In addition, you can use the static GetFullPath method of the System.IO.Path class to convert a relative path into an absolute path using the current working directory.
The Code
The following is a simple example that demonstrates working with relative paths.
using System; using System.IO;
namespace Apress.VisualCSharpRecipes.Chapter05
{
static class Recipe05_14
{
static void Main()
{
Console.WriteLine("Using: " + Directory.GetCurrentDirectory()); Console.WriteLine("The relative path 'file.txt' " +
"will automatically become: '" + Path.GetFullPath("file.txt") + "'");
Console.WriteLine();
Console.WriteLine("Changing current directory to c:\\");
Directory.SetCurrentDirectory(@"c:\");
Console.WriteLine("Now the relative path 'file.txt' " + "will automatically become '" + Path.GetFullPath("file.txt") + "'");

C H A P T E R 5 ■ F I L E S, D I R E C TO R I E S, A N D I / O |
169 |
// Wait to continue. Console.WriteLine(Environment.NewLine); Console.WriteLine("Main method complete. Press Enter."); Console.ReadLine();
}
}
}
Usage
The output for this example might be the following (if you run the application in the directory C:\temp).
Using: c:\temp
The relative path 'file.txt' will automatically become 'c:\temp\file.txt'
Changing current directory to c:\
The relative path 'file.txt' will automatically become 'c:\file.txt'
■Caution If you use relative paths, it’s recommended that you set the working path at the start of each file interaction. Otherwise, you could introduce unnoticed security vulnerabilities that could allow a malicious user to force your application into accessing or overwriting system files by tricking it into using a different working directory.
5-15. Create a Temporary File
Problem
You need to create a file that will be placed in the user-specific temporary directory and will have a unique name, so that it will not conflict with temporary files generated by other programs.
Solution
Use the static GetTempFileName method of the System.IO.Path class, which returns a path made up of the user’s temporary directory and a randomly generated filename.
How It Works
You can use a number of approaches to generate temporary files. In simple cases, you might just create a file in the application directory, possibly using a GUID or a timestamp in conjunction with a random value as the filename. However, the Path class provides a helper method that can save you some work. It creates a file with a unique filename in the current user’s temporary directory which is stored in a folder like C:\Documents and Settings\[username]\Local Settings\temp by default.
The Code
The following example demonstrates creating a temporary file.
using System; using System.IO;

170 C H A P T E R 5 ■ F I L E S, D I R E C TO R I E S, A N D I / O
namespace Apress.VisualCSharpRecipes.Chapter05
{
static class Recipe05_15
{
static void Main()
{
string tempFile = Path.GetTempFileName();
Console.WriteLine("Using " + tempFile);
using (FileStream fs = new FileStream(tempFile, FileMode.Open))
{
// (Write some data.)
}
//Now delete the file. File.Delete(tempFile);
//Wait to continue. Console.WriteLine(Environment.NewLine); Console.WriteLine("Main method complete. Press Enter."); Console.ReadLine();
}
}
}
5-16. Get the Total Free Space on a Drive
Problem
You need to examine a drive and determine how many bytes of free space are available.
Solution
Use the DriveInfo.AvailableFreeSpace property.
How It Works
The DriveInfo class (new to .NET Framework 2.0) provides members that let you find out the drive type, free space, and many other details of a drive. In order to create a new DriveInfo object, you need to pass the drive letter or the drive root string to the constructor, such as 'C' or "C:\" for creating a DriveInfo instance representing the C drive of the computer. You could also retrieve the list of logical drives available by using the static Directory.GetLogicalDrives method, which returns an array of strings, each containing the root of the drive, such as "C:\". For more details on each drive, you create a DriveInfo instance, passing either the root or the letter corresponding to the logical drive. If you need a detailed description of each logical drive, call the DriveInfo.GetDrives method, which returns an array of DriveInfo objects, instead of using Directory.GetLogicalDrives.
■Note An System.IO.IOException exception is thrown if you try to access an unavailable network drive.

C H A P T E R 5 ■ F I L E S, D I R E C TO R I E S, A N D I / O |
171 |
The Code
The following console application shows the available free space using the DriveInfo class for the given drive or for all logical drives if no argument is passed to the application.
using System; using System.IO;
namespace Apress.VisualCSharpRecipes.Chapter05
{
static class Recipe05_16
{
static void Main(string[] args)
{
if (args.Length == 1)
{
DriveInfo drive = new DriveInfo(args[0]);
Console.Write("Free space in {0}-drive (in kilobytes): ", args[0]); Console.WriteLine(drive.AvailableFreeSpace / 1024);
return;
}
foreach (DriveInfo drive in DriveInfo.GetDrives())
{
try
{
Console.WriteLine( "{0} - {1} KB",
drive.RootDirectory, drive.AvailableFreeSpace / 1024 );
}
catch (IOException) // network drives may not be available
{
Console.WriteLine(drive);
}
}
// Wait to continue. Console.WriteLine(Environment.NewLine); Console.WriteLine("Main method complete. Press Enter."); Console.ReadLine();
}
}
}
■Note In addition to the AvailableFreeSpace property, DriveInfo also defines a TotalFreeSpace property. The difference between these two properties is that AvailableFreeSpace takes into account disk quotas.

172 C H A P T E R 5 ■ F I L E S, D I R E C TO R I E S, A N D I / O
5-17. Show the Common File Dialog Boxes
Problem
You need to show the standard Windows dialog boxes for opening and saving files and for selecting a folder.
Solution
Use the OpenFileDialog, SaveFileDialog, and FolderBrowserDialog classes in the System.Windows. Forms namespace. Call the ShowDialog method to display the dialog box, examine the return value to determine whether the user clicked OK or Cancel, and retrieve the selection from the FileName or
SelectedPath property.
How It Works
The .NET Framework provides objects that wrap many of the standard Windows dialog boxes, including those used for saving and selecting files and directories. These classes all inherit from
System.Windows.Forms.CommonDialog and include the following:
•OpenFileDialog, which allows the user to select a file, as shown in Figure 5-2. The filename and path are provided to your code through the FileName property (or the FileNames collection, if you have enabled multiple file select by setting Multiselect to true). Additionally, you can use the Filter property to set the file format choices and set CheckFileExists to enforce validation.
Figure 5-2. OpenFileDialog shows the Open dialog box.
C H A P T E R 5 ■ F I L E S, D I R E C TO R I E S, A N D I / O |
173 |
•SaveFileDialog, which allows the user to specify a new file. The filename and path are provided to your code through the FileName property. You can also use the Filter property to set the file format choices, and set the CreatePrompt and OverwritePrompt Boolean properties to instruct .NET to display a confirmation if the user selects a new file or an existing file, respectively.
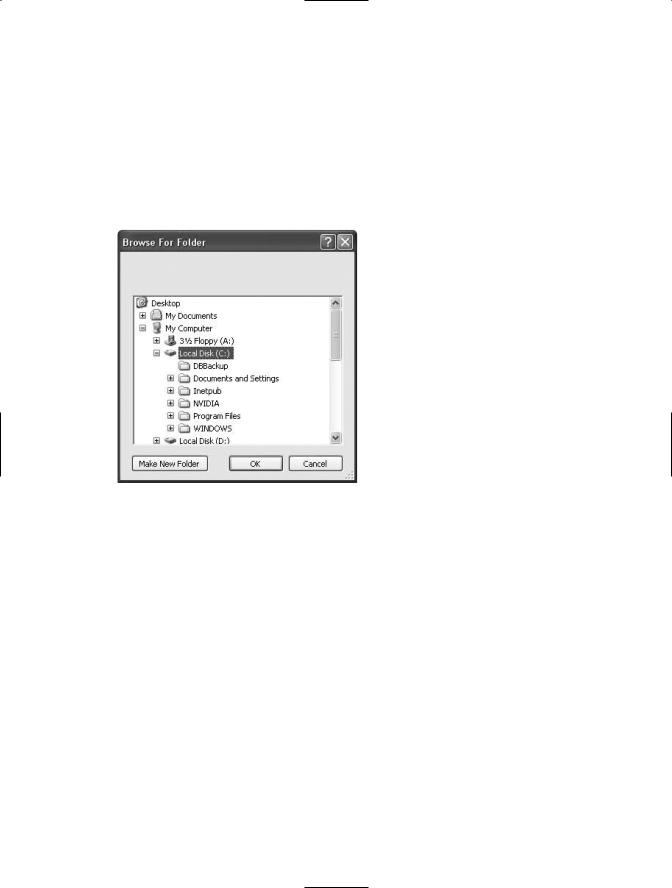
•FolderBrowserDialog, which allows the user to select (and optionally create) a directory, as shown in Figure 5-3. The selected path is provided through the SelectedPath property, and you can specify whether or not a Create New button should appear.
Figure 5-3. FolderBrowserDialog shows the Browse for Folder dialog box.
When using OpenFileDialog or SaveFileDialog, you need to set the filter string, which specifies the allowed file extensions. The filter string is separated with the pipe character (|) in this format:
[Text label] | [Extension list separated by semicolons] | [Text label] | [Extension list separated by semicolons] | . . .
You can also set the Title (form caption) and the InitialDirectory.
The Code
The following code shows a Windows-based application that allows the user to load documents into a RichTextBox, edit the content, and then save the modified document. When opening and saving
a document, the OpenFileDialog and SaveFileDialog classes are used.
using System;
using System.Windows.Forms;
namespace Apress.VisualCSharpRecipes.Chapter05
{
public partial class MainForm : Form
{
public MainForm()

174 C H A P T E R 5 ■ F I L E S, D I R E C TO R I E S, A N D I / O
{
InitializeComponent();
}
private void mnuOpen_Click(object sender, EventArgs e)
{
OpenFileDialog dlg = new OpenFileDialog(); dlg.Filter = "Rich Text Files (*.rtf)|*.RTF|" +
"All files (*.*)|*.*"; dlg.CheckFileExists = true;
dlg.InitialDirectory = Application.StartupPath;
if (dlg.ShowDialog() == DialogResult.OK)
{
rtDoc.LoadFile(dlg.FileName); rtDoc.Enabled = true;
}
}
private void mnuSave_Click(object sender, EventArgs e)
{
SaveFileDialog dlg = new SaveFileDialog();
dlg.Filter = "RichText Files (*.rtf)|*.RTF|Text Files (*.txt)|*.TXT" + "|All files (*.*)|*.*";
dlg.CheckFileExists = true; dlg.InitialDirectory = Application.StartupPath;
if (dlg.ShowDialog() == DialogResult.OK)
{
rtDoc.SaveFile(dlg.FileName);
}
}
private void mnuExit_Click(object sender, EventArgs e)
{
this.Close();
}
}
}
5-18. Use an Isolated Store
Problem
You need to store data in a file, but your application does not have the required FileIOPermission for the local hard drive.
Solution
Use the IsolatedStorageFile and IsolatedStorageFileStream classes from the System.IO. IsolatedStorage namespace. These classes allow your application to write data to a file in a userspecific directory without needing permission to access the local hard drive directly.

C H A P T E R 5 ■ F I L E S, D I R E C TO R I E S, A N D I / O |
175 |
How It Works
The .NET Framework includes support for isolated storage, which allows you to read and write to a user-specific virtual file system that the common language runtime (CLR) manages. When you create isolated storage files, the data is automatically serialized to a unique location in the user profile path (typically a path like C:\Documents and Settings\[username]\Local Settings\Application Data\isolated storage\[guid_identifier]).
One reason you might use isolated storage is to give a partially trusted application limited ability to store data. For example, the default CLR security policy gives local code unrestricted FileIOPermission, which allows it to open or write to any file. Code that you run from a remote server on the local intranet is automatically assigned fewer permissions. It lacks the FileIOPermission, but it has the IsolatedStoragePermission, giving it the ability to use isolated stores. (The security policy also limits the maximum amount of space that can be used in an isolated store.) Another reason you might use an isolated store is to better secure data. For example, data in one user’s isolated store will be restricted from another nonadministrative user.
By default, each isolated store is segregated by user and assembly. That means that when the same user runs the same application, the application will access the data in the same isolated store. However, you can choose to segregate it further by application domain so that multiple AppDomain instances running in the same application receive different isolated stores.
The files are stored as part of a user’s profile, so users can access their isolated storage files on any workstation they log on to if roaming profiles are configured on your local area network. (In this case, the store must be specifically designated as a roaming store by applying the IsolatedStorageFile.Roaming flag when it’s created.) By letting the .NET Framework and the CLR provide these levels of isolation, you can relinquish responsibility for maintaining the separation between files, and you do not need to worry that programming oversights or misunderstandings will cause loss of critical data.
The Code
The following example shows how you can access isolated storage.
using System; using System.IO;
using System.IO.IsolatedStorage;
namespace Apress.VisualCSharpRecipes.Chapter05
{
static class Recipe05_18
{
static void Main(string[] args)
{
// Create the store for the current user. using (IsolatedStorageFile store =
IsolatedStorageFile.GetUserStoreForAssembly())
{
//Create a folder in the root of the isolated store. store.CreateDirectory("MyFolder");
//Create a file in the isolated store.
using (Stream fs = new IsolatedStorageFileStream( "MyFile.txt", FileMode.Create, store))
{
StreamWriter w = new StreamWriter(fs);

176C H A P T E R 5 ■ F I L E S, D I R E C TO R I E S, A N D I / O
//You can now write to the file as normal. w.WriteLine("Test");
w.Flush();
}
Console.WriteLine("Current size: " + store.CurrentSize.ToString());
Console.WriteLine("Scope: " + store.Scope.ToString());
Console.WriteLine("Contained files include:"); string[] files = store.GetFileNames("*.*"); foreach (string file in files)
{
Console.WriteLine(file);
}
}
// Wait to continue. Console.WriteLine(Environment.NewLine); Console.WriteLine("Main method complete. Press Enter."); Console.ReadLine();
}
}
}
The following demonstrates using multiple AppDomain instances running in the same application to receive different isolated stores.
//Access isolated storage for the current user and assembly
//(which is equivalent to the first example).
store = IsolatedStorageFile.GetStore(IsolatedStorageScope.User | IsolatedStorageScope.Assembly, null, null);
//Access isolated storage for the current user, assembly,
//and application domain. In other words, this data is
//accessible only by the current AppDomain instance.
store = IsolatedStorageFile.GetStore(IsolatedStorageScope.User | IsolatedStorageScope.Assembly | IsolatedStorageScope.Domain, null, null);
5-19. Monitor the File System for Changes
Problem
You need to react when a file system change is detected in a specific path (such as a file modification or creation).
Solution
Use the System.IO.FileSystemWatcher component, specify the path or file you want to monitor, and handle the Created, Deleted, Renamed, and Changed events.

C H A P T E R 5 ■ F I L E S, D I R E C TO R I E S, A N D I / O |
177 |
How It Works
When linking together multiple applications and business processes, it’s often necessary to create a program that waits idly and becomes active only when a new file is received or changed. You can create this type of program by scanning a directory periodically, but you face a key trade-off. The more often you scan, the more system resources you waste. The less often you scan, the longer it will take to detect a change. The solution is to use the FileSystemWatcher class to react directly to Windows file events.
To use FileSystemWatcher, you must create an instance and set the following properties:
•Path indicates the directory you want to monitor.
•Filter indicates the types of files you are monitoring.
•NotifyFilter indicates the type of changes you are monitoring.
FileSystemWatcher raises four key events: Created, Deleted, Renamed, and Changed. All of these events provide information through their FileSystemEventArgs parameter, including the name of the file (Name), the full path (FullPath), and the type of change (ChangeType). The Renamed event provides a RenamedEventArgs instance, which derives from FileSystemEventArgs, and adds information about the original filename (OldName and OldFullPath). If you need to, you can disable these events by setting the FileSystemWatcher.EnableRaisingEvents property to false. The Created, Deleted, and Renamed events are easy to handle. However, if you want to use the Changed event, you need to use the NotifyFilter property to indicate the types of changes you want to watch. Otherwise, your program might be swamped by an unceasing series of events as files are modified.
The NotifyFilter property can be set using any combination of the following values from the
System.IO.NotifyFilters enumeration:
•Attributes
•CreationTime
•DirectoryName
•FileName
•LastAccess
•LastWrite
•Security
•Size
The Code
The following example shows a console application that handles Created and Deleted events, and tests these events by creating a test file.
using System; using System.IO;
using System.Windows.Forms;
namespace Apress.VisualCSharpRecipes.Chapter05
{
static class Recipe05_19
{