

Beginning Visual C++ 2005 (2006) [eng]-1
.pdfChapter 1
If the line numbers are not displayed on your system, select Tools > Options from the main menu to display the Options dialog box. If you extend the C/C++ option in the right pane and select General from the extended tree, you can select Line Numbers in the right pane of the dialog box. I’ll first give you a rough guide to what this code in Figure 1-10 does, and you’ll see more on all of these later.
The first two lines are just comments. Anything following “//”in a line is ignored by the compiler. When you want to add descriptive comments in a line, precede your text by “//”.
Line 4 is an #include directive that adds the contents of the file stdafx.h to this file in place of this #include directive. This is the standard way of adding the contents of .h source files to a .cpp source file a in a C++ program.
Line 7 is the first line of the executable code in this file and the beginning of the function _tmain(). A function is simply a named unit of executable code in a C++ program; every C++ program consists of at least one — and usually many more — functions.
Lines 8 and 10 contain left and right braces, respectively, that enclose all the executable code in the function _tmain(). The executable code is, therefore, just the single line 10 and all this does is end the program.
Now you can add the following two lines of code in the Editor window:
// Ex1_01.cpp : Defines the entry point for the console application.
//
#include “stdafx.h” #include <iostream>
int _tmain(int argc, _TCHAR* argv[])
{
std::cout << “Hello world!\n”; return 0;
}
The unshaded lines are the ones generated for you. The new lines you should add are shown shaded. To introduce each new line, place the cursor at the end on the text on the preceding line and press Enter to create an empty line in which you can type the new code. Make sure it is exactly as shown in the preceding example; otherwise, the program may not compile.
The first new line is an #include directive that adds the contents of one of the standard libraries for ISO/ANSI C++ to the source file. The <iostream> library defines facilities for basic I/O operations, and the one you are using in the second line that you added writes output to the command line. std::cout is the name of the standard output stream and you write the string “Hello world!\n” to std::cout in the second addition statement. Whatever appears between the pair of double quote characters is written to the command line.
Building the Solution
To build the solution, press F7 or select the Build > Build Solution menu item. Alternatively, you can click the toolbar button corresponding to this menu item. The toolbar buttons for the Build menu may not display, but you can easily fix this by right-clicking in the toolbar area and selecting the Build
18

Programming with Visual C++ 2005
toolbar from those in the list. The program should then compile successfully. If there are errors, ensure you didn’t make an error while entering the new code, so check the two new lines very carefully.
Files Created by Building a Console Application
After the example has been built without error, take a look in the project folder by using Windows Explorer to see a new subfolder called Debug. This folder contains the output of the build you just performed on the project. Notice that this folder contains several files.
Other than the .exe file, which is your program in executable form, you don’t need to know much about what’s in these files. In case you’re curious, however, let’s do a quick run-through of what the more interesting ones are for.
File Extension |
Description |
|
|
.exe |
This is the executable file for the program. You get this file only if both the |
|
compile and link steps are successful. |
.obj |
The compiler produces these object files containing machine code from your |
|
program source files. These are used by the linker, along with files from the |
|
libraries, to produce your .exe file. |
.ilk |
This file is used by the linker when you rebuild your project. It enables the |
|
linker to incrementally link the object files produced from the modified source |
|
code into the existing .exe file. This avoids the need to re-link everything |
|
each time you change your program. |
.pch |
This is a pre-compiled header file. With pre-compiled headers, large tracts of |
|
code that are not subject to modification (particularly code supplied by C++ |
|
libraries) can be processed once and stored in the .pch file. Using the .pch |
|
file substantially reduces the time needed to rebuild your program. |
.pdb |
This file contains debugging information that is used when you execute the |
|
program in debug mode. In this mode, you can dynamically inspect informa- |
|
tion that is generated during program execution. |
.idb |
Contains information used when you rebuild the solution. |
|
|
Debug and Release Versions of Your Program
You can set a range of options for a project through the Project > Ex1_01 Properties menu item. These options determine how your source code is processed during the compile and link stages. The set of options that produces a particular executable version of your program is called a configuration. When you create a new project workspace, Visual C++ 2005 automatically creates configurations for producing two versions of your application. One version, called the Debug version, includes information that helps you debug the program. With the Debug version of your program you can step through the code when things go wrong, checking on the data values in the program. The other, called the Release version, has no debug information included and has the code optimization options for the compiler turned on to provide you with the most efficient executable module. These two configurations are sufficient for your needs throughout this book, but when you need to add other configurations for an application, you can do so through the Build > Configuration Manager menu. Note that this menu item won’t appear if you haven’t got a project loaded. This is obviously not a problem, but might be confusing if you’re just browsing through the menus to see what’s there.
19

Chapter 1
You can choose which configuration of your program to work with by selecting the configuration from the Active solution configuration drop-down list in the Configuration Manager dialog box, as shown in Figure 1-11.
Figure 1-11
Select the configuration you want to work with from the list and then click the Close button. While you’re developing an application, you’ll work with the debug configuration. After your application has been tested using the debug configuration and appears to be working correctly, you typically rebuild the program as a release version; this produces optimized code without the debug and trace capability, so the program runs faster and occupies less memory.
Executing the Program
After you have successfully compiled the solution, you can execute your program by pressing Ctrl+F5. You should see the window shown in Figure 1-12.
Figure 1-12
20
Programming with Visual C++ 2005
As you see, you get the text that was between the double quotes written to the command line. The “\n” that appeared at the end of the text string is a special sequence called an escape sequence that denotes a newline character. Escape sequences are used to represent characters in a text string that you cannot enter directly from the keyboard.
Try It Out |
Creating an Empty Console Project |
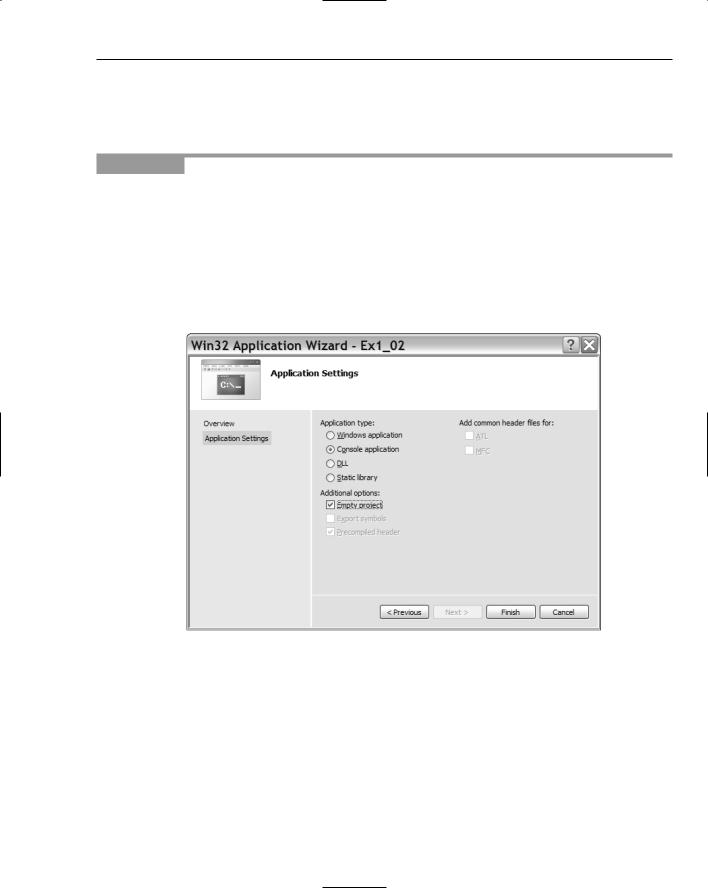
The previous project contained a certain amount of excess baggage that you don’t need when working with simple C++ language examples. The precompiled headers option chosen by default resulted in the stdafx.h file being created in the project. This is a mechanism for making the compilation process more efficient when there are a lot of files in a program but this won’t be necessary for many of our examples. In these instances you start with an empty project to which you can add your own source files. You can see how this works by creating a new project in a new solution for a Win32 console program with the name Ex1_02. After you have entered the project name and clicked the OK button, click on Applications Settings on the right side of the dialog box that follows. You can then select Empty project from the additional options, as Figure 1-13 shows.
Figure 1-13
When you click the Finish button, the project is created as before, but this time without any source files.
Next you add a new source file to the project. Right-click the Solution Explorer pane and then select Add > New Item from the context menu. A dialog box displays; click Code in the right pane, and C++ File(.cpp) in the left pane. Enter the file name as Ex1_02, as shown in Figure 1-14.
21

Chapter 1
Figure 1-14
When you click the Add button, the new file is added to the project and is displayed in the Editor window. Of course, the file is empty so nothing will be displayed; enter the following code in the Editor window:
// Ex1_02.cpp A simple console program |
|
#include <iostream> |
// Basic input and output library |
int main()
{
std::cout << “This is a simple program that outputs some text.” << std::endl; std::cout << “You can output more lines of text” << std::endl;
std::cout << “just by repeating the output statement like this.” << std::endl;
return 0; |
// Return to the operating system |
} |
|
Note the automatic indenting that occurs as you type the code. C++ uses indenting to make programs more readable, and the editor automatically indents each line of code that you enter, based on what was in the previous line. You can also see the syntax color highlighting in action as you type. Some elements of the program are shown in different colors as the editor automatically assigns colors to language elements depending on what they are.
The preceding code is the complete program. You probably noticed a couple of differences compared to the code generated by the Application wizard in the previous example. There’s no #include directive for the stdafx.h file. You don’t have this file as part of the project here because you are not using the precompiled headers facility. The name of the function here is main; before it was _tmain. In fact all ISO/ANSI C++ programs start execution in a function called main(). Microsoft also provides for this function to be called wmain when Unicode characters are used and the name _tmain is defined to be
22

Programming with Visual C++ 2005
either main or wmain, depending on whether or not the program is going to use Unicode characters. For the previous example, the name _tmain is defined behind the scenes to be main. You use the name main in all the ISO/ANSI C++ examples.
The output statements are a little different. The first statement in main() is:
std::cout << “This is a simple program that outputs some text.” << std::endl;
You have two occurrences of the << operator, and each one sends whatever follows to std::cout, which is the standard output stream. First the string between double quotes is sent to the stream and then std::endl where std::endl is defined in the standard library as a newline character. Earlier you used the escape sequence \n for a newline character within a string between double quotes. You could have written the preceding statement as:
std::cout << “This is a simple program that outputs some text.\n”;
I should explain why the line is shaded, where the previous line of code is not. Where I repeat a line of code for explanation purposes I show it unshaded. The preceding line of code is new and does not appear earlier so I have shown it shaded.
You can now build this project in the same way as the previous example. Note that any open source files in the Editor pane are saved automatically if you have not already saved them. When you have compiled the program successfully, press Ctrl+F5 to execute it. The window shown in Figure 1-15 displays.
Figure 1-15
Dealing with Errors
Of course, if you didn’t type the program correctly, you get errors reported. To show how this works, you could deliberately introduce an error into the program. If you already have errors of your own, you can use those to perform this exercise. Go back to the Editor pane and delete the semicolon at the end of the second-to-last line between the braces (line 8); then rebuild the source file. The Output pane at the bottom of the application window includes the error message:
C2143: syntax error : missing ‘;’ before ‘return’
Every error message during compilation has an error number that you can look up in the documentation. Here, the problem is obvious, ; however, in more obscure cases, the documentation may help you figure out what is causing the error. To get the documentation on an error, click the line in the Output pane that contains the error number and then press F1. A new window displays containing further information about the error. You can try it with this simple error, if you like.
23

Chapter 1
When you have corrected the error, you can then rebuild the project. The build operation works efficiently because the project definition keeps track of the status of the files making up the project. During a normal build, Visual C++ 2005 recompiles only the files that have changed since the program was last compiled or built. This means that if your project has several source files and you’ve edited only one of the files since the project was last built, only that file is recompiled before linking to create a new .exe file.
You’ll also use CLR console programs, so the next section shows you what a CLR console project looks.
Try It Out |
Creating a CLR Console Project |
Press Ctrl+Shift+N to display the New Project dialog box; then select the project type as CLR and the template as CLR Console Application, as shown in Figure 1-16.
Figure 1-16
Enter the name as Ex1_03. When you click the OK button, the files for the project are created. There are no options for a CLR console project, so you always start with the same set of files in a project with this template. If you want an empty project — something you won’t need with this book — there’s a separate template for this.
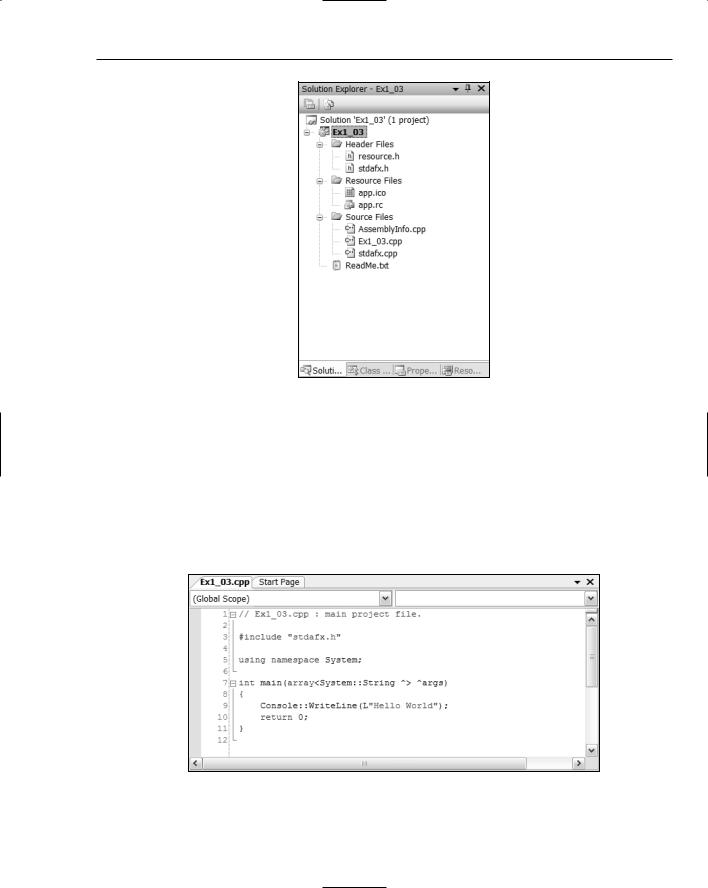
If you look at the Solution Explorer pane shown in Figure 1-17, you see there are some extra files compare to a Win32 console project.
There are a couple of files in the virtual Resource Files folder. The .ico file stores an icon for the application that is displayed when the program is minimized; the .rc file records the resources for the application — just the icon in this case.
24
Programming with Visual C++ 2005
Figure 1-17
There is also a file with the name AssemblyInfo.cpp. Every CLR program consists of one or more assemblies where an assembly is a collection of code and resources that form a functional unit. An assembly also contains extensive data for the CLR; there are specifications of the data types that are being used, versioning information about the code, and information that determines if the contents of the assembly can be accessed from another assembly. In short, an assembly is a fundamental building block in all CLR programs.
If the source code in the Ex1_03.cpp file is not displayed in the Editor window, double-click the file name in the Solution Explorer pane. It should look like Figure 1-18.
Figure 1-18
25

Chapter 1
It has the same #include directive as the default native C++ console program because CLR programs use precompiled headers for efficiency. The next line is new:
using namespace System;
The .NET library facilities are all defined within a namespace, and all the standard sort of stuff you are likely to use is in a namespace with the name System. This statement indicates the program code that follows uses the System namespace, but what exactly is a namespace?
A namespace is a very simple concept. Within your program code and within the code that forms the
.NET libraries, names have to be given to lots of things — data types, variables, and blocks of code called functions all have to have names. The problem is that if you happen to invent a name that is already used in the library, there’s potential for confusion. A namespace provides a way of getting around this problem. All the names in the library code that is defined within the System namespace are implicitly prefixed with the namespace name. So, a name such as String in the library is really System::String. This means that if you have inadvertently used the name String for something in your code, you can use System::String to refer String from the .NET library.
The two colons[md]:: — are an operator called the scope resolution operator. Here the scope resolution operator separates the namespace name System from the type name String. You have seen this in the native C++ examples earlier in this chapter with std::cout and std::endl. This is the same story — std is the namespace name for native C++ libraries, and cout and endl are the names that have been defined within the std namespace to represent the standard output stream and the newline character, respectively.
In fact, the using namespace statement in the example allows you to use any name from the System namespace without having to use the namespace name as a prefix. If you did end up with a name conflict between a name you have defined and a name in the library, you could resolve the problem by removing the using namespace statement and explicitly qualify the name from the library with the namespace name. You’ll learn more about namespaces in Chapter 2.
You can compile and execute the program by pressing Ctrl+F5. The output is as shown in Figure 1-19.
Figure 1-19
The output is the same as from the first example. This output is produced by the line:
Console::WriteLine(L”Hello World”);
26

Programming with Visual C++ 2005
This uses a .NET library function to write the information between the double quotes to the command line, so this is the CLR equivalent of the native C++ statement that you added to Ex1_01:
std::cout << “Hello world!\n”;
It is more immediately apparent what the CLR statement does than the native C++ statement.
Setting Options in Visual C++ 2005
There are two sets of options you can set. You can set options that apply to the tools provided by Visual C++ 2005, which apply in every project context. Also, you can set options that are specific to a project and determine how the project code is to be processed when it is compiled and linked. Options are set through the Options dialog box that’s displayed when you select Tools > Options from the main menu. The Options dialog box is shown in Figure 1-20.
Figure 1-20
Clicking the plus sign (+) for any of the items in the left pane displays a list of subtopics. Figure 1-20 shows the options for the General subtopic under Projects and Solutions. The right pane displays the options you can set for the topic you have select in the left pane. You should concern yourself with only a few of these at this time, but you’ll find it useful to spend a little time browsing the range of options available to you. Clicking the Help button (with the ?) at the top right of the dialog box displays an explanation of the current options.
You probably want to choose a path to use as a default when you create a new project, and you can do this through the first option shown in Figure 1-20. Just set the path to the location where you want your projects and solutions stored.
You can set options that apply to every C++ project by selecting the Projects and Solutions > VC++ Project Settings topic in the left pane. You can also set options specific to the current project through the Project > Properties menu item in the main menu. This menu item label is tailored to reflect the name of the current project.
27