

Beginning Visual C++ 2005 (2006) [eng]-1
.pdfChapter 1
Creating and Executing Windows Applications
Just to show how easy it’s going to be, now create two working Windows applications. You’ll create a native C++ application using MFC and then you’ll create a Windows Forms application that runs with the CLR. I’ll defer discussion of the programs that you generate until I’ve covered the necessary ground for you to understand it in detail. You will see, though, that the processes are straightforward.
Creating an MFC Application
To start with, if an existing project is active — as indicated by the project name appearing in the title bar of the Visual C++ 2005 main window — you can select Close Solution from the File menu. Alternatively, you can create a new project and have the current solution closed automatically.
To create the Windows program select New > Project from the File menu or press Ctrl+Shift+N; then choose the project type as MFC and select MFC Application as the project template. You can then enter the project name as Ex1_04 as shown in Figure 1-21.
Figure 1-21
When you click the OK button, the MFC Application Wizard dialog box is displayed. The dialog box has a range of options that let you choose which features you’d like to have included in your application. These are identified by the items in the list on the right of the dialog box, as Figure 1-22 shows. You’ll get to use many of these in examples later on.
You can ignore all these options in this instance and just accept the default settings, so click the Finish button to create the project with the default settings. The Solution Explorer pane in the IDE window looks like Figure 1-23.
28

Programming with Visual C++ 2005
Figure 1-22
Figure 1-23
29

Chapter 1
Note that I have hidden the Property Manager tab by right-clicking it and selecting Hide, so it doesn’t appear in Figure 1-23. The list shows a large number of files that have been created. You need plenty of space on your hard drive when writing Windows programs! The files with the extension .cpp contain executable C++ source code, and the .h files contain C++ code consisting of definitions that are used by the executable code. The .ico files contain icons. The files are grouped into the subfolders you can see for ease of access. These aren’t real folders, though, and they won’t appear in the project folder on your disk.
If you now take a look at the Ex1_04 solution folder using Windows Explorer or whatever else you may have handy for looking at the files on your hard disk, notice that you have generated a total of 24 files. Three of these are in the solution folder, a further 17 are in the project folder and four more are in a subfolder, res, to the project folder. The files in the res subfolder contain the resources used by the program — such as the menus and icons used in the program. You get all this as a result of just entering the name you want to assign to the project. You can see why, with so many files and file names being created automatically, a separate directory for each project becomes more than just a good idea.
One of the files in the Ex1_04 project directory is ReadMe.txt, and this provides an explanation of the purpose of each of the files that the MFC Application wizard has generated. You can take a look at it if you want, using Notepad, WordPad, or even the Visual C++ 2005 editor. To view it in the Editor window, double-click it in the Solution Explorer pane.
Building and Executing the MFC Application
Before you can execute the program, you have to build the project — meaning, compile the source code and link the program modules. You do this in exactly the same way that you did with the console application example. To save time, press Ctrl+F5 to get the project built and then executed in a single operation.
After the project has been built, the Output window indicates that there are no errors and the executable starts running. The window for the program you’ve generated is shown in Figure 1-24.
Figure 1-24
30
Programming with Visual C++ 2005
As you see, the window is complete with menus and a toolbar. Although there is no specific functionality in the program — that’s what you need to add to make it your program — all the menus work. You can try them out. You can even create further windows by selecting New from the File menu.
I think you’ll agree that creating a Windows program with the MFC Application wizard hasn’t stressed too many brain cells. You’ll need to get a few more ticking away when you come to developing the basic program you have here into a program that does something more interesting, but it won’t be that hard. Certainly, for many people, writing a serious Windows program the old-fashioned way, without the aid of Visual C++ 2005, required at least a couple of months on a fish diet before making the attempt. That’s why so many programmers used to eat sushi. That’s all gone now with Visual C++ 2005. You never know, however, what’s around the corner in programming technology. If you like sushi, it’s best to continue with it to be on the safe side.
Creating a Windows Forms Application
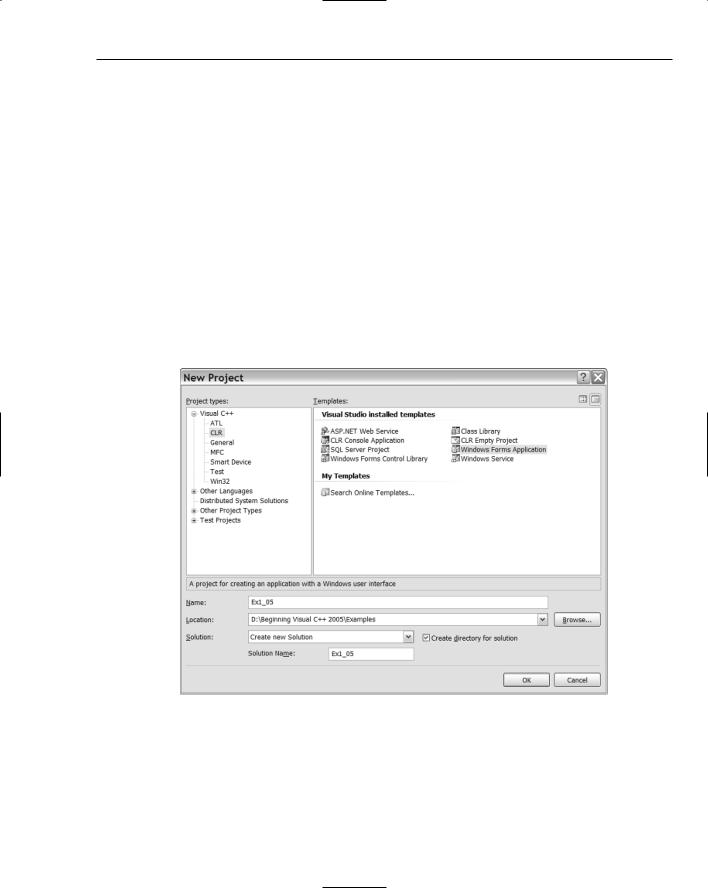
This is a job for another application wizard. So create yet another new project, but this time select the type as CLR in the left pane of the New Project dialog box and the template as Windows Forms Application. You can then enter the project name as Ex1_05 as shown in Figure 1-25.
Figure 1-25
There are no options to choose from in this case, so click the OK button to create the project.
The Solution Explorer pane in Figure 1-26 shows the files that have been generated for this project.
31

Chapter 1
Figure 1-26
There are considerably fewer files in this project — if you look in the directories, you’ll see there are a total of 15 including the solution files. One reason for this is the initial GUI is much simpler than the native C++ application using MFC. The Windows Forms application has no menus or toolbars, and there is only one window. Of course, you can add all these things quite easily, but the wizard for a Windows Forms application does not assume you want them from the start.
The Editor window looks rather different as Figure 1-27 shows.
32

Programming with Visual C++ 2005
Figure 1-27
The Editor window shows an image of the application window rather than code. The reason for this is that developing the GUI for a Windows Forms is oriented towards a graphical design approach rather than a coding approach. You add GUI components to the application window by dragging or placing them there graphically, and Visual C++ 2005 automatically generates the code to display them. If you press Ctrl+Alt+X or select View > Toolbox, you’ll see an additional window displayed showing a list of GUI components as in Figure 1-28.
33

Chapter 1
Figure 1-28
The Toolbox window presents a list of standard components that you can add to a Windows Forms application. You can try adding some buttons to the window for Ex1_05. Click Button in the Toolbox window list and then click in the client area of the Ex1_05 application window that is displayed in the Editor window where you want the button to be placed. You can adjust the size of the button by dragging its borders, and you can reposition the button by dragging it around. You can also change the caption just by typing — try entering Start on the keyboard and then press Enter. The caption changes and along the way another window displays, showing the properties for the button. I won’t go into these now, but essentially these are the specifications that affect the appearance of the button, and you can change these to suit your application. Try adding another button with the caption Stop, for example. The Editor window will look like Figure 1-29.
34

Programming with Visual C++ 2005
Figure 1-29
You can graphically edit any of the GUI components at any time, and the code adjusts automatically. Try adding a few other components in the same way and then compile and execute the example by pressing Ctrl+F5. The application window displays in all its glory. Couldn’t be easier, could it?
Summar y
In this chapter, you have run through the basic mechanics of using Visual C++ 2005 to create applications of various kinds. You created and executed native and CLR console programs, and with the help of the application wizards, you created an MFC-based Windows program and a Windows Forms program that executes with the CLR.
The points from this chapter that you should keep in mind are:
The Common Language Runtime (CLR) is the Microsoft implementation of the Common Language Infrastructure (CLI) standard.
The .NET Framework comprises the CLR plus the .NET libraries that support applications targeting the CLR.
Native C++ applications are written the ISO/ANSI C++ language.
Programs written in the C++/CLI language execute with the CLR.
35

Chapter 1
A solution is a container for one or more projects that form a solution to an information-processing problem of some kind.
A project is a container for the code and resource elements that make up a functional unit in a program.
An assembly is a fundamental unit in a CLR program. All CLR programs are made up of one or more assemblies.
Starting with the next chapter, you’ll use console applications extensively throughout the first half of the book. All the examples illustrating how C++ language elements are used are executed using either Win32 or CLR console applications. You will return to the Application Wizard for MFC-based programs as soon as you have finished delving into the secrets of C++.
36

2
Data, Variables, and
Calculations
In this chapter, you’ll get down to the essentials of programming in C++. By the end of the chapter, you’ll be able to write a simple C++ program of the traditional form: input-process-output. As I said in the previous chapter, I’ll first discuss the ANSI/ISO C++ language features and then cover any additional or different aspects of the C++/CLI language.
As you explore aspects of the language using working examples, you’ll have an opportunity to get some additional practice with the Visual C++ Development Environment. You should create a project for each of the examples before you build and execute them. Remember that when you are defining projects in this chapter and the following chapters through to Chapter 10, they are all console applications.
In this chapter you will learn about:
C++ program structure
Namespaces
Variables in C++
Defining variables and constants
Basic input from the keyboard and output to the screen
Performing arithmetic calculations
Casting operands
Variable scope