

Pro CSharp 2008 And The .NET 3.5 Platform [eng]
.pdf42 CHAPTER 2 ■ BUILDING C# APPLICATIONS
Obviously, the C# command-line compiler has many other options that can be used to control how the resulting .NET assembly is to be generated. If you wish to learn more details regarding the functionality of csc.exe, look up my article titled “Working with the C# 2.0 Command Line Compiler” online at http://msdn.microsoft.com. While this article examines the options of the C# 2.0 compiler, thankfully the C# 2008 compiler supports the same set of features.
■Source Code The CscExample application can be found under the Chapter 2 subdirectory.
Building .NET Applications Using TextPad
While Notepad is fine for creating simple .NET programs, it offers nothing in the way of developer productivity. It would be ideal to author *.cs files using an editor that supports (at a minimum) keyword coloring and integration with a C# compiler. As luck would have it, such a tool does exist: TextPad.
TextPad is an editor you can use to author code for numerous programming languages, including C#. The chief advantage of this product is the fact that it is very simple to use and provides just enough bells and whistles to enhance your coding efforts, without too many to obfuscate the learning process.
To obtain TextPad, navigate to http://www.textpad.com and download the latest version (5.0.3 at the time of this writing). Once you have installed the product, you will have a feature-complete version of TextPad; however, this tool is not freeware. Until you purchase a single-user license
(for around US$30.00), you will be presented with a “friendly reminder” each time you run the application.
Enabling C# Keyword Coloring
TextPad is not equipped to understand C# keywords or work with csc.exe out of the box. To do so, you will need to register the *.cs file extension with the tool. Launch TextPad and perform the following tasks using the New Document Wizard:
1.Select the Configure New Document Class menu option.
2.Enter the name C# in the Document class name edit box.
3.In the next step, enter *.cs in the Class members edit box.
4.Finally, enable syntax highlighting, choose csharp.syn from the drop-down list box, and close the wizard.
■Note Earlier versions of TextPad did not ship with the C# syntax file (csharp.syn); however, it could be downloaded from the TextPad website. In fact, syntax files for a variety of languages can be downloaded from the TextPad website.
You can now tweak TextPad’s C# look and feel using the Document Classes node accessible from the Configure Preferences menu option (see Figure 2-4).

CHAPTER 2 ■ BUILDING C# APPLICATIONS |
43 |
Figure 2-4. Setting TextPad’s C# preferences
Configuring the *.cs File Filter
The next configuration detail is to create a filter for C# source code files displayed by the Open and Save dialog boxes:
1.Select the Configure Preferences menu option and select File Name Filters from the tree view control.
2.Click the New button, and enter C# into the Description field and *.cs into the Wild cards text box.
3.Move your new filter to the top of the list using the Move Up button and click OK.
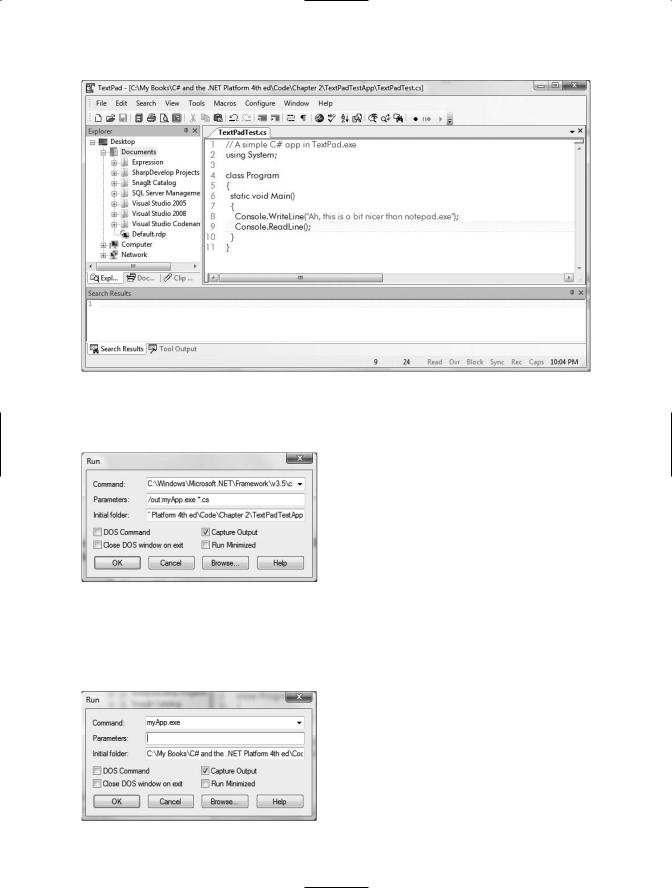
Create a new file (using File New) and save it in a convenient location (such as C:\TextPadTestApp) as TextPadTest.cs. Next, enter a trivial class definition (see Figure 2-5).
Hooking Into csc.exe
The last configuration detail to contend with is to load csc.exe from within TextPad so you can compile your C# files. The first way to do so is using the Tools Run menu option. Here you are presented with a dialog box that allows you to specify the name of the tool to run and any necessary command-line flags. To compile TextPadTest.cs into a .NET console-based executable, follow these steps:
1.Enter the full path to csc.exe into the Command text box (e.g., C:\Windows\Microsoft.NET\ Framework\v3.5\csc.exe).
2.Enter the command-line options you wish to specify within the Parameters text box (e.g., /out:myApp.exe *.cs). Recall that you can specify a custom response file to simplify matters (e.g., @myInput.rsp).
3.Enter the directory containing the input files via the Initial folder text box (for example, C:\TextPadTestApp).
4.If you wish TextPad to capture the compiler output directly (rather than within a separate command window), select the Capture Output check box.
44 CHAPTER 2 ■ BUILDING C# APPLICATIONS
Figure 2-5. TextPad in action
Figure 2-6 shows some possible compilation settings.
Figure 2-6. Specifying a custom Run command
At this point, you can either run your program by double-clicking the executable using Windows Explorer or leverage the Tools Run menu option once again to specify myApp.exe as the current command (see Figure 2-7).
Figure 2-7. Instructing TextPad to run myApp.exe

CHAPTER 2 ■ BUILDING C# APPLICATIONS |
45 |
When you click OK, you should see the program’s output displayed in the Tool Output window.
Associating Run Commands with Menu Items
TextPad also allows you to create custom menu items that represent predefined run commands. Thus, rather than having to manually configure the tool, parameters, and starting folder each time you wish to run the command, you can essentially do so once and save the settings for later use. Let’s create a custom item under the Tools menu named “Compile C# Code” that will compile all C# files in the current directory using a response file.
1.Select the Configure Preferences menu option and select Tools from the tree view control.
2.Using the Add button, select Program and specify the full path to csc.exe (again, C:\Windows\Microsoft.NET\Framework\v3.5 by default) using the resulting dialog box and click OK.
3.If you wish, rename your new menu item to a more descriptive label (Compile C#) by selecting the name of the tool in the list box (to activate it for editing).
4.Finally, select your tool name (Compile C#) from the Tools node, and specify @build.rsp as the sole value in the Parameters field; the $FileDir token in the Initial Folder field instructs TextPad to look in the folder of the active file (see Figure 2-8).
Figure 2-8. Creating a Tools menu item
With this, you can now compile all C# files in the current directory using your custom Tools menu item, provided that this same directory has a C# response file named build.rsp. Notice in Figure 2-9 the Document Selector pane can be used to see each file opened within TextPad at the current time. The Tool Output window shows the output of running our custom Tool menu.
This should be enough information regarding TextPad to get you in a good position for further exploration. As you might suspect, this tool is a very rich editor that supports many additional plugin utilities (spell checkers, code formatters, clip libraries, autocompletion support, etc.). Check out http://www.textpad.com/add-ons for further details.

46 CHAPTER 2 ■ BUILDING C# APPLICATIONS
Figure 2-9. Executing the C# compiler using TextPad
Building .NET Applications Using Notepad++
The final simple text editor I’d like to point out is the open source (and freely downloadable) Notepad++ application. This tool can be obtained from http://notepad-plus.sourceforge.net, and like TextPad, it allows you to author code in a variety of languages, hook into the C# compiler (via the Run menu), and install various plug-ins. In addition, Notepad++ provides a few other niceties, including the following:
•Out-of-the-box support for C# keywords
•Support for syntax folding, which allows you to collapse and expand groups of code statements within the editor (similar to Visual Studio 2008/C# 2008 Express)
•The ability to zoom in/zoom out text via Ctrl-mouse wheel
•Configurable autocompletion for a variety of C# keywords and .NET namespaces
Regarding this last point, the Ctrl+space keyboard combination will activate C# autocompletion support (see Figure 2-10).

CHAPTER 2 ■ BUILDING C# APPLICATIONS |
47 |
Figure 2-10. Autocompletion using Notepad++
Customizing the Autocompletion List
The list of options shown within the autocomplete window can be modified and extended. Simply open up the C:\Program Files\Notepad++\plugins\APIs\cs.api file for editing and add any additional entries. As you can see in Figure 2-11, each entry is listed on a single line.
Figure 2-11. Updating the autocompletion list of Notepad++
I won’t go into too many details of Notepad++ beyond what we have examined here, given that the functionality of this application is similar to that of TextPad. If you require more assistance, select the ? Online Help menu option.

48 CHAPTER 2 ■ BUILDING C# APPLICATIONS
Building .NET Applications Using SharpDevelop
As you may agree, authoring C# code with TextPad and Notepad++ is a step in the right direction, compared to Notepad and the command prompt. However, these tools do not provide rich IntelliSense capabilities for C# code, designers for building graphical user interfaces, project templates, or database manipulation tools. To address such needs, allow me to introduce the next .NET development option: SharpDevelop (also known as #Develop).
SharpDevelop is an open source and feature-rich IDE that you can use to build .NET assemblies using C# or VB as well as using CIL and a Python-inspired .NET language named Boo. Beyond the fact that this IDE is completely free, it is interesting to note that it was written entirely in C#. In fact, you have the choice to download and compile the *.cs files manually or run a setup.exe program to install SharpDevelop on your development machine. Both distributions can be obtained from http://www.sharpdevelop.com.
SharpDevelop provides numerous productivity enhancements and in many cases is as feature rich as Visual Studio .NET 2008 Standard Edition. Here is a hit list of some of the major benefits:
•Support for the Microsoft and Mono C# compilers
•IntelliSense, code completion, and code snippet capabilities
•An Add Reference dialog box to reference external assemblies, including assemblies deployed to the global assembly cache (GAC)
•A visual Windows Forms designer
•Integrated object browsing and code definition utilities
•Visual database designer utilities
•A C# to VB (and vice versa) code conversion utility
•Integration with the NUnit (a .NET unit testing utility) and NAnt (a .NET build utility)
•Integration with the .NET Framework 3.5 SDK documentation
Impressive for a free IDE, is it not? Although this chapter doesn’t cover each of these points in detail, let’s walk through a few items of interest.
Building a Simple Test Project
Once you have installed SharpDevelop, the File New Solution menu option allows you to pick which type of project you wish to generate (and in which .NET language). For example, assume you have created a C# Windows Application named MySDWinApp (see Figure 2-12).

CHAPTER 2 ■ BUILDING C# APPLICATIONS |
49 |
Figure 2-12. The SharpDevelop New Project dialog box
Like Visual Studio, you have a GUI designer, toolbox (to drag and drop controls onto the designer), and a Properties window to set up the look and feel of each UI item. Figure 2-13 illustrates configuring a Button type using the IDE.
Figure 2-13. Graphically designing a Windows Forms Application with SharpDevelop

50 CHAPTER 2 ■ BUILDING C# APPLICATIONS
If you were to click the Source button mounted to the bottom of the form’s designer, you would find the expected IntelliSense, code completion, and integrated help features (see Figure 2-14).
Figure 2-14. SharpDevelop supports numerous code-generation utilities.
SharpDevelop was designed to mimic much of the same functionality found within Microsoft’s
.NET IDEs (which we will examine next). Given this point, I won’t dive into all of the features of this open source .NET IDE. If you require more information, simply use the provided Help menu.
■Note Appendix B will examine building cross-platform .NET applications using the open source Mono .NET distribution. As you read over that appendix, be sure you remember that SharpDevelop is Mono-aware!
Building .NET Applications Using Visual C# 2008
Express
During the summer of 2004, Microsoft introduced a brand-new line of IDEs that fall under the designation of “Express” products (http://msdn.microsoft.com/express). To date, there are various members of the Express family (all of which are completely free and supported and maintained by Microsoft Corporation), including the following:
•Visual Web Developer 2008 Express: A lightweight tool for building dynamic websites and XML web services using ASP.NET
•Visual Basic 2008 Express: A streamlined programming tool ideal for novice programmers who want to learn how to build applications using the user-friendly syntax of Visual Basic
•Visual C# 2008 Express and Visual C++ 2008 Express: Targeted IDEs for students and enthusiasts who wish to learn the fundamentals of computer science in their syntax of choice
•SQL Server Express: An entry-level database management system geared toward hobbyists, enthusiasts, and student developers

CHAPTER 2 ■ BUILDING C# APPLICATIONS |
51 |
Some Unique Features of Visual C# Express
By and large, the Express products are slimmed-down versions of their Visual Studio 2008 counterparts and are primarily targeted at .NET hobbyists and students. Like SharpDevelop, Visual C# 2008 Express provides various object browsing tools, a Windows Forms designer, the Add References dialog box, IntelliSense capabilities, and code expansion templates.
However, Visual C# 2008 Express offers a few (important) features currently not available in SharpDevelop, including the following:
•Rich support for Windows Presentation Foundation (WPF) XAML applications
•IntelliSense for new C# 2008 syntactical constructs including lambda expressions and LINQ query statements
•The ability to program Xbox 360 and PC video games using the freely available Microsoft XNA Game Studio
Consider Figure 2-15, which illustrates using Visual C# Express to author the XAML markup for a WPF project.
Figure 2-15. Visual C# Express has integrated support for .NET 3.0 and .NET 3.5 APIs.