

Pro Visual C++-CLI And The .NET 2.0 Platform (2006) [eng]-1
.pdf308 |
C H A P T E R 8 ■ I N P U T , O U T P U T , A N D S E R I A L I Z A T I O N |
Figure 8-14. SOAP-formatted file output of the serialization of the Player class
Summary
In this chapter, you explored a major component of software development: I/O. You started by looking at how the .NET Framework class library provides an object-style approach to the Windows file system, covering files and directories. You then moved on to look at how to open files for I/O manipulation. Next, you learned how to perform many different methods of reading, writing, and seeking to not only files, but also memory streams. You finished by looking at a specialized I/O system known as serialization.
Though none of the concepts in this chapter should be new to anyone who has worked with file I/O before, how it is done with the .NET Framework class library is new. And, as you should suspect, I/O manipulation can be accomplished in many different ways.
In the next chapter, you will move away from the humdrum of the console and start playing with one of Windows’s claims to fame: the graphical user interface (GUI).

C H A P T E R 9
■ ■ ■
Basic Windows Forms Applications
Console applications are fine for quick utilities and testing functionality, but Windows applications really shine when they present a graphical user interface (GUI) to the world. With the release of Visual Studio 2005, Microsoft is continuing to extend its “easy-to-build” initiative for C++/CLI windows applications. It is effortless to drag and drop your complete user interface using the builtin design tool provided by Visual Studio 2005. Adding event handling to these GUI components is a breeze as well—all it requires is a double-click at design time on the component.
The available GUI options in the .NET Framework are quite staggering, and no one chapter can do them justice. As this is the case, I have broken up the topic into two parts. In this chapter I cover the more basic areas of .NET Framework Windows GUI development, better known as Windows Forms (or Win Forms). On completing this chapter, you should have a firm background on how to develop (albeit bland) Win Forms on your own. You will have to wait for the next chapter to learn more of the bells and whistles.
In this chapter you will learn how to use the design tool, but that is not the only focus of the chapter. You will also learn how to build your Win Forms without the design tool. The reason I cover both approaches is that I feel the intimate knowledge of the Win Form components that you gain by manual development will allow you to build better interfaces. Once you know both methods, you can combine the two to create the optimal interface to your Windows application.
Win Forms Are Not MFC
The first thing you need to know about Win Forms is that they are not an upgrade, enhancement, new version, or anything else of the Microsoft Foundation Classes (MFC). They are a brand-new, truly object-oriented Windows GUI implementation. A few classes have the same names and support the same functionalities, but that is where the similarities end.
Win Forms have a much stronger resemblance to Visual Basic’s (pre-.NET) forms from an implementation standpoint. In fact, Microsoft has taken the Visual Basic GUI development model of forms, controls, and properties and created a language-neutral equivalent for the .NET Framework. When you create Windows applications with the .NET Framework, you will be working with
Win Forms. It is possible to still use MFC within Visual Studio 2005; in fact the line between MFC and Win Forms is becoming quite blurry as you are now able to work with components of both with a single Windows GUI application. However, once you have worked with Win Forms for a while, you will see that it is a much easier-to-code, cleaner, more object-oriented, and more complete implementation of the Windows GUI. More than likely you will start to phase out your MFC development altogether.
This book will completely ignore MFC and focus entirely on Win Forms.
309

310 C H A P T E R 9 ■ B A S I C W I N D O W S F O R M S A P P L I C A T I O N S
“Hello World!” Win Form Style
Okay, you did the obligatory “Hello World!” for a console application, so now you’ll do it again for a Win Form application. The first thing you need to do is create a project using the Windows Forms Application (.NET) template, exactly as you did for the console application (see Figure 9-1).
Figure 9-1. Creating a Win Form “Hello World!” application project
Once the project template is finished being built, you have a complete Windows application. Okay, on to the next chapter . . . Just kidding!
The process of building the “Hello World!” application involves the following steps:
1.Expand the GUI Toolbox view.
2.Click the required GUI component in the Toolbox view.
3.Drag the component to the design form.
4.Change the component’s properties in the Properties view.
5.Double-click the component to create the event handler for the component. This will bring up the IDE editor.
6.Enter the code in the IDE editor to handle the event for the component.
This is very straightforward. If this level of simplicity gives you the willies, as it did me, be comforted by the fact that you can go in and code everything by hand if you want. After a while, you will come to realize that you do not have to code much in the way of the GUI interface manually.
So what code is provided? Listing 9-1 shows Hello.cpp. It doesn’t look as if much is going on, but looks can be deceiving.
C H A P T E R 9 ■ B A S I C W I N D O W S F O R M S A P P L I C A T I O N S |
311 |
Listing 9-1. The Default Hello.cpp
// Hello.cpp : main project file.
#include "stdafx.h" #include "Form1.h"
using namespace Hello;
[STAThreadAttribute]
int main(array<System::String ^> ^args)
{
//Enabling Windows XP visual effects before any controls are created Application::EnableVisualStyles(); Application::SetCompatibleTextRenderingDefault(false);
//Create the main window and run it
Application::Run(gcnew Form1()); return 0;
}
The first thing you notice is that the wizard includes the stdafx.h header file. Within the header file is nothing but a #pragma once directive. This handy file, which has been preconfigured to be precompiled, can be used in the future when you need to include common header (.h) files across all your source (.cpp) files.
Make sure you keep the #include "Form1.h" line, which, as you’ll see, contains the definition of the form.
The next thing the code does is add metadata, using [STAThreadAttribute], which will let the Win Form know to use single-threaded apartment (STA), if needed. If you don’t know what an apartment state is, don’t worry about it—it’s a process threading thing for COM, and this book doesn’t look at COM until Chapter 21. The .NET Framework normally doesn’t use apartment threads, but just to be safe, the apartment state is set to a single-threaded apartment in case a COM object is wrapped and used later in the application.
Next, the template sets up the default look and feel for the Win Form application by adding the Application::EnableVisualStyles() method to give the application an Windows XP look. You can do what you like with this method; I normally just leave it.
The template then adds the SetCompatibleTextRenderingDefault() method, which you use to specify backward compatibility on rendering of text with .NET 1.1. When this method is passed a value of true, text rendering is compatible with .NET 1.1; when passed a value of false, this method provides richer GDI rendering capabilities that are not backward compatible. You can leave this set to false unless you are using rendering methods from .NET 1.1 assemblies and you find that things don’t render as expected.
Finally, the program uses the Application::Run() method to start up Form1. As you will see, the Application class is a fairly powerful class containing several static methods and properties to manage an application. The most common tasks you will use it for are starting and stopping your applications, processing Windows messages, and processing the previously noted template defaulted
EnableVisualStyles() and SetCompatibleTextRenderingDefault() static methods. You may also find it useful for getting information about an application via its properties.
Not much there, was there? Okay, maybe all the magic is in the Form1.h file (see Listing 9-2). To access the source code of Form1.h, you need to right-click Form1.h within Solution Explorer (or within the form designer window) and select View Code.
312 C H A P T E R 9 ■ B A S I C W I N D O W S F O R M S A P P L I C A T I O N S
Notice that the template makes extensive use of inline coding. My guess is that the Microsoft development team stole a lot of GUI design code from the C# version and doing it this way simplified development. (Also, I had to slightly change the Form1 class <Summary> comment to fit the dimensions of the book.)
Listing 9-2. The Default Form1.h
#pragma once
namespace |
Hello |
{ |
|
using |
namespace System; |
using |
namespace System::ComponentModel; |
using |
namespace System::Collections; |
using |
namespace System::Windows::Forms; |
using |
namespace System::Data; |
using |
namespace System::Drawing; |
///<summary>
///Summary for Form1
///WARNING: If you change the name of this class, you will need to change
///the 'Resource File Name' property for the managed resource
///compiler tool associated with all .resx files this class
///depends on. Otherwise, the designers will not be able to
///interact properly with localized resources associated with
///this form.
///</summary>
public ref class Form1 : public System::Windows::Forms::Form
{
public:
Form1(void)
{
InitializeComponent();
//
//TODO: Add the constructor code here
//
}
protected:
///<summary>
///Clean up any resources being used.
///</summary>
~Form1()
{
if (components)
{
delete components;
}
}
C H A P T E R 9 ■ B A S I C W I N D O W S F O R M S A P P L I C A T I O N S |
313 |
private:
///<summary>
///Required designer variable.
///</summary> System::ComponentModel::Container ^components;
#pragma region Windows Form Designer generated code
///<summary>
///Required method for Designer support - do not modify
///the contents of this method with the code editor.
///</summary>
void InitializeComponent(void)
{
this->components = gcnew System::ComponentModel::Container(); this->Size = System::Drawing::Size(300,300);
this->Text = L"Form1";
this->Padding = System::Windows::Forms::Padding(0); this->AutoScaleMode = System::Windows::Forms::AutoScaleMode::Font;
}
#pragma endregion };
}
Believe it or not, Form1.h, along with Hello.cpp, is a complete Win Forms application. You want to know something else? If you code Form1.h by hand, all you need is this:
#pragma once
using namespace System;
using namespace System::Windows::Forms;
namespace Hello
{
public ref class Form1 : public Form
{
protected:
~Form1()
{
if (components)
{
delete components;
}
}
public:
Form1()
{
this->Size = Drawing::Size(300,300); this->Text = L"Form1";
}
};
}
314 C H A P T E R 9 ■ B A S I C W I N D O W S F O R M S A P P L I C A T I O N S
All the rest of the code is for the design tool. Now this is simple! All the code does is specify the form’s size and title. The rest is handled within the .NET Framework.
Okay, now for grins and giggles, let’s change the title of the form to Hello World!. To do this, just change the form’s Text property. You can do this in a couple of ways. First, you can just type Hello World! in the source code, replacing the String Text property value Form1. Second, you can change the Text text box within the Properties view. Notice that if you change the property in one place, the other automatically gets updated as well.
As a thought, I guess the developers of the .NET Framework could have made things easier by calling this the Title property, but as you will soon see, the Text property is found in all Win Forms controls and is used for the default text-based property of the control.
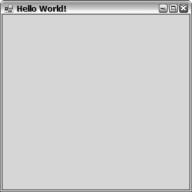
When you finally finish staring in disbelief, go ahead and try compiling and running hello.exe. (Pressing Ctrl-F5 is the fastest way of doing this.) Rather unexciting, as you can see in Figure 9-2, but hey, what do you expect from a one-line code change?
Figure 9-2. The “Hello World!” form
Customizing the Form Class
The Form class by itself is not the most exciting thing, but before you move on and give it some functionality, let’s look at what you’ll be getting in the default Form class. Then let’s see what else you can customize.
So what do you get for free with a Form class? Among many things, you get the following:
•Sized
•Minimized
•Maximized
•Moved
•Closed
C H A P T E R 9 ■ B A S I C W I N D O W S F O R M S A P P L I C A T I O N S |
315 |
It displays an icon, provides a control box, and does a lot of stuff in the background such as change the cursor when appropriate and take Windows messages and convert them into .NET events. The Form class is also very customizable. By manipulating a few of the Form class’s properties
you can get a completely different look from the default, along with some additional functionality that was disabled in the default form configuration. Some of the more common properties are
as follows:
•AutoScroll is a Boolean that specifies whether the form should automatically display scroll bars if sizing the window obscures a displayable area. The default value is true.
•ClientSize is a System::Drawing::Size that specifies the size of the client area. The client area is the size of the window within the border and caption bar. You use this control to adjust the size of the window to your liking or to get the dimensions of it for GDI+ drawing. You will examine GDI+ in Chapter 11.
•Cursor is a Cursor control that you use to specify the cursor to display when over the Win Form. The default is conveniently named Cursors::Default.
•FormBorder is a FormBorderStyle enum class that specifies the style of the border. You use this control to change the look of the form. Common styles are FixedDialog, FixedToolWindow, and SizableToolWindow, but the style you will see most often is the default Sizable.
•Icon is a System::Drawing::Icon that you use to specify the icon associated with the form.
•MaximizeBox is a Boolean that specifies whether the maximize button should be displayed on the caption bar. The default is true.
•Menu is a MainMenu control you use as the menu displayed on the form. The default is null, which signifies that there is no menu.
•MinimizeBox is a Boolean that specifies whether the minimize button should be displayed on the caption bar. The default is true.
•Size is a System::Drawing::Size that specifies the size of the form. The size of the window includes the borders and caption bar. You use this control to set the size of the Win Form.
•WindowState is a FormWindowState enum class that allows you to find out or specify whether the Win Form is displayed as Normal, Minimized, or Maximized. The default window state is
FormWindowState::Normal.
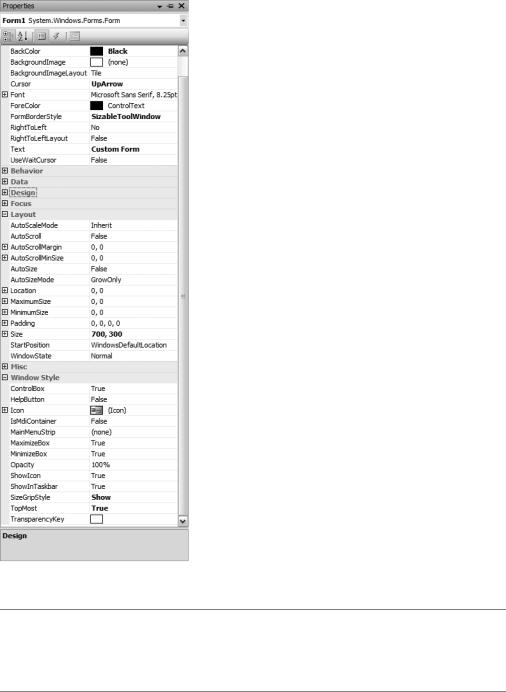
There’s nothing special about working with Form class properties. You can either change them using the Properties view, as shown in Figure 9-3, or directly in code, as Listing 9-3 points out. The choice is yours. Frequently you’ll start off by making general changes using the Properties window and then go into the code’s InitializeComponent() method (which you can find in the Form1.h file for all the examples in the book) to fine-tune the changes. It doesn’t matter if you make the changes in the code or in the Properties window, as any changes you make in one will immediately be reflected in the other.
316 C H A P T E R 9 ■ B A S I C W I N D O W S F O R M S A P P L I C A T I O N S
Figure 9-3. Customizing Form1 using the Properties view
■Caution Be careful when you make changes within the InitializeComponent() method. The changes have to be made in exactly the same manner as the code generator or you may cause Visual Studio 2005’s GUI design tool to stop functioning. Also, if you add code to this section it may be deleted if you modify the form by adding or removing components.

C H A P T E R 9 ■ B A S I C W I N D O W S F O R M S A P P L I C A T I O N S |
317 |
To customize a form (or any other control, for that matter), you just assign the appropriate types and values you want to the properties and let the form handle the rest. The example in Figure 9-3 and Listing 9-3 shows a hodgepodge of different form customizations just to see what the form will look like when it’s done. The biggest change happened when I modified FormBorderStyle.
■Tip Properties that differ from the default appear in boldface in the Properties view.
Listing 9-3. Customizing Form1.h
#pragma once
namespace |
CustomHello |
{ |
|
using |
namespace System; |
using |
namespace System::ComponentModel; |
using |
namespace System::Collections; |
using |
namespace System::Windows::Forms; |
using |
namespace System::Data; |
using |
namespace System::Drawing; |
public ref class Form1 : public System::Windows::Forms::Form
{
public:
Form1(void)
{
InitializeComponent();
}
protected:
~Form1()
{
if (components)
{
delete components;
}
}
private:
System::ComponentModel::Container ^components;
#pragma region Windows Form Designer generated code