

Pro Visual C++-CLI And The .NET 2.0 Platform (2006) [eng]-1
.pdf218 C H A P T E R 6 ■ I N T E G R A T E D X M L D O C U M E N T A T I O N
Don’t follow my lead on this. I have the luxury in this book to have another 800 or so pages of documentation surrounding my code, and duplicating the text in my book within the code would make the book even longer. An unfortunate side effect is that the downloaded code is virtually commentless.
A reasonable number of comments fall somewhere in between these two extremes, and it is up to the developer to find this documentation sweet spot.
So what is reasonable? Oh, there are hundreds, if not thousands, of pages written on the topic, but I personally consider a reasonable amount of commenting as enough documentation to allow you, and by proxy someone else, to understand your code six months after you have written it. I feel that after approximately six months you will be looking at the code in nearly the same perspective as any other programmer with a basic overall understanding of the software being developed. Remember, this is just my personal standard. If you don’t like it or think it too simplistic, then be my guest and read up on the topic.
You should try to establish documentation standards and a definition of what is reasonable documentation early in the project when you are developing in a team environment. I find early code reviews to be the best place to solidify the standards set during the design phase.
One aspect of software development that I like even less than commenting my code is writing the same documentation twice: once in the code itself and then again in an external reference document. Not liking it doesn’t mean I don’t see the need for it. In fact, I have to admit, it is more or less essential, especially for projects in which multiple developers are going to share the code. And let’s not even get started discussing how both internal and external documentation is indispensable for maintenance programmers.
That said, wouldn’t it be nice to have to write documentation in only one place and then generate the other needed forms of documentation from it? Guess what, you can. (Duh?! or I wouldn’t be writing this chapter.)
Although I’m sure other languages provide the facility, C# was my first exposure to a language that provided a built-in tool to allow me to tackle both of my areas of least pleasure at one time. This tool is integrated XML documentation, or, as I like to call it, the triple slash comment. (This feature was one of the many that first attracted me to code C# over Managed Extensions for C++ when I first started developing for .NET.) Now, with Visual Studio 2005 and C++/CLI, the playing field has been leveled in this area, because triple slash comments have been added.
The Triple Slash Comment
So what are triple slash comments? They are a new commenting syntax added to C++/CLI that allows XML documentation to be generated from them. There really is nothing special about them. You just write three forward slashes (///) and then write an XML-formatted comment associated with the next class, method, property, or variable.
One common error that you will find when using the triple slash comment is associating them with variables and functions outside of classes; this is not allowed (nor can you use them with namespaces).
■Caution You can use triple slash comments only with classes and their members.
In addition to this error, triple slash comments can be used only in the code declaration (within the class itself) and not in external implementations either within the .h or .cpp file.
■Caution Triple slash comments are valid only within the class declaration itself.

C H A P T E R 6 ■ I N T E G R A T E D X M L D O C U M E N T A T I O N |
219 |
Another common error is not having well-formed XML within your triple slash comments, as this results in a compile-time warning being thrown.
■Caution Triple slash comments must use well-formed XML.
The third most common mistake (it’s really not an error) is expecting the formatting that you place within your triple slash comments to be maintained in your generated XML documents. There are tags that allow you to format your generated XML.
■Caution White space is ignored within triple slash comments by the compiler.
Adding Triple Slash Comment to Your Code
Okay, let’s look at the simple triple slash comment example in Listing 6-1. I provide more advanced examples a little later.
Listing 6-1. Simple Triple Slash Comments
using namespace System;
namespace SimpleTripleSlash
{
///<summary>
///This is a summary comment for Class1
///</summary>
public ref class Class1
{
public:
///<summary>This is a summary comment for Method1</summary> void Method1() {}
///<summary>This is a summary comment for Variable1</summary> int Variable1;
};
}
Not much of a difference between a triple slash comment and a standard C++/CLI comment, is there? In fact, if you were not paying attention, you probably wouldn’t have noticed anything different about these comments.
But believe me, there is a world of difference. First off, the actual comments are enclosed in the XML tags, in this case the <summary>. The <summary> tag is one of the many tags available to you for generating integrated XML documentation from triple slash comments. The biggest difference, however, occurs when you compile this class (with the addition of a compile switch or of a simple project property change—I cover both next), as compiling the class causes an XML file to be generated. These generated XML files contain the <summary> XML tag, as well as a few other auto-generated tags and attributes. It is with these XML files that you can generate very impressive external code documentation.
The triple slash comments are single-line comments, but as shown in Listing 6-1, you can stretch your comments within a tag over multiple lines. Remember, however, that white space is removed by the compiler, so don’t spend your time lining up everything and expect it to line up in

220 C H A P T E R 6 ■ I N T E G R A T E D X M L D O C U M E N T A T I O N
the generated XML documentation. But don’t panic, I will show you later how you can do some formatting to make your comments look impressive.
Generating XML Documentation Files
It is really a no-brainer when it comes to generating XML documentation files from triple slash comments.
If you are developing your code with Visual Studio 2005, you simply need to set the Generate XML Documentation Files property of the project to yes. To do this, follow these steps:
1.Right-click the project in the Solution Explorer.
2.Select the Properties menu item. This will display the project’s property page, as shown in Figure 6-1.
3.Select All Configurations from the Configuration drop-down list (if you want documentation generated for all configuration) or select the appropriate option to suit your needs.
4.Expand the Configuration Properties and C/C++ branches.
5.Select Output Files.
6.Select Yes (/doc) within the Generate XML Documentation Files property.
7.Click the OK button.
Figure 6-1. The project property page
If, on the other hand, you are developing your code using some other development editor, you need to add the /doc argument to the cl compile command:
cl SimpleTripleSlash.cpp /clr:safe /doc
With either scenario, the same XML documentation file is generated (see Listing 6-2).

C H A P T E R 6 ■ I N T E G R A T E D X M L D O C U M E N T A T I O N |
221 |
Listing 6-2. Generated XML Documentation
<?xml version="1.0"?> <doc>
<assembly> SimpleTripleSlash
</assembly>
<members>
<member name="T:SimpleTripleSlash.Class1"> <summary>
This is a summary comment for Class1 </summary>
</member>
<member name="M:SimpleTripleSlash.Class1.Method1"> <summary>This is a summary comment for Method1</summary>
</member>
<member name="F:SimpleTripleSlash.Class1.Variable1"> <summary>This is a summary comment for Variable1</summary>
</member>
</members>
</doc>
Not what you expected, is it? It’s definitely not the beautiful MSDN documentation that you have become accustomed to. Believe it or not, IntelliSense and NDoc (as you can see in Figure 6-2) can take this document and work wonders with it, as it actually contains a lot of information.
Figure 6-2. NDoc-generated documentation from XML documentation
First, it tells the assembly name that the document is associated with within the <assembly> tag. Next it contains, with a <members> tag, all the member types (T:), methods (M:), and fields (F:) found

222 C H A P T E R 6 ■ I N T E G R A T E D X M L D O C U M E N T A T I O N
in the assembly and fully clarified within <member> tags. Finally, also within the member tags, are your triple slash comments (without the triple slash).
In this simple example there are only <summary> tags but, as you will see later in the chapter, a number of tags can be added. Plus, you can also add your own custom tags.
■Note The actual compile process, which is normally hidden from you (and usually irrelevant to you), is that the cl.exe command generates an .xdc file, which then gets converted to an .xml file by the xdcmake.exe command. That is why there is an .xdc file in your project’s Debug directory.
Viewing Integrated XML Documentation in IntelliSense
One very cool feature of integrated XML documentation is that you can use it to provide IntelliSense for your class libraries. All you need to do is copy the generated XML documentation file to the same directory as your class library assembly and then auto-magically the triple slash documentation of the summary and param tags that you added to the class becomes part of the information IntelliSense displays. You can see this in action in Figure 6-3.
Figure 6-3. Automatically generated IntelliSense from triple slash comments
■Caution If you move or delete the XML documentation file from the directory of the assembly, IntelliSense will stop working for the classes of that assembly.
One thing that caught me a couple of times is that you have to compile any new documentation changes to the assembly and make sure the newly generated XML file is moved to the appropriate directory. If you don’t, the old IntelliSense documentation will still be displayed.
What if you place your assembly in some nonstandard place—does this mean you have to manually copy the XML documentation file to this same location? The answer is yes you can, but you don’t have to because you can append the directory you want the XML file written to after the /doc argument:

C H A P T E R 6 ■ I N T E G R A T E D X M L D O C U M E N T A T I O N |
223 |
cl SimpleTripleSlash.cpp /clr:safe /doc"C:\some\special\place\"
You can also rename the XML file by appending a file name instead of a path, although I’m not sure why you would want to do this.
Visual Studio 2005 also provides a method for specifying an XML file’s name or path:
1.Right-click the project in the Solution Explorer.
2.Select the Properties menu item.
3.Select All Configurations from the Configuration drop-down list (if you want documentation generated for all configurations) or select the option that suits your needs.
4.Expand the Configuration Properties and C/C++ branches.
5.Select Output Files.
6.Update the filename or path within the XML Documentation File Name property.
7.Click the OK button.
Documentation Tags
Although the compiler will process any tag that is valid XML, most likely you will restrict yourself to the 16 tags described in this section. These 16 tags make up the most commonly used set of tags implemented by most documenting systems that use the compiler’s auto-generated XML documentation. They also happen to cover all the documentation you normally need to fulfill the “reasonable amount” requirement I discussed previously.
Notice that I said the compiler will process any valid XML. You have to be careful here, as it is possible to create what looks like great documentation, only to have your compiler throw out garbage. The biggest culprit of breaking valid XML rules is the use of the less-than [<] symbol in implementation code examples. Instead of your comments saying something is less than something else, it says that a new tag has started. Not quite what you are expecting, I am sure. To get around this, you need to replace the [<] symbol with the < XML code.
The common integrated XML documentation tags available to the C++/CLI developer fall into three different categories. The first kind of tag describes the functionality of the subsequent type, member, or field. The second kind helps provide formatting to the tags and is used within the functionality tags. The third tag type provides ways of referencing other documentation sources.
The order that you place the functionality tags (and include tag) is not relevant, but it is probably a good thing to use the tags in the same order because shifting the order may lead to confusion or tags being forgotten. Formatting tags and reference tags must be placed inside functionality tags (except the include tag as just noted). Be careful, though: you cannot embed functionality tags within each other. Finally, not every tag is applicable to every type being documented. In most cases it is fairly obvious which tag(s) to use.
■Note All example figures of documentation are generated by NDoc. The code for each was generated from the documentation example at the end of this section.
Functionality Tags
As I noted previously, the order in which you add the functionality tags to your source is irrelevant; however, I’m going to cover them in the order that I personally place them in my programs.
224 C H A P T E R 6 ■ I N T E G R A T E D X M L D O C U M E N T A T I O N
Something you might want to note is all of the tags can be repeated except <summary>, <remarks>, and <returns>. This makes sense to me, as you are only going to need one instance of these three tags. (I could make a case, however, that multiple <remarks> tags come in handy.)
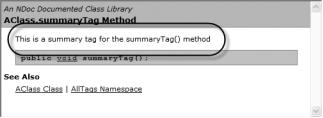
<summary>
You will probably use the <summary> tag (see Figure 6-4) every time you triple slash comment your code. You should probably treat this tag as mandatory.
Its basic purpose is to provide an overall summary of the type, method, or field being documented. The <summary> tag is used by most development tools as the primary source of the description of the object being described. IntelliSense and the Object Browser in Visual Studio 2005 rely on it to provide the functionality summary displayed.
The basic syntax is
/// <summary> The summary text </summary>
But most likely you will split the <summary> tag on multiple lines, something like this:
///<summary>
///The summary text
///</summary>
Remember that white space is not significant, unless one of the formatting tags is embedded within the <summary> tag. I cover formatting tags later in the chapter.
Figure 6-4. NDoc-generated <summary> tag
<param>
You will only use the <param> tag (see Figure 6-5) if the object you are documenting is a method, as it describes one of the parameters being passed to a method. Of course, if the method has no parameters, using this tag is quite useless.
The syntax is
/// <param name="parameterName"> Description of the parameter </param>
The name attribute must match the name of the parameter exactly. If not, the compiler will warn you of the discrepancy and IntelliSense will be unable to provide you information about the parameter as you pass your cursor over the parameter within your code.
Personally, I like to mention the data type of the parameter using a <see> tag (I cover the <see> tag a little later); that way, if the documentation is being viewed online, it enables the reader to quickly click the data type to get more information about what is being passed.

C H A P T E R 6 ■ I N T E G R A T E D X M L D O C U M E N T A T I O N |
225 |
Figure 6-5. NDoc-generated <param> tag
<returns>
Like the <param> tag, you will only use the <returns> tag (see Figure 6-6) when documenting methods. The purpose of the <returns> tag is to describe what gets returned by a method. Obviously, if the method does not return a value, a <returns> tag should not be included for the method. You might think this tag would be useful for properties, but you should use a <value> tag for that instead.
The syntax is
/// <returns> Description of the value returned </returns>
Like the <param> tag, I find it useful to add the data type returned with the <see> tag. This provides a quick link for online documentation created from the generated XML documentation.
Figure 6-6. NDoc-generated <returns> tag
<value>
The <value> tag documents the value of a property (see Figure 6-7). You should probably consider it as a mandatory tag for all public properties.
You need to put the <value> tag outside of the property and not within it. In other words, don’t place the tag next to the get or set declarations; instead, place it outside above the property’s grouping declaration. For a trivial property, you don’t have much choice.
The syntax is
/// <value> Description of the property's value </value>

226 C H A P T E R 6 ■ I N T E G R A T E D X M L D O C U M E N T A T I O N
Just like the <returns> and <param> tags, I like to mention the data type of the property value using a <see> tag, so that online documentation can provide quick links to the values data type for more details.
Figure 6-7. NDoc-generated <value> tag
<remarks>
The <remarks> tag’s purpose is to provide supplemental information about the object being documented (see Figure 6-8).
The basic syntax is
/// <remarks> The remark text </remarks>
But most often you will split the <remarks> tag on multiple lines, like you did with the <summary> tag, something like this:
///<remarks>
///The remark text
///</remarks>
Most likely you will extensively use one of the formatting tags within this tag, as it will probably contain things like lists, code snippets, and paragraph breaks.
You could potentially place all your documentation within the <summary> tag and ignore the <remarks> tag altogether. I feel that it is better to use the <remarks> tags to point out special information that you think is important and want to stand out.
Figure 6-8. NDoc-generated <remarks> tag
<example>
As I’m sure you can figure out, the purpose of the <example> tag is to supply examples, most likely coding examples, for the object being documented (see Figure 6-9). This tag is extremely helpful if you are creating a class library API because it shows how to implement the object.

C H A P T E R 6 ■ I N T E G R A T E D X M L D O C U M E N T A T I O N |
227 |
Unfortunately, I find that most developers don’t use this tag as much as they should (sometimes even me; hey, I never claimed to be a perfect software developer!). In a perfect world, every method in a class should have an implementation example, but instead most developers just put one catchall example at the class level.
The basic syntax is
/// <example> The example </example>
You will probably never use the <example> tag without embedding within it a formatting tag of some sort—most examples require some form of formatting, especially if the example is code.
The following is the syntax of the example you will more than likely use. (Sorry about the chicken and egg scenario; the formatting tags are covered later in the chapter.)
///<example>
///<para> Example summary </para>
///<para>[Visual Basic]</para>
///<code>
///Visual Basic .NET code example
///</code>
///<para>[C#]</para>
///<code>
///C# code example
///</code>
///<para>[C++]</para>
///<code>
///C++ code example
///</code>
///</example>
The <example> tag shown in this sample code first gives a basic outline of what the example contains and then provides implementation examples for each language.
Figure 6-9. NDoc-generated <example> tag