

Pro Visual C++-CLI And The .NET 2.0 Platform (2006) [eng]-1
.pdf228 C H A P T E R 6 ■ I N T E G R A T E D X M L D O C U M E N T A T I O N
<exception>
The often overlooked <exception> tag is used to describe one exception that a method may throw (see Figure 6-10). If your method throws more than one exception type, you should provide one <exception> tag for each exception thrown.
Fortunately, the .NET Framework documentation uses this tag quite extensively. However, I have worked with fairly well-documented class libraries that failed to use it, and when an exception occurs I have no clue why the exception happened or how to proceed.
The basic syntax is
///<exception cref="ExceptionClass">
///Description of exception and how to resolve it
///</exception>
The cref attribute of the <exception> tag is the class name of the exception being thrown and must match exactly the exception thrown in the code. In some cases if the exception isn’t defined within the same namespace, you will have to fully qualify the cref, for example:
/// <exception cref="System::OverflowException"> ... </exception>
Figure 6-10. NDoc-generated <exception> tag
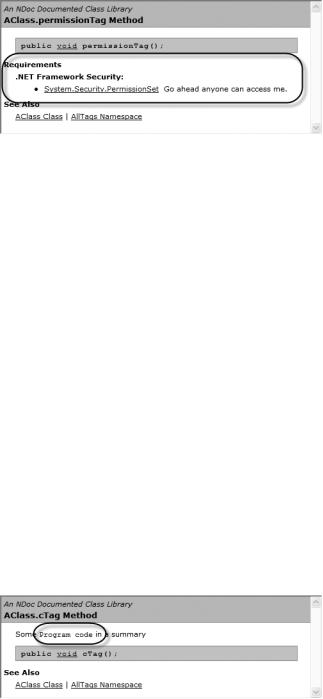
<permission>
The <permission> tag is seldom used but is available for describing the permissions a caller needs to be able to call and execute the method successfully (see Figure 6-11). Usually you restrict access to a method when it is providing an interface to a system resource of some type and it doesn’t want any Tom, Dick, or Harry program to have access to the resource. Because most methods you write don’t access such resources, there is no need to restrict access permission, thus, no need to use the
<permission> tag.
The basic syntax is
/// <permission cref="PermissionClass"> Description of permission </permission>
The cref attribute of the <permission> tag is the name of the permission required to run and must match exactly the permissions used in the code. In most cases, the cref attribute will need to be fully qualified as you will most liking being using the System::Security namespace provided by the .NET Framework. In fact, it will probably be the System::Security::PermissionSet class.
C H A P T E R 6 ■ I N T E G R A T E D X M L D O C U M E N T A T I O N |
229 |
Figure 6-11. NDoc-generated <permission> tag
Formatting Tags
If you could only generate documentation as one continuous stream without paragraphs, formatting, or lists, I could safely say it would not be used. Documentation needs to be user-friendly and easy to read or it isn’t likely to be used, although there have been some exceptions in the past, mostly out of sheer necessity.
You might be thinking that because the documentation generated from triple slash comments is based on XML, and its white space is not significant, auto-generated documentation will be unformatted and awfully bland. This is not the case, however, as integrated XML documentation has predefined tags to provide formatting.
One thing to remember is that formatting tags are, in fact, just tags. It is up to the document generation tool to provide the actual formatting associated with these tags. You might find different tools handle these tags differently, but their basic underlying results should be similar.
Another thing to remember is that formatting tags are placed within other tags and are not used as stand-alone comments.
<c>
The <c> tag is the first of two formatting tags used to provide code formatting (see Figure 6-12). The other is the <code> tag. In most cases, code formatting means the use of a fixed-width font and white space is significant.
You use the <c> tag to embed code directly within the current line of text and the code contains no line breaks. The basic syntax is
<c>Some Code</c>
You can use this tag within all of the other tags (except another <c> or <code> tag, as that would be redundant).
Figure 6-12. NDoc-generated <c> tag

230 C H A P T E R 6 ■ I N T E G R A T E D X M L D O C U M E N T A T I O N
<code>
The second code formatting tag is the <code> tag (see Figure 6-13). Its purpose is to provide a standalone block of code. So, when embedded within a stream of text, the <code> tag will cause a line break on both ends of the tag. For some documentation generators, the code will be placed in a gray box. Just like the <c> tag, you can expect the generated text to use a fixed-width font and the white space to be significant.
The basic syntax is
///<code>
///A code statement
///Another code statement;
///</code>
Remember that with the <code> tag white space is significant, so adding tabs, spaces, and return characters will be reflected in the generated code. White space significance starts after the last slash of the triple slash comment.
■Caution Be careful of tabs, as they can make your code formatting look—how should I say it?—ugly.
You will most likely use this tag within the <example> tag, but there is nothing stopping you from using it within other tags.
Figure 6-13. NDoc-generated <code> tag
<para>
You will often find that your functionality tags contain text that needs to be split into multiple paragraphs (see Figure 6-14). This is where the <para> tag comes in handy. You use the <para></para> pair to delimit the start and end of a paragraph.
The basic syntax is
<para> The paragraph </para>
One thing to be aware of is that white space within the <para> tag is not significant. Therefore, you can place the <para> end to end or on their own lines and have the paragraph text immediately follow the tag or start on a new line and have the document generated create the same result.

C H A P T E R 6 ■ I N T E G R A T E D X M L D O C U M E N T A T I O N |
231 |
Figure 6-14. NDoc-generated <para> tag
<list>
The <list> tag (see Figure 6-15) is one of the most complex tags available to you, as it allows you to create a bulleted list, numbered list, a table, and a definition of a term. (The reason for not designing four different tags escapes me.) Just to make things easier, I’ll cover each format individually.
Figure 6-15. NDoc-generated <list> tag
Bulleted List
The bulleted list’s basic syntax is quite simple. Create a <list> tag with a type of bullet and then list all the bullets as <item> tags:
///<list type="bullet">
///<item> bullet </item>
///<item> bullet </item>
///</list>
You will most likely use this tag within the <summary> and <remarks> tags, but there is nothing stopping you from using it within other tags.

232 C H A P T E R 6 ■ I N T E G R A T E D X M L D O C U M E N T A T I O N
■Note The documentation states that you should use a <description> tag within each <item> tag, but I don’t see any need for it; it seems to work fine without it.
Numbered List
The numbered list’s basic syntax is nearly the same as that of a bulleted list. Create a <list> tag with a type of number and then list all the numbered list entries as <item> tags:
///<list type="number">
///<item> entry 1 </item>
///<item> entry 2 </item>
///<item> entry n </item>
///</list>
You will most likely use this tag within the <summary> and <remarks> tags, but there is nothing stopping you from using it within other tags.
Table
Personally, I don’t like the basic syntax of the table, as I don’t think it really makes sense. I feel whoever developed this is just trying to force the syntax to work when it would have been better to create a new tag.
Here is the table’s basic syntax:
///<list type="table">
///<item>
///<description>row 1 -- column a</description>
///<description>row 1 -- column b</description>
///<description>row 1 -- column c</description>
///</item>
///<item>
///<description>row 2 -- column a</description>
///<description>row 2 -- column b</description>
///<description>row 2 -- column c</description>
///</item>
///</list>
Create a <list> tag with a type of table and then create rows using the <item> tag and columns using the <description> tag.
Definition of Terms
On the other hand, I think the basic syntax of terms makes perfect sense, except I would have added another type, instead of duplicating the table type.
Here is the definition of terms’ basic syntax:
///<list type="table">
///<listheader>
///<term>Properties</term>
///<description>Initial Value</description>

C H A P T E R 6 ■ I N T E G R A T E D X M L D O C U M E N T A T I O N |
233 |
///</listheader>
///<item>
///<term>term1 name</term>
///<description>term1 description</description>
///</item>
///<item>
///<term>term2 name</term>
///<description>term2 description</description>
///</item>
///<item>
///<term>termN name</term>
///<description>termN description</description>
///</item>
///</list>
First, just like all of the other lists, create a <list> but this time with a type of table (why not terms?), and then create a <listheader> section containing two subsection headers, <term> and <description>. These headers are used in the header section of the definition of terms table. Finally, add <item> tags for each <term> and <description> pair contained in the table.
Reference Tags
The last four tags, for lack of a better word, I call “reference” tags as each references something— although I will admit I’m stretching it a bit with the <include> tag. They are especially helpful because they keep you from having to write the same documentation repeatedly.
<include>
The <include> tag (see Figure 6-16) provides the ability to include documentation from an external XML file. You should be comfortable with the concept of include files, as you use them all the time in C++ programming. The only difference here is that you are including documentation instead of code.
The basic syntax is
/// <include file='DocumentationFile' path='XPathToComment' />
Figure 6-16. NDoc-generated <include> tag
The <include> tag is useful, but only in specific conditions; it should not be abused. For example, the <include> tag is handy when you have a repeating set of documentation that you don’t want to

234 C H A P T E R 6 ■ I N T E G R A T E D X M L D O C U M E N T A T I O N
type over and over again. With the <include> tag, you can write it once in an external XML file and then include it repeatedly within your triple slash comments.
A neat thing about the <include> tag is that you can include a complete tag like <remarks>. That way, if you have a repeating remark, you only have to write it once in an include XML file and then just put the <include> tag in the triple slash comment.
There is one gotcha that keeps getting me when I use the <include> tag: changes made to the include documentation XML file do not force a build to occur. In other words, a build when you have only changed the include documentation XML does nothing.
■Caution A build of a class library will not occur if you only make changes in the included documentation XML file. You need to either specify a rebuild or make a change to the class library code.
The big problem with the <include> tag is, because the documentation is now in a separate file, you lose the benefit of triple slash’s internal documentation capability. Let’s look at some examples in Listings 6-3 and 6-4 so you can see what I mean.
Listing 6-3. Included Comments
using namespace System;
namespace AllTags
{
public ref class AClass
{
public:
///<summary> This is a summary with an <include> tag containing
///a <list type="bullet">
///<include file='document.xml' path='AllDoc/Entry[@num="1"]/*' />
///</summary>
///<include file='document.xml' path='AllDoc/Entry[@num="2"]/*' /> void includeTag() {}
};
}
As you can see, the comments mean virtually nothing to the reader of the code. Listing 6-4 is the actual XML documentation XML file.
Listing 6-4. An Include XML Documentation File
<?xml version="1.0" encoding="utf-8"?> <AllDoc>
<Entry num="1">
<para>These are repeating bullets:</para> <list type="bullet">
<item> bullet </item> <item> bullet </item> <item> bullet </item>
</list>
</Entry>

C H A P T E R 6 ■ I N T E G R A T E D X M L D O C U M E N T A T I O N |
235 |
<Entry num="2"> <remarks>
This is a complete <remark> entry from an include file called documentation.xml.
</remarks>
</Entry>
</AllDoc>
Notice you have to use the < XML code in both of these listings because, if you don’t, invalid XML will be created in the triple slash comment.
One thing of note about <include> tags (and the main reason I don’t use them very often) is that not only are they not very helpful in documenting the code itself, but they cause you to lose the context of the comment within the include XML documentation file because it is not directly associated with the code it is documenting.
I guess what I am saying is, I don’t like the <include> tag. I’d rather cut and paste the repeated code, but it’s your code and your documentation standards.
<paramref>
The <paramref> tag (see Figure 6-17) is similar to the <param> tag in that they both reference a parameter of the method being documented. The difference is that the <paramref> tag gets embedded in the comment text, while the <param> tag creates its own section in the documentation.
The basic syntax is
<paramref name="parameterName"/>
This tag really doesn’t do much more than provide a way to let the document generated know this is a parameter name and provide a unique format style. For example, in the case of NDoc, it simply gets italicized.
Figure 6-17. NDoc-generated <paramref> tag
<see>
The <see> tag (see Figure 6-18) is one of the most powerful tags in your triple slash comment arsenal. It allows you to reference other documentation in your documentation environment. Most important, it allows you to reference all of the .NET Framework. Thus, you can provide references (as I noted previously) to the data types you are using within the <param>, <returns>, <value>, <exception>, and <permission> tags. This enables the documentation’s users to quickly jump to the documentation of the referenced data type if they are uncertain about its functionality.

236 C H A P T E R 6 ■ I N T E G R A T E D X M L D O C U M E N T A T I O N
The basic syntax is
<see cref="datatype"/>
What is generated is a link to the specified data type embedded in the text of your comments. One problem (or not, depending on how you look at it) is that the link text will not be fully qualified even if the cref is fully qualified. Sometimes you will want to have the qualifiers show up in the link text (or any other text for that matter), so this tag provides additional syntax:
<see cref="datatype"> link text </see>
With this syntax, whatever text you place within the <see></see> pair gets used as the link text.
Figure 6-18. NDoc-generated <see> tag
<seealso>
The <seealso> tag is similar to the <see> tag except instead of placing the link to the reference data type directly in the comment text, it gets placed in the “See Also” section of the documentation (see Figure 6-19).
Like the <see> tag, the <seealso> tag has two syntaxes:
<seealso cref="datatype"/>
<seealso cref="datatype"> embedded text </seealso>
The difference between the two syntaxes is that the first does not place any text in the comment where the <seealso> tag is placed, whereas the second syntax does. (The text placed is just normal text and not a link.)
Figure 6-19. NDoc-generated <seealso> tag
Documentation Example
Listing 6-5 is a nonsense example demonstrating all the common tags provided by the C++/CLI compiler. You can see the NDoc results of this example in Figures 6-4 through 6-19.

C H A P T E R 6 ■ I N T E G R A T E D X M L D O C U M E N T A T I O N |
237 |
■Note When I first started using triple slash comments, I found that they looked simple enough to use, but I always seemed to mess up on which got embedded into which. Hopefully this long-winded example will help you get over this hurdle I experienced.
Listing 6-5. All the Documentation Tags in Action
using namespace System; using namespace System::IO;
namespace AllTags
{
public ref class AClass
{
public:
///<summary>
///This is a summary tag for the summaryTag() method
///</summary>
void summaryTag() {}
///<param name="param1">The first int parameter</param>
///<param name="param2">The second String^ parameter</param> void paramTag(int param1, String ^param2) {}
///<returns> returnsTag returns an int </returns>
int returnsTag() {return 0;}
///<value> valueTag property has a value of double</value> property double valueTag
{
double get() {return 0.0;} void set(double val) {}
}
///<remarks>
///This is a remarks tag for the remarksTag() method
///</remarks>
void remarksTag() {}
///<example>
///<para> Example summary </para>
///<para>[Visual Basic]</para>
///<code>
///Visual Basic .NET code example
///</code>
///<para>[C#]</para>
///<code>
///C# code example
///</code>
///<para>[C++]</para>
///<code>
///C++ code example