

Note If you need help using your BIOS, see your manual or visit the BIOS publisher's site online.
While you're in the system BIOS, set the "Plug and Play OS" option to "no." This tells the BIOS to do some basic hardware setup, rather than relying on the operating system to do everything. Modern versions of Microsoft Windows expect the hardware to do as it is told, and hence expect full access to the hardware. FreeBSD, on the other hand, expects a system to perform as the hardware standards and specifications demand, and hence can take advantage of some setup work that is most easily done in the BIOS.
Note Many devices (particularly network cards) will behave poorly if you don't change this option.
Actually Installing FreeBSD
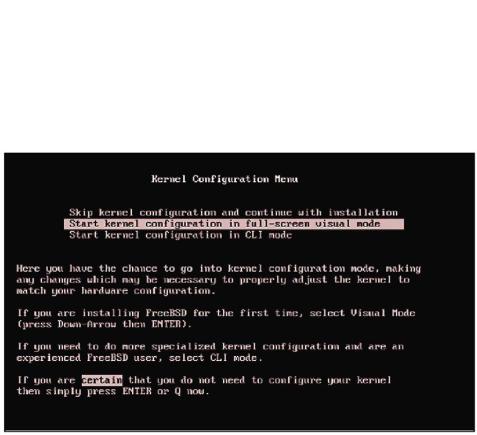
When you have either a bootable CD−ROM or your two floppy disks, it's time to reboot your machine using one or the other. When you reboot, you should see a message offering you a chance to continue with the install, to configure your kernel in a visual menu, or to configure your kernel in a text menu, as shown in Figure 1.1.
Figure 1.1: First boot menu
If you have old hardware, you might have to configure the kernel, which means telling the kernel about your hardware. For example, FreeBSD supports ISA network cards from the early 1990s but requires a very particular configuration to work properly. (This is a limitation of the hardware, not of FreeBSD.)
If you don't have any ISA cards, you can just continue with the install, but if you're using ISA cards, you'll need to configure your kernel to use them. Personally, I recommend replacing ISA cards with PCI whenever possible; they're easier to manage and have much better throughput. If you're running FreeBSD on a very old system, however, that might not be an option.
Note If you have problems, check the FreeBSD Handbook (online at http://www.freebsd.org/) for help. If your hardware is less than a few years old, you should be able to continue with installation without configuring the kernel.
20
Configuring the Kernel for ISA Cards
If you have any ISA cards, you'll need to know how to identify and adjust their hard−jumpered IRQs (interrupt requests) and memory port addresses. (If not, you'll need to learn, or better yet upgrade, your ISA cards.) Once you tell FreeBSD the card's proper IRQ and memory address, it should work.
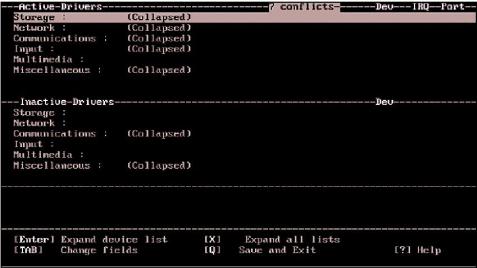
At the initial boot menu (shown in Figure 1.1), choose the option to configure the kernel in full−screen visual mode. That will bring up a menu like the one shown in Figure 1.2.
Figure 1.2: ISA card configuration
Devices are grouped into rough categories: storage, network, and so on. Select the category your ISA card belongs to, and press ENTER to expand it. If your device is listed, FreeBSD supports it. If your device is not listed, it either does not require configuration or FreeBSD does not support it. Select your device, and enter your card's IRQ, port number, and memory address in the spaces provided.
Once you finish telling the FreeBSD kernel about your card, type Q. You will be asked if you want to save your configuration and exit. Type Y to continue. This will bring you to sysinstall.
Sysinstall: The Ugly FreeBSD Installer
The FreeBSD installer (shown in Figure 1.3) is a notoriously ugly, menu−driven system called sysinstall. While other operating systems have pretty graphical installers with mouse−driven menus and multicolor pie charts, FreeBSD's looks like an old DOS program. Even the system's author has referred to the underlying library as "genuinely evil." (While a replacement is in the works, as I write this it looks like sysinstall will be with FreeBSD for some time.)
21

Figure 1.3: Sysinstall main menu
Despite its looks, sysinstall is fairly simple to use, and it works well. While I won't present a step−by−step walkthrough of the interface (that shouldn't be necessary), I will discuss the various options presented during installation so you can make sensible choices.
You will need one very important instruction when dealing with sysinstall: Use the space bar to select. The funny thing is, even though this simple bit of information is displayed on several screens in sysinstall, in the help file, and in the instructions, people keep missing it. Then, once it's pointed out, they spend the rest of their days wondering how they missed it. If you don't use the space bar to select what you want, the install will fail.
Oh yes: The first time through, choose Standard install. Arrow down one line, and press ENTER.
Disk Usage
Many people have a computer that boots multiple operating systems. They divide their hard disk into sections by OS, using one chunk for Windows and another for their other operating systems. FreeBSD works well in such a setup. However, since we're building Internet servers, you should use the entire disk for FreeBSD. Internet servers have to be up all the time, and you won't be shutting down the company mail server to, say, play Civilization on a Windows partition!
The standard FreeBSD install leaves tiny partitions at the beginning and end of the disk, marked "unused." This blank space is present when a disk is formatted for use with any operating system; FreeBSD just shows you it's there. (As usual, the FreeBSD−hackers mailing list archive contains a painful amount of detail on just why things work this way.)
Note If you're installing FreeBSD 3.X or earlier, you might see an option for "dangerously dedicated" mode. This eliminates the tiny partitions and the beginning and end of the drive. Some very, very old hard drives perform best in dangerously dedicated mode. Don't use it unless you've researched the issues involved and are ready to deal with the consequences. The FreeBSD−hackers mailing list archives at http://www.FreeBSD.org/ search are a good source of information on this topic (see Chapter 2).
The installer will first display a list of all the partitions on your hard drive. Arrow down and delete them by pressing D. The example shown in Figure 1.4 shows four partitions: the two "unused"
22
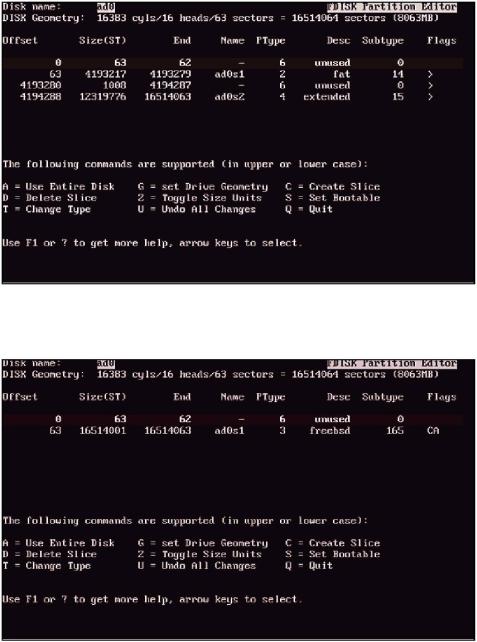
partitions discussed previously, one FAT partition (for Windows), and one Windows Extended partition.
Figure 1.4: Fdisk with Windows partitions
Once you've deleted all of the old partitions, use the A key to assign the entire disk to FreeBSD. The resulting screen will look something like Figure 1.5.
Figure 1.5: Fdisk with one FreeBSD partition
Type Q to finish. The installer will drop you into the Boot Manager screen, shown in Figure 1.6. Install a standard master boot record (MBR), which removes any existing boot manager that your computer would use if you booted into multiple operating systems. (We're building Internet servers and won't be sharing the hard drive with, say, Windows Me.) Just arrow down to "Standard", press the space bar, and press ENTER to leave the screen.
23