

- •Table of Contents
- •Dedication
- •Foreword
- •Introduction
- •What Is FreeBSD?
- •How Did FreeBSD Get Here?
- •The BSD License: BSD Goes Public
- •The Birth of Modern FreeBSD
- •FreeBSD Development
- •Committers
- •Contributors
- •Users
- •Other BSDs
- •NetBSD
- •OpenBSD
- •Other UNIXes
- •Solaris
- •Linux
- •IRIX, HPUX, etc.
- •FreeBSD's Strengths
- •Portability
- •Power
- •Simplified Software Management
- •Optimized Upgrade Process
- •Filesystem
- •Who Should Use FreeBSD
- •FreeBSD as Your Desktop
- •Who Should Run Another BSD
- •Who Should Run a Proprietary Operating System
- •How to Read This Book
- •What Must You Know?
- •How to Think About UNIX
- •Channels of Communication
- •Working with Channels
- •The Command Line
- •Chapter 1: Installation
- •FreeBSD Hardware
- •Processor
- •Memory (RAM)
- •Hard Drives
- •Downloading FreeBSD
- •Installing by FTP
- •Other FTP Install Information
- •Hardware Setup
- •Actually Installing FreeBSD
- •Configuring the Kernel for ISA Cards
- •Sysinstall: The Ugly FreeBSD Installer
- •Disk Usage
- •Partitioning
- •Root
- •Swap Space
- •Swap Splitting
- •/var, /usr, and /home
- •A Second Hard Drive
- •Soft Updates
- •Block Size
- •What to Install
- •Installation Media
- •Committing
- •Root Password
- •Adding Users
- •Time Zone
- •Mouse
- •Configuring Network Cards
- •Xfree86
- •Software
- •Restart
- •A Note on Editors
- •Chapter 2: Getting More Help
- •Why Not Mail First?
- •The FreeBSD Attitude
- •Man Pages
- •The FreeBSD Manual
- •Man Page Headings
- •The FreeBSD Documentation
- •The Mailing List Archives
- •Other Web Sites
- •Checking the Handbook/FAQ
- •Checking the Man Pages
- •Checking the Mailing List Archives
- •Using Your Answer
- •Mailing for Help
- •Chapter 3: Read This Before You Break Something Else! (Backup and Recovery)
- •Overview
- •System Backups
- •Tape Devices
- •How to Read Dmesg.boot
- •Controlling Your Tape Drive
- •Device Nodes
- •Using the TAPE Variable
- •The mt Command
- •Backup Programs
- •Dump/Restore
- •Restoring from an Archive
- •Checking the Contents of an Archive
- •Extracting Data from an Archive
- •Restoring Interactively
- •Recording What Happened
- •Revision Control
- •Getting Older Versions
- •Breaking Locks
- •Viewing Log Messages
- •Reviewing a File's Revision History
- •Ident and ident Strings
- •Going Further
- •The Fixit Disk
- •Chapter 4: Kernel Games
- •Overview
- •What Is the Kernel?
- •Configuring Your Kernel
- •Sysctl
- •Changing Sysctls
- •Setting Sysctls at Boot
- •Kernel Configuration with Loader.conf
- •Manually Configuring the Loader
- •Viewing Loaded Modules
- •Loading and Unloading Modules
- •Customizing the Kernel
- •Preparation
- •Your Backup Kernel
- •Editing Kernel Files
- •Basic Options
- •Multiple Processors
- •Device Entries
- •Building Your Kernel
- •Troubleshooting Kernel Builds
- •Booting an Alternate Kernel
- •Adding to the Kernel
- •LINT
- •Fixing Errors with Options
- •Tweaking Kernel Performance
- •Sharing Kernels
- •Chapter 5: Networking
- •Overview
- •Network Layers
- •The Physical Layer
- •The Physical Protocol Layer
- •The Logical Protocol Layer
- •The Application Layer
- •The Network in Practice
- •Mbufs
- •What Is a Bit?
- •Ethernet
- •Broadcasting
- •Address Resolution
- •Hubs and Switches
- •Netmasks
- •Netmask Tricks
- •Hexadecimal Netmasks
- •Unusable IP Addresses
- •Routing
- •Network Ports
- •Connecting to an Ethernet Network
- •Multiple IP Addresses on One Interface
- •Using Netstat
- •Chapter 6: Upgrading FreeBSD
- •Overview
- •FreeBSD Versions
- •Release
- •Snapshots
- •Security Updates
- •Which Release Should You Use?
- •Upgrade Methods
- •Upgrading via Sysinstall
- •Upgrading via CVSup
- •Simplifying the CVSup Upgrade Process
- •Building a Local CVSup Server
- •Controlling Access
- •Authentication
- •Combining Authentication and Access
- •Chapter 7: Securing Your System
- •Overview
- •Who Is the Enemy?
- •Script Kiddies
- •Disaffected Users
- •Skilled Attackers
- •FreeBSD Security Announcements
- •Subscribing
- •What You'll Get
- •Installation Security Profiles
- •Moderate
- •Extreme
- •Root, Groups, and Permissions
- •The root Password
- •Groups of Users
- •Primary Group
- •Some Interesting Default Groups
- •Group Permissions
- •Changing Permissions
- •Changing File Ownership
- •Assigning Permissions
- •File Flags
- •Viewing a File's Flags
- •Setting Flags
- •Securelevels
- •Setting Securelevels
- •Which Securelevel Do You Need?
- •What Won't Securelevel and File Flags Do?
- •Living with Securelevels
- •Programs That Can Be Hacked
- •Putting It All Together
- •Chapter 8: Advanced Security Features
- •Traffic Control
- •Default Accept vs. Default Deny
- •TCP Wrappers
- •Configuring Wrappers
- •Daemon Name
- •The Client List
- •Putting It All Together
- •Packet Filtering
- •IPFilter
- •IPFW
- •Default Accept and Default Deny in Packet Filtering
- •Basic Concepts of Packet Filtering
- •Implementing IPFilter
- •Configuring Your Server to Use Jail
- •Configuring Your Kernel to Use Jail
- •Client Setup
- •Final Jail Setup
- •Starting the Jail
- •Managing Jails
- •Shutting Down a Jail
- •Monitoring System Security
- •If You're Hacked
- •Chapter 9: Too Much Information About /etc
- •Overview
- •Varieties of /etc Files
- •Default Files
- •/etc/defaults/rc.conf
- •/etc/adduser.conf
- •/etc/crontab
- •/etc/dhclient.conf
- •/etc/fstab
- •/etc/hosts.allow
- •/etc/hosts.equiv
- •/etc/hosts.lpd
- •/etc/inetd.conf
- •/etc/locate.rc
- •/etc/login.access
- •/etc/login.conf
- •Specifying Default Environment Settings
- •/etc/mail/mailer.conf
- •/etc/make.conf and /etc/defaults/make.conf
- •/etc/master.passwd
- •/etc/motd
- •/etc/mtree/*
- •/etc/namedb/*
- •/etc/newsyslog.conf
- •/etc/passwd
- •/etc/periodic.conf and /etc/defaults/periodic.conf
- •/etc/printcap
- •Working with Printcap Entries
- •/etc/profile
- •/etc/protocols
- •/etc/rc.conf and /etc/defaults/rc.conf
- •/etc/resolv.conf
- •/etc/security
- •/etc/services
- •/etc/shells
- •/etc/spwd.db
- •/etc/sysctl.conf
- •/etc/syslog.conf
- •Chapter 10: Making Your System Useful
- •Overview
- •Making Software
- •The Pain and Pleasure of Source Code
- •Debugging
- •The Ports and Packages System
- •Ports
- •Finding Software
- •Legal Restrictions
- •Using Packages
- •Installing via FTP
- •What Does a Package Install?
- •Uninstalling Packages
- •Package Information
- •Controlling Pkg_add
- •Package Problems
- •Forcing an Install
- •Using Ports
- •Installing a Port
- •Using Make Install
- •Uninstalling and Reinstalling
- •Cleaning Up with Make Clean
- •Building Packages
- •Changing the Install Path
- •Setting Make Options Permanently
- •Upgrading Ports and Packages
- •Upgrading the Ports Collection
- •Ports Collection Upgrade Issues
- •Checking Software Versions
- •Hints for Upgrading
- •Chapter 11: Advanced Software Management
- •Overview
- •Startup and Shutdown Scripts
- •Typical Startup Script
- •Using Scripts to Manage Running Programs
- •Managing Shared Libraries
- •Ldconfig
- •Running Software from the Wrong OS
- •Recompilation
- •Emulation
- •ABI Implementation
- •Foreign Software Libraries
- •Installing and Enabling Linux Mode
- •Identifying Programs
- •What Is Linux_base?
- •Adding to Linux_base
- •Configuring Linux Shared Libraries
- •Installing Extra Linux Packages as RPMs
- •What Is SMP?
- •Kernel Assumptions
- •FreeBSD 3.0 SMP
- •FreeBSD 5 SMP
- •Using SMP
- •SMP and Upgrades
- •Chapter 12: Finding Hosts With DNS
- •How DNS Works
- •Basic DNS Tools
- •The Host Command
- •Getting Detailed Information with Dig
- •Looking Up Hostnames with Dig
- •More Dig Options
- •Configuring a DNS Client: The Resolver
- •Domain or Search Keywords
- •The Nameserver List
- •DNS Information Sources
- •The Hosts File
- •The Named Daemon
- •Zone Files
- •A Real Sample Zone
- •named.conf
- •/var/named/master/absolutebsd.com
- •Making Changes Work
- •Starting Named at Boottime
- •Checking DNS
- •Named Configuration Errors
- •Named Security
- •Controlling Information Order
- •More About BIND
- •Chapter 13: Managing Small Network Services
- •Bandwidth Control
- •Configuring IPFW
- •Reviewing IPFW Rules
- •Dummynet Queues
- •Directional Traffic Shaping
- •Certificates
- •Create a Request
- •Being Your Own CA
- •Testing SSH
- •Enabling SSH
- •Basics of SSH
- •Creating Keys
- •Confirming SSH Identity
- •SSH Clients
- •Connecting via SSH
- •Configuring SSH
- •System Time
- •Setting the Time Zone
- •Network Time Protocol
- •Ntpdate
- •Ntpd
- •Inetd
- •/etc/inetd.conf
- •Configuring Programs in Inetd
- •Inetd Security
- •Starting Inetd
- •Changing Inetd's Behavior
- •Chapter 14: Email Services
- •Email Overview
- •Where FreeBSD Fits In
- •The Email Protocol
- •Email Programs
- •Who Needs Sendmail?
- •Replacing Sendmail
- •Installing Postfix
- •Pieces of Postfix
- •Configuring Postfix
- •Email Aliases
- •Email Logging
- •Virtual Domains
- •Postfix Commands
- •Finding the Correct Mail Host
- •Undeliverable Mail
- •Installing POP3
- •Testing POP3
- •POP3 Logging
- •POP3 Modes
- •Qpopper Preconfiguration Questions
- •Default Qpopper Configuration
- •APOP Setup
- •Configuring Pop3ssl
- •Qpopper Security
- •Chapter 15: Web and FTP Services
- •Overview
- •How a Web Server Works
- •The Apache Web Server
- •Apache Configuration Files
- •Configuring Apache
- •Controlling Apache
- •Virtual Hosting
- •Tweaking Virtual Hosts
- •.NET on FreeBSD
- •Installing the SSCLI
- •FTP Security
- •The FTP Client
- •The FTP Server
- •Chapter 16: Filsystems and Disks
- •Device Nodes
- •Hard Disks and Partitions
- •The /etc/fstab File
- •Disk Basics
- •The Fast File System
- •Vnodes
- •FFS Mount Types
- •FFS Mount Options
- •What's Mounted Now?
- •Dirty Disks
- •Fsck
- •Mounting and Unmounting Disks
- •Mounting Standard Filesystems
- •Mounting with Options
- •Mounting All Standard Filesystems
- •Mounting at Nonstandard Locations
- •Unmounting
- •Soft Updates
- •Enabling Soft Updates
- •IDE Write Caching and Soft Updates
- •Virtual Memory Directory Caching
- •Mounting Foreign Filesystems
- •Using Foreign Mounts
- •Foreign Filesystem Types
- •Mount Options and Foreign Filesystems
- •Filesystem Permissions
- •Removable Media and /etc/fstab
- •Creating a Floppy
- •Creating an FFS Filesystem
- •The Basics of SCSI
- •SCSI Types
- •SCSI Adapters
- •SCSI Buses
- •Termination and Cabling
- •SCSI IDs and LUNs
- •FreeBSD and SCSI
- •Wiring Down Devices
- •Adding New Hard Disks
- •Creating Slices
- •Creating Partitions
- •Configuring /etc/fstab
- •Installing Existing Files onto New Disks
- •Temporary Mounts
- •Moving Files
- •Stackable Mounts
- •Chapter 17: RAID
- •Hardware vs. Software RAID
- •RAID Levels
- •Software RAID
- •Vinum Disk Components
- •Vinum Plex Types
- •Preparing Vinum Drives
- •Dedicating Partitions to Vinum
- •Configuring Vinum
- •Concatenated Plex
- •Removing Vinum Configuration
- •Striped Volumes
- •Mirrored Volumes
- •Starting Vinum at Boot
- •Other Vinum Commands
- •Replacing a Failed Mirrored Plex
- •Chapter 18: System Performance
- •Overview
- •Computer Resources
- •Disk Input/Output
- •Network Bandwidth
- •CPU and Memory
- •Using Top
- •Memory Usage
- •Swap Space Usage
- •CPU Usage
- •When Swap Goes Bad
- •Paging
- •Swapping
- •Are You Swapping or Paging?
- •Fairness in Benchmarking
- •The Initial Test
- •Using Both CPUs
- •Directory Caching
- •Moving /usr/obj
- •Lessons Learned
- •Chapter 19: Now What's It Doing?
- •Status Mails
- •Forwarding Reports
- •Logging with Syslogd
- •Facilities
- •Levels
- •Syslog.conf
- •Wildcards
- •Rotating Logs with Newsyslog.conf
- •Reporting with SNMP
- •Basics of SNMP
- •MIBs
- •Snmpwalk
- •Specific Snmpwalk Queries
- •Translating Between Numbers and Names
- •Setting Up Snmpd
- •Index Numbers
- •Configuring MRTG
- •Sample mrtg.cfg Entry
- •Testing MRTG
- •Tracking Other System Values
- •Monitoring a Single MIB
- •Customizing MRTG
- •MRTG Index Page
- •Sample MRTG Configurations
- •Chapter 20: System Crashes and Panics
- •What Causes Panics?
- •What Does a Panic Look Like?
- •Responding to a Panic
- •Prerequisites
- •Crash Dump Process
- •The Debugging Kernel
- •kernel.debug
- •Dumpon
- •Savecore
- •Upon a Crash
- •Dumps and Bad Kernels
- •Using the Dump
- •Advanced Kernel Debugging
- •Examining Lines
- •Examining Variables
- •Apparent Gdb Weirdness
- •Results
- •Vmcore and Security
- •Symbols vs. No Symbols
- •Serial Consoles
- •Hardware Serial Console
- •Software Serial Console
- •Changing the Configuration
- •Using a Serial Console
- •Serial Login
- •Emergency Logon Setup
- •Disconnecting the Serial Console
- •Submitting a Problem Report
- •Problem Report System
- •What's in a PR?
- •Filling Out the Form
- •PR Results
- •Chapter 21: Desktop FreeBSD
- •Overview
- •Accessing File Shares
- •Prerequisites
- •Character Sets
- •Kernel Support for CIFS
- •SMB Tools
- •Configuring CIFS
- •Minimum Configuration: Name Resolution
- •Other smbutil Functions
- •Mounting a Share
- •Other mount_smbfs Options
- •Sample nsmb.conf Entries
- •CIFS File Ownership
- •Serving Windows File Shares
- •Accessing Print Servers
- •Running a Local Lpd
- •Printer Testing
- •Local Printers
- •X: A Graphic Interface
- •X Prerequisites
- •X Versions
- •Configuring X
- •Making X Look Decent
- •Desktop Applications
- •Web Browsers
- •Email Readers
- •Office Suites
- •Music
- •Graphics
- •Desk Utilities
- •Games
- •Afterword
- •Overview
- •The Community
- •What Can You Do?
- •Getting Things Done
- •Second Opinions
- •Appendix: Some Useful SYSCTL MIBs
- •List of Figures
- •Chapter 1: Installation
- •Chapter 5: Networking
- •Chapter 6: Upgrading FreeBSD
- •Chapter 19: Now What's It Doing?
- •List of Tables
- •Chapter 4: Kernel Games
- •Chapter 5: Networking
- •Chapter 8: Advanced Security Features
- •Chapter 9: Too Much Information About /etc
- •List of Sidebars
- •Chapter 15: Web and FTP Services
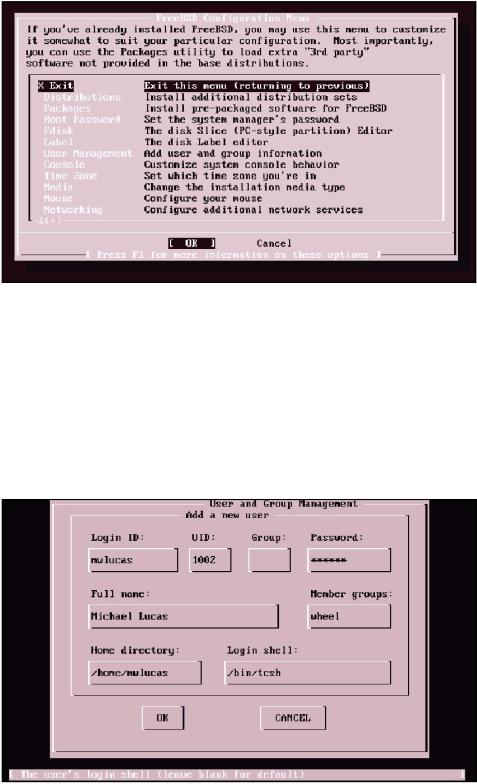
Figure 1.12: Setting the root password
Adding Users
You should do everything possible while signed on as a regular user, and only use the root account when you must change the system. That will happen frequently at first, but will grow less common as time passes. Before you can sign on as a regular user, though, you need to set one up for your use.
To add a regular user, select the User Management option in the Configuration menu. It will pop up a brief menu offering you a chance to add a new user, add a new group, or exit back to the Configuration menu. Choose "User", and you'll see the screen shown in Figure 1.13.
Figure 1.13: Adding a user
Your first selection in this screen should be the Login ID, or username. Your company might have a standard for usernames. I prefer to use first initial, middle initial, and last name (not using the middle initial creates a surprising number of conflicts).
The UID (user ID) is assigned by the system. If you're an experienced systems administrator you can alter this, but it's not recommended and there's generally not much point.
31
The FreeBSD default is to have the user in a "Group" of the same name as the username; for example, the user "mwlucas" is automatically in the Group "mwlucas". If you know what you're doing, you can change this.
"Full name" is, simply enough, the user's name. Other system users can see this name, so you don't want to set it arbitrarily. I've seen new systems administrators get in trouble when they gave a customer a full name of, say, "Pain in the Tuckus."
The "Home directory" is where the user's files are kept. The default is generally fine.
"Member groups" is just a list of other system groups this account is part of. If you want this user to be able to use the root password and become root, add your user to the group "wheel" under the "Member groups" space. Administrators need to be in the wheel group, users don't. (Make sure your personal user account is in wheel!)
Finally, choose a shell for your new user. Older admins and greybeards−in−training frequently prefer /bin/sh. The examples in this book are written assuming your shell is /bin/tcsh, which is the modern BSD standard and much friendlier.
Select OK when you're done, and your user will be created.
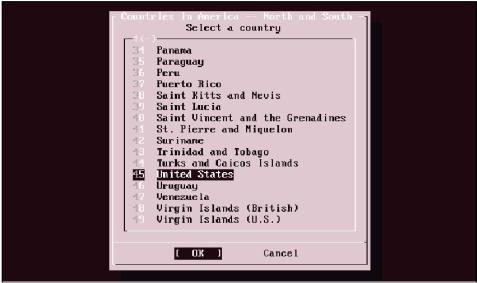
Time Zone
Set your time zone by selecting the Time Zone option from the Configuration screen (shown in Figure 1.11). You'll be asked if the system clock is set to UTC; answer "No", and walk through the menus presented. You'll be asked to choose a continent, a country (as shown in Figure 1.14), and then a time zone.
Figure 1.14: Time selection by country
Mouse
If you have a mouse, it's easy to set it up now. If you have a dead−standard two−or three−button PS/2 mouse or trackball plugged in, just choose Mouse from the Configuration menu, and then choose Enable. You should see a mouse pointer on your screen, and it should wiggle when you move it.
32
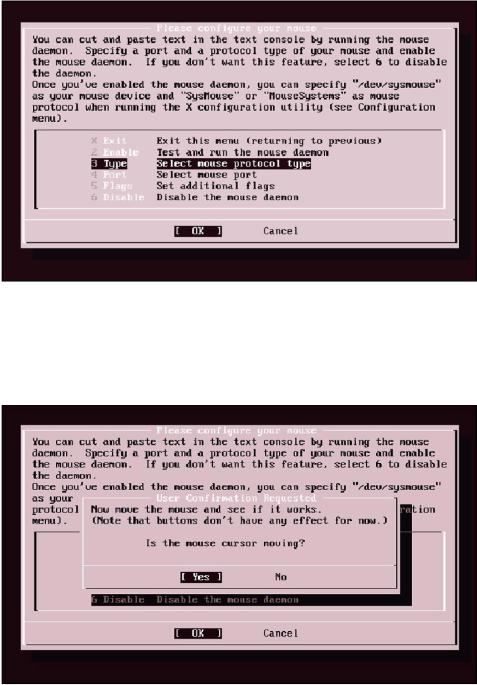
If your mouse isn't dead−standard, that's okay. By using the menu shown in Figure 1.15, you can change the port your mouse runs on and the type it is.
Figure 1.15: Mouse management
Once you have set the mouse type and port, choose Enable and you will get a pop−up menu asking you if the mouse is working. Wiggle your mouse, and enter "Yes" or "No" as appropriate (see Figure 1.16). If it doesn't work, your settings probably don't match your mouse. I've had more than one mouse surprise me by being something other than what I thought it was. To change your settings and try again choose "No".
Figure 1.16: Mouse test menu
Configuring Network Cards
If your machine has a network card, and you did a CD−ROM install, you probably want to configure your network card now. It'll save you trouble later. Be sure your card is plugged into the network, and then choose Networking from the Configuration menu, and then Interfaces from the Network Services menu shown in Figure 1.17.
33
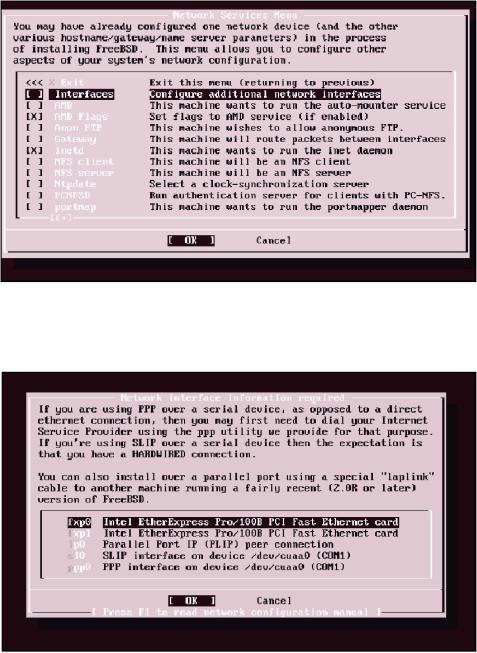
Figure 1.17: Network Services menu
You'll get a choice of network interfaces to configure. (If you're fairly new to computing, you might not have realized that your parallel port can be a network interface!) Look for an entry that includes Ethernet, and choose it. In Figure 1.18, we see an Ethernet card called fxp0.
Figure 1.18: Network interface information menu
You'll get a pop−up dialog box asking if you want to try IPv6 configuration of the interface. If you don't know what IPv6 is, don't choose it. A second popup will offer to try DHCP configuration of the interface. If you are on a network with DHCP, you can try it; otherwise, choose "No". You'll get a network interface configuration screen as shown in Figure 1.19.
34