

ASP.NET 2.0 Visual Web Developer 2005 Express Edition Starter Kit (2006)
.pdfChapter 3
This table structure reduces the repeated content seen in the original design for storing the order data, but still allows easy display of the order details. For example, you can see that by displaying the contents of the appropriate Orders table row, followed by the linked rows in the OrderItems table, you could easily build a page such as that shown in Figure 3-2, which shows the completed order details page in the example application.
Figure 3-2: The completed order details page in the example application
The Final Database Design
Having learned about the design for the database in the example PPQ application, you will see how to build it in the next section of this chapter. However, before then, it is worth briefly summarizing the final design.
Figure 3-3 shows the tables as they appear in a database diagram (generated by the Database Explorer in VWD). You will see how to create and view diagrams like this later in this chapter. Notice that there is an extra column named GraphicFileName in the MenuItems table. This is used to store the name of the image (.gif) file for that item.
74

Building the PPQ Database
Figure 3-3: The final database design for the PPQ application
You can see in Figure 3-3 relationships drawn between the columns that link each table, with a “key” at one end and an “infinity” symbol at the other end. These indicate that the column in each row at the “key” end is the primary key of that table, and so the values in that column will be unique. The column at the “infinity” end of the relationship can contain more than one row with the matching key value — this is a one-to-many relationship. This is what supports application of the normalization rules by allowing removal of repeated data from one table and placement in a linked table.
Figure 3-4 shows an example of the kinds of values stored in the tables. It also shows how the key values link the tables together to maintain the required data model (not all links are shown as arrows). The shaded columns are the primary keys for each table. You can see that, for example, C. Sing living on NE 4th Street has ordered both a Medium and a Large Margherita pizza, and a 16 fl.oz. Cola. The total value of the order, including the 5.00 delivery charge, is 24.25.
75

Chapter 3
Figure 3-4: An example of row values for the database tables
This data model simplifies the data-storage requirements of the example application, while providing plenty of opportunity to demonstrate data access and storage techniques. It does not follow all the rules for ideal data normalization, but it does provides a reasonable balance between data-storage efficiency and ease of display. While the rules of normalization provide the science of database design, this achievement of balance is where the art comes into play. In your own applications, you will find that achieving this balance becomes easier as you get familiar with the way that ASP.NET works, and how the ways that the data is used affect design decisions.
Creating and Modifying Databases in VWD
Visual Web Developer (VWD) contains several features that make it easy to work with a database, including the Database Explorer window that you first saw in Chapter 1. When you open the example PPQ site in VWD, it attaches the database provided in the examples to SQL Server Express Edition and displays the contents of this database in the Database Explorer window. If the Database Explorer window is not visible, open it from the View menu, or press Ctrl-Alt-S.
76

Building the PPQ Database
If you are following the examples in these chapters, and working with the skeleton version of the application, you will see three tables in the Database Explorer window (the version of the application in the complete folder contains more tables that you will build yourself in this chapter).
Figure 3-5 shows the three tables expanded to display the names of the columns they contain.
Figure 3-5: The Database Explorer window
If you right-click on a table in the Database Explorer window, you will see a context menu that provides several options for managing the database and the table (see Figure 3-6). This includes adding a new table, trigger, or query, viewing the definition of the selected table, viewing the table’s data content, and copying or deleting the table. You can also refresh the display if the database has changed, and display the properties of the table.
77

Chapter 3
Figure 3-6: Some of the actions available in the Database Explorer window
The Table Designer Window
When you select the Open Table Definition option from the context menu or from the Data menu on the main toolbar, VWD displays the Table Designer. This is where you create and modify the structure of the tables in the database, set the primary key(s), and specify the properties for each column.
Figure 3-7 shows two copies of the Table Designer open, one each for the MenuItems table on the left and the Orders table on the right. You can see how you specify the data type (varchar(25), for example, simply means a 25-character string value), and whether the column can contain NULL values, for each column in the tables.
78

Building the PPQ Database
Figure 3-7: The Table Designer showing the MenuItems and Orders tables
The first column, named MenuItemID, is selected in the MenuItems table and the properties for this column are shown in the lower section of this window. This is the primary key of the table, as indicated by the key symbol in the column name grid at the top of the window. It is also an Identity (auto-number) column, and so the Identity Specification property value is Yes. The Identity Increment and
Identity Seed properties, which you find by expanding the Identity Specification entry, are set to 1 (the default values), which means that as a row is added to this table the MenuItemID will be set automatically to the next available positive number.
The Orders table displayed in the right-hand window also shows the data types for each column, and indicates that the OrderID column is in the primary key. In this table, there is a column named OrderDate that is specified as of type datetime, and two columns — DeliveryCharge and TotalValue — that will contain money (currency) values.
79

Chapter 3
These last three columns also have a default value set, which is inserted into the row if the user does not provide a value when creating a new row. The OrderDate column (selected in Figure 3-7) has the value (getdate()) for the Default Value or Binding property. This means that the SQL Server function named getdate will insert the current date into the column for a new row. The DeliveryCharge and TotalValue columns have a default value of zero set.
The Query Window
If you select Show Table Data from the context menu in the Database Explorer window (or select this option from the Data menu when a table is selected in the Database Explorer window), VWD opens the Query window and displays the contents of all the rows in that table. When building pages that display data, this is a good way to see what a table actually contains (see Figure 3-8).
Figure 3-8: Viewing the data in a table from the Database Explorer window
In fact, this is the same window as you saw in Chapter 1 when you experimented with creating a query to extract data from a database table. The three buttons at the top left of the main window switch the display so that it shows the Diagram pane (the tables from which the data is extracted), the Criteria pane (where the columns included in the query are specified and any filtering is applied), and the SQL
pane (which displays the SQL statement used to extract the data). Try opening all these panes to see how VWD is able to display the contents of a database table (see Figure 3-9).
80

Building the PPQ Database
Figure 3-9: The Query window with all the “panes” turned on and displayed
Creating a New Database
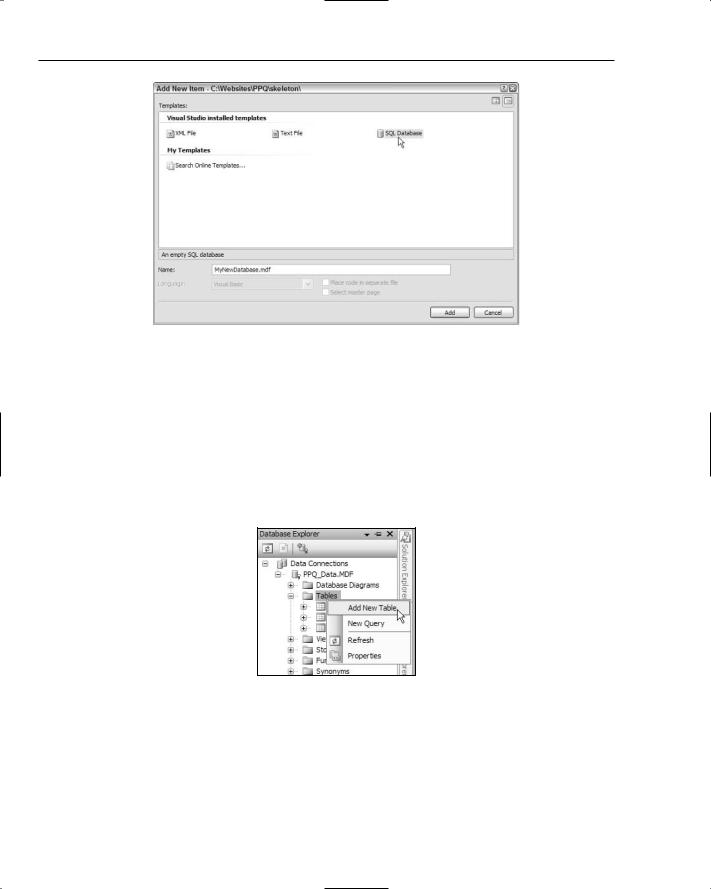
In the next section, you will build the remaining table required for the PPQ Web site, and then construct the relationships between this and the other tables already provided in the example database. If you were starting completely from scratch, you would first have to create a new database. For this, you would right-click the top-level entry in the Solution Explorer window (not the Database Explorer window!) that shows the path to your Web site and select Add New Item... from the context menu. In the Add new Item dialog that appears, select SQL Database and specify the name, then click Add. This opens the Database Explorer window for the new database, where you can add the tables and other objects you require.
81
Chapter 3
Figure 3-10: Creating a new database in SQL Server Express Edition
Creating the PPQ OrderItems Table
This chapter devoted considerable space to discussing database design issues. It has also looked at how VWD supports database development. In this section, you will create the remaining table required by the PPQ Web site. The MenuItems, SizeAndPrice, and Orders tables are provided in the example database. The one missing table is the OrderItems table.
1.Open the Database Explorer window (press Ctrl-Alt-S if it is not visible) and right-click on the Tables entry. Select Add New Table from the context menu that appears (see Figure 3-11).
Figure 3-11: Database Explorer window
2.This opens the Table Designer window (see Figure 3-12), ready for you to specify the columns for the new table. Type in the column name fkOrderID, and select the int data type from the drop-down list. Make sure that you clear the Allow Nulls checkbox as well.
82

Building the PPQ Database
Figure 3-12: Table Designer window
The prefix fk is the accepted way to indicate that this column contains a foreign key. When the rows in two tables are related through key values within specific columns of the tables, the value of the primary key in the parent table row is used in the child table rows that match that parent row. These values in the child table are the foreign keys, and so the column is generally referred to as a foreign key column.
3.Now continue by defining the remaining columns for the OrderItems table. These are:
Column Name |
Data Type |
Allow Nulls |
|
|
|
fkMenuItemID |
int |
no |
ItemSize |
varchar(50) |
no |
ItemName |
varchar(50) |
yes |
Quantity |
int |
no |
LineValue |
money |
no |
|
|
|
You should see the result shown in Figure 3-13.
Figure 3 -13: OrderItems data
4.Now you can set the specific properties of the columns in the new table. Select the Quantity column, and in the Column Properties section at the bottom of the Table Designer window find the entry for Default Value or Binding. This is the value for this column in new rows where no specific value is provided when the row is created. Type the value 1 for this property, as shown in Figure 3-14. Then select the LineValue column, and set the Default Value or Binding property value to zero.
83