


Other NASM-IDE Features
Most of what you do with NASM-IDE involves editing assembly language source code files, but by no means all. In this final section of the chapter I discuss some of the other things that NASM-IDE can do.
Exiting NASM-IDE
There is more than one way to get out of NASM-IDE once you're finished with the job at hand. The File menu has an Exit item, and that's the easiest to remember, and it will do the job. The shortcut for the File|Exit menu item is Alt-X:
Alt-X exits to DOS.
NASM-IDE keeps track of whether a file has been changed by you since the last time it was saved to disk. If you attempt to exit NASM-IDE with unsaved changes on deck, NASM-IDE will bring up a dialog box asking if you want to save your changes. Most of the time you do—and in most cases you'll click the Yes button. But other occasions might arise when the best thing to do is abandon a changed file and start again. The most common example of this is a careless Replace all command that went through your entire file and did a lot of unintended and difficult-to-reverse things. The best thing to do in such a case is leave NASM-IDE without saving the damaged file, and then coming back in with the most recent copy. This is another good reason to save often: You don't want to abandon a bad "Replace all" change (what some programmers have with grim remembrance come to call a "search and destroy") along with two hours' worth of useful work.
Save often. And know when not to save. It's all part of the game.
Changing the Display Size
By default, NASM-IDE brings up a traditional 25-line by 80-character DOS text screen. This isn't a lot of room to move, especially when virtually every modern display adapter is capable of showing you either 43 lines (on some ancient hardware) or 50 lines on a text screen. When I use NASM-IDE in my own work, I use 50 lines, every time.
Setting it up is easy. Pull down the Options|Environment menu item. The dialog box shown in Figure 5.9 will appear. The top pane governs your screen size. The default is 25 lines, but you can check 43/50 instead by clicking on the 43/50 lines button. Then when you click on OK, the screen size will change immediately.
Figure 5.9: The Environment Options dialog box.
What it changes to depends on your hardware. If you have an EGA (Enhanced Graphics Adapter) (which is most unlikely in the year 2000), you'll get a 43-line screen. If you have a VGA (Video Graphics Array) or anything more recent than the VGA, you'll get a 50-line screen. Note that these are mutually exclusive; a single system cannot (as far as I know) let you choose from 43 lines or 50 lines. You get the big screen, however many lines that works out to on your particular hardware.
DOS Shell
People who have grown up using nothing but Microsoft Windows have a little trouble sometimes
understanding what a DOS shell is or why it's useful. The answer, of course, is that there was a time when we didn't have Windows and couldn't just click on a window and open up another program without closing the first one.
But a DOS shell was a very handy thing to have in the DOS era, and NASM-IDE provides one. If you select the File|DOS shell menu item, NASM-IDE will tuck itself away and open up a DOS shell. It's like exiting NASM-IDE without really exiting it. You can run DOS programs, look at and copy files, and so on. When you're done, you simply type "exit" and press Enter and in a pop you're back inside NASMIDE as though you'd never left.
This is still useful for doing things like invoking your linker, since NASM-IDE doesn't do that for you. I return to the DOS shell when we discuss linking modular files later in this book.
Chapter 6: An Uneasy Alliance The x86 CPU and Its
Segmented Memory System
As comedian Bill Cosby once said: I told you that story so I could tell you this one...We're pretty close to a third finished with this book, and I haven't even begun describing the principal element in PC assembly language: the x86 CPU. Most books on assembly language, even those targeted at beginners, assume that the CPU is as good a place as any to start their story, without considering the mass of groundwork without which most beginning programmers get totally lost and give up.
That's why I began at the real beginning, and took 150 pages to get to where the other guys start.
Keep in mind that this book was created to supply that essential groundwork. It is not a complete course in PC assembly language. Once you run off the end of this book, you'll have one leg up on any of the multitude of beginner books on assembly language from other publishers.
And it's high time we got right to the heart of things, and met the foreman of the PC itself.
The Joy of Memory Models
I wrote this book in large part because I could not find a beginning text in assembly language that I respected in the least. Nearly all books on assembly start by introducing the concept of an instruction set, and then begin describing machine instructions, one by one. This is moronic, and the authors of such books should be hung. Even if you've learned every single instruction in an instruction set, you haven't learned assembly language.
You haven't even come close.
The naïve objection that a CPU exists to execute machine instructions can be disposed of pretty easily: It executes machine instructions once it has them in its electronic hands. The real job of a CPU, and the real challenge of assembly language, lies in locating the required instructions and data in memory. Any idiot can learn machine instructions. (Many do.) The skill of assembly language consists of a deep comprehension of memory addressing. Everything else is details—and easy details, at that.
This is a difficult business, made much more difficult by the fact that there are a fair number of different ways to address memory in the x86 CPU family. (The "x86" indicates any member of Intel's microprocessor family that includes the 8086, 8088, 80286, 80386, 80486, Pentium, and the Pentium descendents.) Each of these ways is called a memory model. There are three major memory models that you can use with the more recent members of the x86 CPU family, and a number of minor variations on those three, especially the one in the middle.
The oldest memory model is called real mode flat model. It's relatively straightforward. The middle-aged memory model is called the real mode segmented model. It may be the most hateful thing you ever have to learn in any kind of programming, assembly or otherwise. DOS programming at its peak used the real mode segmented model. The newest memory model is called protected mode flat model, and it's the memory model behind modern operating systems such as Windows NT and Linux. (Note that the protected mode flat model is available only on the 386 and newer CPUs. The 8086, 8088, and 286 do not support it.) Windows 9x falls somewhere between models, and I doubt anybody except the people at Microsoft really understands all the kinks in the ways it addresses memory—maybe not even them. Windows 9x crashes all the time, and one main reason in my view is that it has a completely insane memory model. (Dynamic link libraries, or DLLs—a pox on homo computationis—are the other major reason.) Its gonzo memory model isn't the only reason you shouldn't consider writing Win 9x programs in assembly, but it's certainly the best one.
I have a strategy in this book, and before we dive in, I'll lay it out: I will begin by teaching you programming under the real mode flat model, under DOS. It's amazingly easy to learn. I will discuss real mode segmented model because you will keep stubbing your toe on it here and there and need to know it, even if you never do any serious programming in it. However, the future lies in protected mode flat model, especially under Linux. It's also amazingly easy to learn—the hard part is fooling with all the Linux system calls that don't exist under DOS. And the key is this: Real mode flat model is very much like protected mode flat model in miniature.

There is a big flat model, and a little flat model. If you grasp real mode flat model, you will have no trouble with protected mode flat model. That monkey in the middle is just the dues you have to pay to consider yourself a real master of memory addressing.
So let's go see how this crazy stuff works.
16 Bits'll Buy You 64K
The year I graduated from college, Intel introduced the 8080 CPU and basically invented microcomputing. (Yes, I'm an old guy, but I've been blessed with a sense of history—by virtue of having lived through quite a bit of it.) That was 1974, and the 8080 was a white-hot little item at the time. I had one that ran at 1 MHz, and it was a pretty effective word processor, which is mostly what I did with it.
The 8080 was an 8-bit CPU, meaning that it processed 8 bits of information at a time. However, it had 16 address lines coming out of it. The "bitness" of a CPU—how many bits wide its accumulator and general-purpose registers are—is important, but to my view the far more important measure of a CPU's effectiveness is how many address lines it can muster in one operation. In 1974, 16 address lines was aggressive, because memory was extremely expensive, and most machines had 4K or 8K bytes at very most—and some had a lot less.
Sixteen address lines will address 64K bytes. If you count in binary (which computers always do) and limit yourself to 16 binary columns, you can count from 0 to 65,535. (The colloquial "64K" is shorthand for the number 66,536.) This means that every one of 65,536 separate memory locations can have its own unique number, from 0 up to 65,535. This number is an address, a concept I introduced functionally back in Chapter 3. If you want to find out what's recorded in memory location number 24,263, you place the number 24,263 on a memory system's address lines, and the memory system will read the contents at that location and send them back to you.
The 8080 memory-addressing scheme was very simple: You put a 16-bit address out on the address lines, and you got back the 8-bit value that was stored at that address. Note well: There is no necessary relation between the number of address lines in a memory system and the size of the data stored at each location. The 8080 stored 8 bits at each location, but it could have stored 16 or even 32 bits at each location, and still had 16 memory address lines.
By far and away, the operating system most used with the 8080 was CP/M-80. CP/M-80 was a little unusual in that it existed at the top of installed memory—sometimes so that it could be contained in ROM, but mostly just to get it out of the way and allow a consistent memory starting point for transient programs—those that (unlike the operating system) were loaded into memory and run only when needed. When CP/M-80 read a program in from disk to run it, it would load the program into low memory, at address 0100H—that is, 256 bytes from the bottom of memory. The first 256 bytes of memory were called the program segment prefix (PSP) and contained various odd bits of information as well as a general-purpose memory buffer for the program's disk input/output (I/O). But the executable code itself did not begin until address 0100H.
I've drawn the 8080 and CP/M-80 memory model in Figure 6.1.
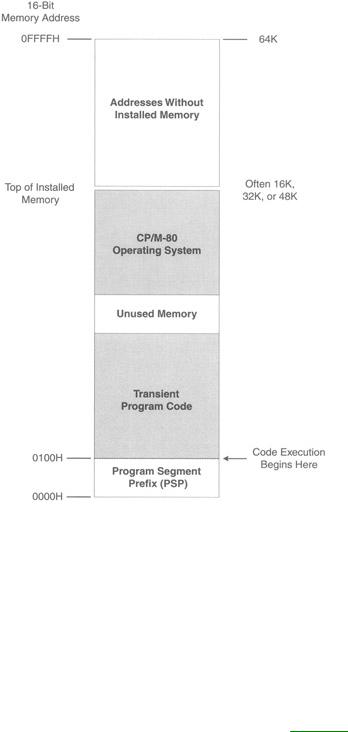
Figure 6.1: The 8080 memory model.
The 8080's memory model as used with CP/M-80 was simple, and people used it a lot. So, when Intel created its first 16-bit CPU, the 8086, it wanted to make it easy for people to translate CP/M-80 software from the 8080 to the 8086—what we call porting. One way to do this was to make sure that a 16-bit addressing system such as that of the 8080 still worked. So, even though the 8086 could address 16 times as much memory as the 8080 (16 x 64K = 1 MB), Intel set up the 8086 so that a program could take some 64K byte segment within that megabyte of memory and run entirely inside it, just as though it were the smaller 8080 memory system.
This was done by the use of segment registers—which are basically memory pointers located in CPU registers that point to a place in memory where things begin, whether this be data storage, code execution, whatever. We'll have a lot more to say about the use of segment registers very shortly. For now, it suffices to think of them as pointers indicating where, within the 8086's megabyte of memory, a program ported from the 8080 world would begin. See Figure 6.2.

Figure 6.2: The 8080 memory model inside an 8086 memory system.
When speaking of the 8086 and 8088, there are four segment registers to consider—and again, we'll be dealing with them in detail very soon. But for the purposes of Figure 6.2, consider the register called CS—which stands for code segment. Again, it's a pointer pointing to a location within the 8086's megabyte of memory. This location acts as the starting point for a 64K region of memory, within which a quickly converted CP/M-80 program can run very happily.
This was very wise short-term thinking—and catastrophically bad long-term thinking. Any number of CP/M-80 programs were converted to the 8086 within a couple of years. The problems began big time when programmers attempted to create new programs from scratch that had never seen the 8080 and had no need for the segmented memory model. Too bad—the segmented model dominated the architecture of the 8086. Programs that needed more than 64K of memory at a time had to use memory in 64K chunks, switching between chunks by switching values into and out of segment registers.
This was, and is, a nightmare. There is one good reason to learn it, however: Understanding the way segments work will help you understand how the two x86 flat models work, and in the process you will come to understand the nature of the CPU a lot better.
So, having worked my way up to the good stuff, I find myself faced with a tricky conundrum. Programming involves two major components of the PC: the CPU and memory. Most books begin by choosing one or the other and describing it. My own opinion is that you can't really describe memory and memory addressing without describing the CPU, and you can't really describe the CPU without going into memory and memory addressing.
So let's do both at once.
The Nature of a Megabyte
When running in segmented real mode, the x86 CPUs can use up to a megabyte of directly addressable memory. This memory is also called real mode memory. Most modern x86 machines have a lot more memory than that—typically 32 MB or more. (My own machines have 256 MB of memory.) However, most modern x86 machines run in protected mode, which can address up to 4 giga bytes of

memory. We return to protected mode in a big way toward the end of this book, in discussing Linux.
As I discussed briefly in Chapter 3, a megabyte of memory is actually not 1 million bytes of memory, but 1,048,576 bytes. It doesn't come out even in our base 10 because computers insist on base 2. Those 1,048,576 bytes expressed in base 2 are 100000000000000000000B bytes. (We don't use commas in base 2—that's yet another way to differentiate binary notation from decimal apart from the suffixed B.) That's 220, a fact that we'll return to shortly. The number 100000000000000000000B is so bulky that it's better to express it in the compatible (and much more compact) base 16, which we call hexadecimal. The quantity 220 is equivalent to 165, and may be written in hexadecimal as 100000H. (If the notion of number bases still confounds you, I'd recommend another trip through Chapter 2, if you haven't been through it already. Or, perhaps, even if you have.)
Now, here's a tricky and absolutely critical question: In a bank of memory containing 100000H bytes, what's the address of the very last byte in the memory bank? The answer is not 100000H. The clue is the flip side to that question: What's the address of the first byte in memory? That answer, you might recall, is 0. Computers always begin counting from 0. It's a dichotomy that will occur again and again in computer programming. The last in a row of four items is item number 3, because the first item in a row of four is item number 0. Count: 0, 1, 2, 3.
The address of a byte in a memory bank is just the number of that byte starting from zero. This means that the last, or highest, address in a memory bank containing 1 megabyte is 100000H minus one, or 0FFFFFH. (The initial zero, while not mathematically necessary, is there for the convenience of your assembler. Get in the habit of using an initial zero on any hex number beginning with the hex digits A through F.)
The addresses in a megabyte of memory, then, run from 00000H to 0FFFFFH. In binary notation, that is equivalent to the range of 00000000000000000000B to 11111111111111111111B. That's a lot of bits—20, to be exact. If you look back to Figure 3.3 in Chapter 3, you'll see that a megabyte memory bank has 20 address lines. One of those 20 bits is routed to each of those 20 address lines, so that any address expressed as 20 bits will identify one and only one of the 1,048,576 bytes contained in the memory bank.
That's what a megabyte of memory is: some arrangement of memory chips within the computer, connected by an address bus of 20 lines. A 20-bit address is fed to those 20 address lines to identify 1 byte out of the megabyte.
Backward Compatibility
Modern x86 CPUs such as the Pentium can address much more memory than this and have a lot of machinery that I won't be discussing in this book. With the 8086 and 8088 CPUs, the 20 address lines and 1 megabyte of memory was literally all they had. They didn't speak of the real mode segmented model back in the 8088 era because that one model was all there was.
More powerful memory models didn't really come about until the appearance of the 80386 in 1986. The 386 was Intel's first true 32-bit CPU, and the first to fully implement a 32-bit protected mode. The 80286 was a transitional CPU that tried—but did not completely succeed—in implementing a protected mode. People simply used it as a faster 8088. (Later on, I talk more about what the "protected" in "protected mode" means.) The 386 and later Intel CPUs could address 4 gigabytes of memory without carving it up into smaller segments. In the 32-bit CPUs, a segment is 4 gigabytes—so one segment is, for the most part, plenty.
However, a huge pile of DOS software written to make use of segments was everywhere around and had to be dealt with. So, to maintain backward compatibility with the ancient 8086 and 8088, newer CPUs were given the power to limit themselves to what the older chips could address and execute. When a Pentium CPU places itself into real mode segmented model, it very nearly becomes an 8086. This may seem a waste, but it allows the Pentium to run old DOS software originally written for the 8086. Think of it as training wheels to get you up to speed in assembly language.
Whenever a newer CPU such as the 386 or Pentium is set up to look like an 8086, we say that it is in real mode. The term real mode was coined as a contrast to protected mode, which is the much more powerful mode used in newer operating systems (such as Windows 9x and NT, as well as Linux) that allows the operating system much more control over what programs running on the machine can do.

When you launch an MS-DOS window or "DOS box" under Windows 9x or NT, you're creating what amounts to a little real mode island inside the Windows protected mode memory system. If you have a Windows machine, you should do all your assembly language for this book in an MS-DOS window, so that real mode conventions apply. (For Linux, obviously, this limitation does not apply!)
16-Bit Blinders
In real mode segmented model, an x86 CPU can "see" a full megabyte of memory. That is, the CPU chips set themselves up so that they can use 20 of their 32 address pins and can pass a 20-bit address to the memory system. From that perspective, it seems pretty simple and straightforward. However,...the bulk of all the trouble you're ever likely to have in understanding real mode segmented model stems from this fact: that whereas those CPUs can see a full megabyte of memory, they are constrained to look at that megabyte through 16-bit blinders.
You may call this peculiar. (If you do any significant amount of programming in this mode, you'll probably call it much worse.) But you must understand it, and understand it thoroughly.
The blinders metaphor is closer to literal than you might think. Look at Figure 6.3. The long rectangle represents the megabyte of memory that the CPU can address in real mode segmented model. The CPU is off to the right. In the middle is a piece of metaphorical cardboard with a slot cut in it. The slot is 1 byte wide and 65,536 bytes long. The CPU can slide that piece of cardboard up and down the full length of its memory system. However, at any one time, it can only access 65,536 bytes.
Figure 6.3: Seeing a megabyte through 64K blinders.
The CPU's view of memory in real mode segmented model is peculiar. It is constrained to look at memory in chunks, where no chunk is larger than 65,536 bytes in length—what we call "64K." Making use of those chunks—that is, knowing which one is currently in use and how to move from one to another—is the real skill of real mode segmented model programming. The chunks are called
segments, and it's time to take a closer look at what they are and how they're used.