

Beginning ASP.NET 2
.0.pdfPage Design
Figure 3-2
Figure 3-3
59

Chapter 3
Figure 3-4
Figure 3-5
5.Switch to Design View and type in some text, as depicted in Figure 3-5.
Don’t worry about the actual text — this is a simple example, and you don’t have to publish this on the Web!
6.Next, from the toolbar select Layout Insert Table to add a table to the page. Give it two rows, two columns, and borders and padding if you like, all of which appear in Figure 3-6.
60

Page Design
7.Once you have a table, you can add content within each cell. Try adding some text to a cell, then drag an image tag from the HTML section of the Toolbox on the left of VWD onto the page, as shown in Figure 3-7.
Figure 3-6
Figure 3-7
61

Chapter 3
Once you have a table in the designer, you can click the <table> button at the bottom of the screen to select only that element on the page (see Figure 3-8) — you can then modify the padding and border attributes on the table by changing the values in the Properties box on the right.
Figure 3-8
8.Click the Source button at the bottom of the screen and you can see the HTML that’s generated for you (see Figure 3-9). With some small tweaks, you can add a small amount of styling and some links to your images.
9.To turn the nascent page into the finished example, I added some more text and images to my version. Here’s the code for the version of the finished page that you can download from www.wrox.com — notice the <style> attribute on the <body> tag:
<body style=”color: darkolivegreen; font-family: georgia”>
This is a simple static web page with an image and some interesting information about some places I have been:<br />
<br />
<table cellspacing=”3” cellpadding=”3” border=”1”>
<tr>
<td>
<img src=”azoreschurch.jpg” height=”100” /><br />
A church near Faja Grande, a small town on the western-most edge of Flores - one of the 9 islands in the Azores.</td>
62

Page Design
<td>
<img src=”budapest.jpg” height=”100” /><br />
A view of old parts of Budapest (Hungary) across the Danube.</td> </tr>
<tr>
<td style=”height: 192px”>
<img src=”sirmione.jpg” width=”100” /><br />
A castle on the end of a peninsula on the shores of Lake Garda, Italy.</td> <td style=”height: 192px”>
<img src=”bullring.jpg” width=”100” /><br />
Selfridges at the Bullring shopping centre - a truly remarkable piece of architecture in Birmingham, UK.<br /></td>
</tr>
</table>
</body>
Having finished adding content to the page, you can view the page by pressing Ctrl+F5. The result is a page that looks like Figure 3-10 (which is the same as Figure 3-1).
Figure 3-9
63

Chapter 3
Figure 3-10
How It Works
As you carry on through this chapter, you’ll become increasingly familiar with the technique of adding layout elements in the design window, and making some changes either in the Properties pane on the right, or by modifying the code manually. Static elements such as the ones used in this example (simple text within a body tag, tables, and images) are used throughout both static and dynamic pages, and understanding how to add and integrate these elements is all part of building dynamic web applications.
In this example, you gained a bit of practice in working with simple HTML layout of a page. For example, the elements on the page were laid out in a simple HTML table, and within each of the cells in the table were some text and some images:
<td>
<img src=”azoreschurch.jpg” height=”100” /><br />
A church near Faja Grande, a small town on the western-most edge of Flores - one of the 9 islands in the Azores.
</td>
The body tag in the rendered page has some simple styling attached to it that defines the color and font used for the text on the page:
<body style=”color: darkolivegreen; font-family: georgia”>
64

Page Design
This attribute will apply to all of the elements within the opening and closing <body> tags, hence all of the content of the visible page.
Don’t worry if a lot of this is new to you — the next section is designed as a crash course in HTML to help you get up to speed.
The World of HTML
If you are unfamiliar with HTML, here are some of the basic concepts you need to understand:
An HTML file is human-readable text with a few extra brackets — when you browse a web page, your web browser will understand how to convert the bracketed bits into something that looks interesting.
The bracketed bits are called elements, though strictly speaking, the element normally consists of two tags that open and close the element, and sometimes have textual or other HTML content between them. Some elements have only a single tag.
Elements have attributes that give the browser extra information about how the element should appear on the page.
Here’s a simple HTML element:
<div id=”divUserDetails” style=”width:300px;height:100px;float:left;background:darkred;color:white”>
These are my details, my favorite color, and my hobbies </div>
In this example, the <div ...> and </div> parts are tags describing the div element, the id=”” and style=”” bits are attributes, and the text between the two tags is the content of the element.
Rendering is the process of turning HTML code into visual elements, so the preceding code will render as shown in Figure 3-11.
Figure 3-11
65

Chapter 3
The following table contains some of the HTML elements you’re likely to run into.
Element |
Description |
Example Usage |
|
|
|
<img> |
An image tag. This tag |
<img src=”myimage.gif” /> |
|
places an image on a page. |
|
<div> |
A paragraph-style block of text. |
<div style=”float:left”> |
|
Text contained in a <div> element |
Left-hand content here</div> |
|
can be positioned on a page using |
<div style=”float:right” |
|
various attributes. For example, to |
>Right-hand content |
|
place two div elements side-by-side, |
here</div> |
|
you could have one with a float: |
|
|
left style, and one with a float: |
|
|
right style. |
|
<span> |
A tag used to format characters of |
<div> |
|
text, so you could surround a word |
Some standard text with a |
|
in a sentence with a <span> tag |
<span style=”font- |
|
and make the span have bold styling |
weight:bold> |
|
to highlight that word. |
bold</span> word in the |
|
|
middle |
|
|
</div> |
<table> |
A table element that contains rows |
<table border=”1”> |
<tr> |
(<tr>) and cells (<td>). Commonly |
<tr> |
<td> |
used to position elements on a page, |
<td>The contents of a |
|
should ideally be used only for tabular |
cell</td> |
|
data. According to accessibility |
</tr> |
|
guidelines, <div> elements should be |
</table> |
|
used for layout and positioning, but a |
|
|
lot of sites still use tables because they |
|
|
are simpler to develop. |
|
<a> |
An anchor element. Defines a hyperlink |
Some text with a <a href=page |
|
on a page, enabling the developer to |
.htm”>hyperlink</a> in it” |
|
specify both the target content (in the |
|
|
href attribute) and the text to display |
|
|
to the user. |
|
<head> |
The two main parts of an HTML page |
<html> |
<body> |
are the <head> and the <body>. The |
<head> |
|
<head> is where the <title> element |
<title>Page Title</title> |
|
and <link> elements (along with a |
</head> |
|
variety of metadata) are placed. |
<body> |
|
The <body> contains the display |
Contents of page |
|
elements. |
</body> |
|
|
</html> |
|
|
|
66

|
|
|
Page Design |
|
|
|
|
|
|
|
Element |
Description |
Example Usage |
|
|
|
|
|
|
|
|
|
|
|
|
<form> |
A form element. When creating a site |
<form id=”form1” |
|
|
<input> |
that has a data entry form, the elements |
runat=”server”> |
|
|
|
that are used to transmit data to the |
<input id=”Text1” |
|
|
|
server must be contained within a |
type=”text” /> |
|
|
|
<form> element. The HTML <input> |
<input id=”Submit1” |
|
|
|
element is quite versatile; with a type |
type=”submit” |
|
|
|
attribute of text, it appears as a text |
value=”submit” /> |
|
|
|
box on the screen. With a type of |
</form> |
|
|
|
submit, it appears as a button that, |
|
|
|
|
when clicked, submits the form to the |
|
|
|
|
server. |
|
|
|
<title> |
Within the <head> of the page, the |
<head> |
|
|
<link> |
<title> element controls the text in |
<title>Page Title</title> |
|
|
|
the title bar of the page. The <link> is |
<link rel=”Stylesheet” |
|
|
|
most often used to link a page with a |
type=”text/css” |
|
|
|
CSS style sheet. |
href=”MyCss.css” /> |
|
|
|
|
</head> |
|
|
<script> |
Can contain either client-side script |
<script |
|
|
|
(script run on the browser, normally |
language=”JavaScript”> |
|
|
|
written in JavaScript, or possibly |
alert(‘Hello World!’); |
|
|
|
VBScript), or server-side .NET code. |
</script> |
|
|
|
|
<script runat=”server”> |
|
|
|
|
Protected Sub Page_Load( _ |
|
|
|
|
sender As Object, _ |
|
|
|
|
e As EventArgs) |
|
|
|
|
... |
|
|
|
|
End Sub |
|
|
|
|
</script> |
|
|
<br /> |
Used to help to lay out a page, the |
This is a string of text with a |
|
|
<hr /> |
<br /> tag adds a line break to a string |
line<br />break and |
|
|
|
of text, and the   forcibly enters a |
a space. |
|
|
|
non-breaking space character; hence |
<hr /> |
|
|
|
two words (or elements) separated only |
Two images separated by a |
|
|
|
by a   character cannot be split |
space:<br /> |
|
|
|
apart over two lines. The <hr /> |
<img src=”1.gif”> <img |
|
|
|
element displays a horizontal line |
src=”2.gif”> |
|
|
|
across the page. |
|
|
|
|
|
|
|
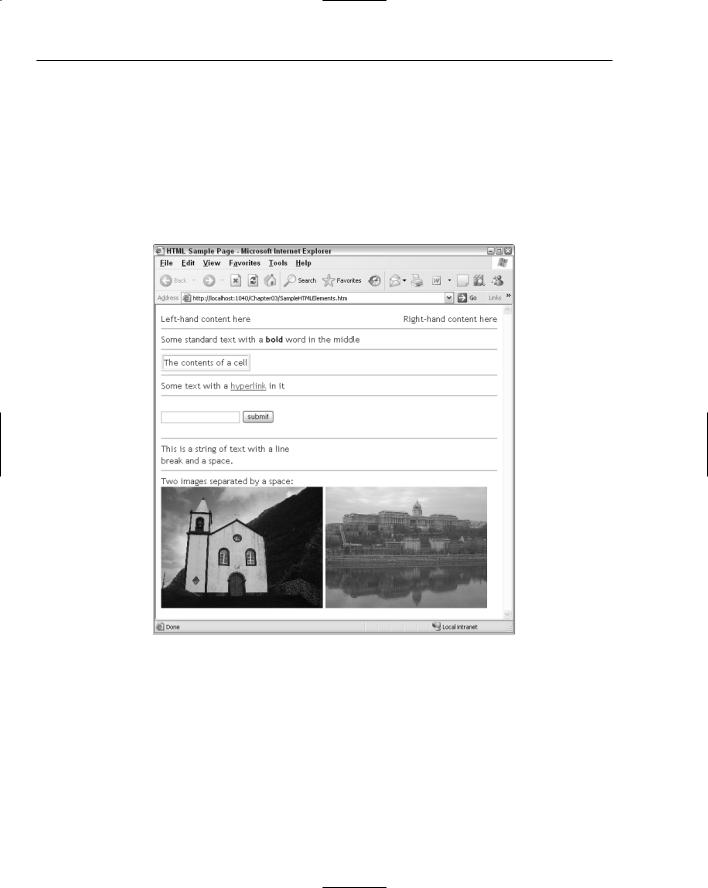
A sample HTML page called SampleHTMLElements.htm that includes these simple examples is available in the code download for this chapter, and it appears as shown in Figure 3-12.
Gaining familiarity with the common elements in HTML is a necessity for any ASP.NET developer, and not only do you have to understand how to use these elements, you have to learn how to use them correctly, in adhering to the standards, and making sure that sites you develop are accessible by as many users as possible.
67
Chapter 3
It’s very easy to end up with HTML that’s almost impossible to maintain, with tags and styling all over the place. Many older tools for constructing HTML pages would take pride in destroying your carefully crafted HTML code, and supposedly correct your code to follow the guidelines within the tool. Anyone who used older versions of FrontPage would have cursed many a time at the fact that simply opening an HTML page and closing it in FrontPage would permanently mangle your HTML code! Thankfully, VWD has one of the best HTML editors I’ve ever used.
Perhaps the best way to make your code clean and easy to maintain is to adhere to a common standard. The introduction of XHTML has brought many more guidelines to web development, and following these guidelines is a great way to improve your technique.
Figure 3-12
From HTML to XHTML Code
Although most people speak of HTML code, the fact is that if you write good HTML code, you’re actually writing XHTML. XHTML is a set of rules that, if you follow them when you write HTML code, result in code that is more standards-compliant, and hence more likely to render as you want it to on a variety of different client browsers.
The core rules of XHTML are as follows:
Always close your tags (so always have both a <p> and a </p> for a paragraph) or use self-closing tags (such as <br /> instead of <br>).
68