

Beginning ASP.NET 2
.0.pdfMembership and Identity
Because anonymous access is denied for the site, you are immediately taken to the login page. Notice that the address of the page indicates that your intention was to view the
Default.aspx page.
8.Before you log in, try entering some invalid credentials (a username and password that don’t exist, but not a blank password). You should see the message shown in Figure 4-15.
Figure 4-15
9.Now try to log in as one of the user accounts available to the site; you will automatically be taken back to the Default.aspx page, as illustrated in Figure 4-16.
Figure 4-16
Clicking the Logout link will take you back to the Login.aspx page — the site will not let anyone view pages without being logged in first.
119

Chapter 4
How It Works
The Login controls available to ASP.NET pages are a real gift from the Microsoft teams. I’ve lost count of the number of sites I’ve worked on that had custom login functionality, all coded by hand, and now all I have to do is drag a few controls onto a page. On top of that, the wizards available for configuring user accounts and permissions make it even easier to get results up and running quickly. You may prefer to use your own user account data store, or even to link in to Active Directory user accounts, but this can be changed later in your development process.
This Try It Out simply walked you through the process of configuring user accounts. Though that is a necessary process, the Website Administration Tool is more interesting in what it creates behind the scenes. First, the user account profiles that were created have to be stored in some central repository, so the tool creates a new profile database for you for this purpose. Take a look at the Chapter04 folder in your C:\BegASPNET2\Chapters\Begin\Chapter04 directory and you should see a folder called App_Data. Right-click and select Refresh Folder, and you should see a file called AspNetDB.mdf. This is a Microsoft SQL database file, and you can view the structure and contents of the database tables within the VWD environment, as shown in Figure 4-17 (you’ll learn more about this process when you get to the database chapters).
Figure 4-17
The other part of the configuration was to assign some permissions to user accounts for accessing the site. By running the wizard, you’re able to run through this process quite easily. Once the wizard is finished, you have a new file in your solution called Web.config (the configuration file that stores preferences related to the way the application runs on your server — see Chapter 2 for more details). If you look in the Web.config file stored in your Chapter04 folder, you will see the statements shown in Figure 4-18.
120

Membership and Identity
Figure 4-18
Notice that the <allow ... /> and <deny ... /> parts of the configuration file reflect the permissions that were set as part of the example. You can add and modify these statements yourself directly in the Web.config file by typing them in, or you can use the Administration Tool to streamline the process, whichever you prefer.
It’s worth a quick note to say that the LoginView control can do much more than display specific text to users depending on whether or not they’re logged in. In Chapter 11, you’ll see that this control can be used to change the appearance of a page entirely based on not just user identity, but also on roles. This control can contain text, HTML, or even other controls. The next Try It Out shows an example of this in action.
Personalization
The capability to personalize a site to reflect the preferences of the currently logged-in user is a great way to give a site a sense of community and belonging. Although you won’t be doing too much personalization in this site, the next chapter explores some of the features available to ASP.NET developers to give users a more personalized user interface and browsing experience.
A useful addition to any personalized site is to provide some kind of feedback to logged-in users to confirm that they have been correctly identified. The LoginName control is a simple way to add this functionality. In this Try It Out, you learn how this control is used. For this example, you will need to enable anonymous access.
121

Chapter 4
Try It Out |
Displaying User-Specific Information |
1.You can choose which way you want to enable anonymous access — you can either edit the Web.config file (refer to the previous “How It Works”) or you can launch the Web Site Administration Tool. To relaunch the tool, right-click the administration site icon in your system tray and select Open in Web Browser. Alternatively, to modify the Web.config file, simply open it up in VWD and change the following highlighted line of code:
<authorization> <allow users=”?” />
<allow users=”administrator” /> <allow users=”chrishart” />
</authorization>
The question mark represents all unknown (anonymous) users, so by changing deny to allow, you can enable anonymous access.
2.Next you need to make a slight change to the web page code to add the LoginName control. Open up Default.aspx and pop out the Common Task menu next to the LoginView control (click the small right-hand arrow next to the control and select the LoggedInTemplate, as shown in Figure 4-19). Change the text to You are logged in as, and then drag a LoginName control to the end of the text.
Figure 4-19
3.There is no need to make any amendments to the LoginName control once it’s been added to the page, so all that remains is to save your changes and run the page. The first thing you should see is the anonymous user’s perspective on the site, shown in Figure 4-20.
122

Membership and Identity
Figure 4-20
Now click the Login link and log in to the site. Once logged in, you should see something similar to Figure 4-21, depending on which user account you used.
Figure 4-21
How It Works
The LoginName control is a quick an easy way to display a user’s currently logged-in identity on a site. If you switch to Source View for the page, you can see the LoginName control, shown here with a gray background:
<LoggedInTemplate> You are logged in as
<asp:LoginName ID=”LoginName1” runat=”server” /> <br />
</LoggedInTemplate>
Some HTML code has been added to my code; because I pressed Return after the LoginName control (so that the LoginStatus control would appear on the next line), there’s a <br /> HTML tag in the code. This is the HTML code for a simple line break. You’ll often find tags like this, added to your code after switching from Design View to Source View. The two most common are the character, which is a non-breaking space (a space character that keeps the items immediately before and after it on the same
123

Chapter 4
line), and the <br />, which is a simple line break. The bit of code that is most relevant in this case is not the HTML, but the LoginName’s source. Again, there’s hardly anything exciting to see in the generated source, because ASP.NET does all the hard work of finding out what the currently logged-in user’s name is behind the scenes, and inserts it when the page is rendered.
Note that the LoginName control was not added to the Anonymous template, but then there’s no reason to do so — if you view the site as an anonymous user, the control will not display anything when it is rendered.
So you’ve spent a while experimenting with user accounts and logging in to the site. Earlier in the chapter, the concept of roles was discussed. The following section takes a look at what roles are and how they are used to refine the membership characteristics of a site.
Membership
Defining which users can access a site is a perfectly viable way to build a small site, but it would have to be very small and remain small to be a manageable solution. A far better solution would be to define a set of user roles, and add user accounts to the appropriate roles. Once users are members of a role, you can assign permissions based on a role.
For example, consider a typical site configuration scenario: all the members of an Administrators role can access the site, and can access all areas of the site. All members of a Users role can access the site, but cannot access certain restricted areas. All anonymous users will see a cut-down version of the site, but without any personalization, and certainly without any permissions for visiting restricted areas of a site.
Chapter 11 examines roles in more detail, including refining the Wrox United site to make good use of roles. In the meantime, you can experience roles for yourself in the next Try It Out, because the Chapter04 example site is extended to include roles. In this example you will be defining two roles: Users and Administrators. These roles have to be created before you can add users to the roles.
Try It Out |
Adding Users to Roles |
1.Start off by launching the Web Site Administration Tool once more. If you have been running the tool recently, you can right-click the icon in your system tray for the administration site and select Open in Web Browser. Or, as an alternative, you can click Website ASP.NET Configuration from the main VWD menu bar. Once the tool is up and running, select the Security tab and click the Enable Roles link, as shown in Figure 4-22.
124
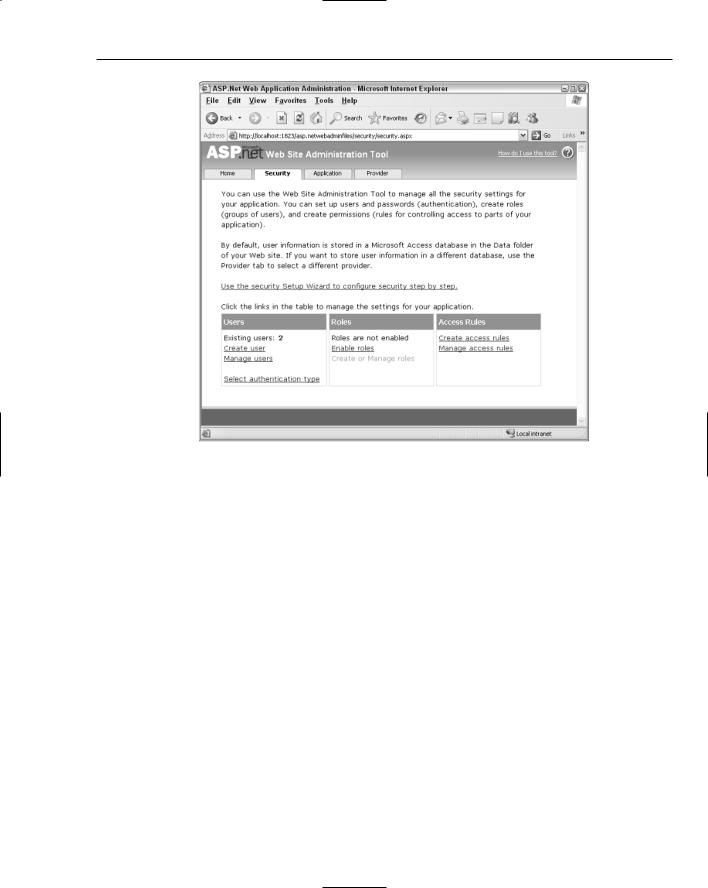
Membership and Identity
Figure 4-22
2.The Create or Manage Roles link should then be enabled, so click it to enter the Create New Role screen. In here, you need to create the two roles; users and administrators, by entering a role name in the text box and clicking Add Role (see Figure 4-23).
125

Chapter 4
Figure 4-23
3.Click the Manage link for the Administrators group, then search for the Administrator user account, using the search tools shown in Figure 4-24. The easiest way to find the Administrator account is to search for all accounts beginning with the letter A, so type a* in the text box and click Find User. Add the Administrator account to the Administrators role simply by checking the User Is In Role checkbox.
4.Add the remaining user accounts to the Users role in the same way.
5.Click the Security tab to return to the main Security section of the administration tool. Once there, click the Manage access rules link to return to managing the access rules for the site. In the same interface as you used in the earlier example for managing access rules (see Figure 4-13), remove the access rules for the individual user accounts, and instead grant access to the site to both the administrators and users groups. As you delete rules, you’ll be prompted as in Figure 4-25.
126
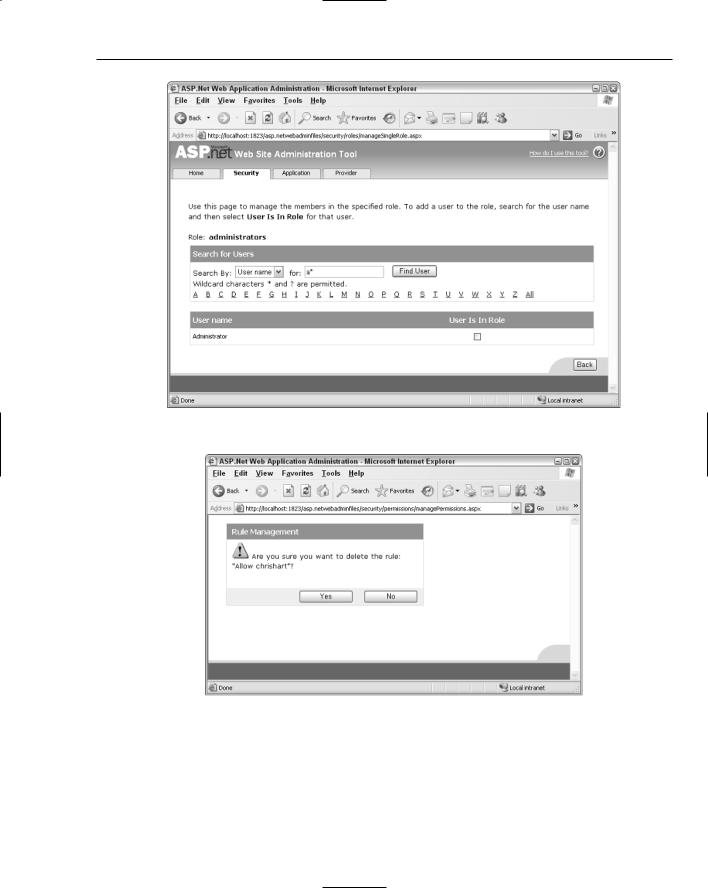
Membership and Identity
Figure 4-24
Figure 4-25
You can then add the new permissions on a role-by-role basis with the interface shown in Figure 4-26.
127

Chapter 4
Figure 4-26
Once you have added the rules, you should see the list of rules shown in Figure 4-27.
Figure 4-27
128