

Beginning ASP.NET 2
.0.pdfEvents and Code
This event is raised when a row from the database is bound to a server control. Like the Click event of the ImageButton, the ItemDataBound event of the DataList supplies extra information to the event procedure in the form of the second parameter. This contains information about the row being bound, and contains a property called DataItem, which itself contains three properties:
DataItem: The actual data item from the database.
ItemIndex: The index number of the item being bound. This starts at 0 and increments by one for each row.
ItemType: The type of the item in the DataList. This will be one of the following:
AlternatingItem, EditItem, Footer, Header, Item, Pager, SelectedItem, or Separator.
The ItemType is used to determine what type of row item you are on. For example, if data is being bound into the header row, the ItemType would be Header. For the actual rows in this example, the ItemType will be Item or AlternatingItem (for each row and every other row). So your code, shown here, simply checks the ItemType, so you only work with the rows you are interested in:
If e.Item.ItemType = ListItemType.Item Or _ e.Item.ItemType = ListItemType.AlternatingItem Then
Next you can use the ItemType to access the actual data being bound to the Image control, so you can check to see if there is any data for the image. First, you extract the actual row of data — don’t worry about the exact details of this code; data and data conversion are covered in the next few chapters. What’s important to remember is that e.Item.DataItem is the actual data from the database for this row, and you check to see whether the PictureUrl column is empty:
row = DirectCast(e.Item.DataItem, DataRowView)
If row(“PictureUrl”).ToString().Trim() = “” Then
If the PictureUrl column is empty, you want to access the Image control and make it invisible. Here you again use e.Item, but this time to find the Image control (NewsImage), and set its Visible property to False:
img = DirectCast(e.Item.FindControl(“NewsImage”), Image) img.Visible = False
Several things in this example have not been explained fully because they are covered in more detail later in the book. Data binding and databases are covered in Chapter 7, and data conversion (using DirectCast) and the use of FindControl are covered in Chapter 9. You don’t need to understand how these work at the moment, because the important thing is to know what is possible. In this case, you are seeing that an event is raised when an item from the database is bound to a server control. This event provides information about the underlying data and the row on the server control, thus giving you a lot of information.
This technique is also used on the menu. Chapter 3 looked at the navigation controls such as the Menu and SiteMapPath controls. One of the issues we have with the Wrox United web site is that we wanted the SiteMapPath on every page, which means that every page has to be in the SiteMap file as XML nodes. However, we don’t want all of the pages to appear in the Menu. For example, we don’t want users to navigate directly to the Checkout page, because we only want them to access it from the Shopping Cart page. The problem we have is that we can have an item that appears in the SiteMap and SiteMapPath, but that doesn’t appear in the Menu — the navigation framework doesn’t cater for that situation. So we have to cheat.
199

Chapter 6
What we do is use the MenuItemDataBound event in the master page (site.Master), as shown here:
Protected Sub MyMenu_MenuItemDataBound(ByVal sender As Object,
ByVal e As System.Web.UI.WebControls.MenuEventArgs)
Dim text As String = e.Item.Text
If text = “Checkout” Or text = “Shop Item” Or _ text = “Shopping Cart” Then e.Item.Parent.ChildItems.Remove(e.Item)
End If
End
As each menu item is taken from the SiteMap file and bound to the menu the MenuItemDataBound event is raised. Within this event procedure we check to see if the menu text is one of the pages we don’t want to show, and if it is we remove the item from the menu. This means that the item still retains its place in the navigation structure, but that it won’t show on the menu.
So you can see that events raised by ASP.NET are extremely useful. Despite the fact ASP.NET takes care of the data binding and display of data for us, we still have access to what’s happening. The next section looks at another example, where events are raised indirectly by the user.
Indirect Events
Indirect events are raised by ASP.NET, but because of some action that the user took. For example, have a look at one of the administration pages, where the team owner can change the players in the squad, as shown in Figure 6-19.
Figure 6-19
200

Events and Code
Here there are two visible controls: the GridView at the top, showing all players, and the DetailsView at the bottom where the player details are edited. One of the things you have to do is make sure that the GridView is updated when the player details are changed. The following Try It Out shows how you can do this.
Try It Out |
Indirect Events |
1.In the Chapter06 web site in Visual Web Developer, open the EditSquad.aspx page.
2.Click the right mouse button and select View in Browser from the menu.
3.View the player details by clicking the More details link — pick Chris Christopher the Left Back.
4.Click the Edit link to allow the player details to be changed. Change his position from Left Back to Goalkeeper and click Update. Notice how the details show him as Goalkeeper, but the grid still shows him as Left Back, as in Figure 6-20.
Figure 6-20
You need to change this to make sure that the grid is updated with the new details.
5.Close the browser window and return to Visual Web Developer.
6.Open the EditSquad.aspx.vb file, and from the drop-down list at the top-left of the page, select DetailsDataSource, and from the drop-down list at the top-right, select the Updated event.
7.Add the following line of code into the empty event procedure:
GridView1.DataBind()
201

Chapter 6
8.Save and close the code file.
9.From the web page, view the page in the browser and repeat the update process, changing the Position of Chris Christopher to Striker. Notice that when you click Update to save the changes the grid also changes.
How It Works
This code is extremely simple, and even though it relies on data binding, it is easy to understand. The key is that the page uses a SqlDataSource object, which is responsible for fetching the data from the database and making it available to the grid to display. The SqlDataSource control is just like other ASP.NET server controls, except that it doesn’t actually display anything. So although it’s on the page, nothing is shown to the user.
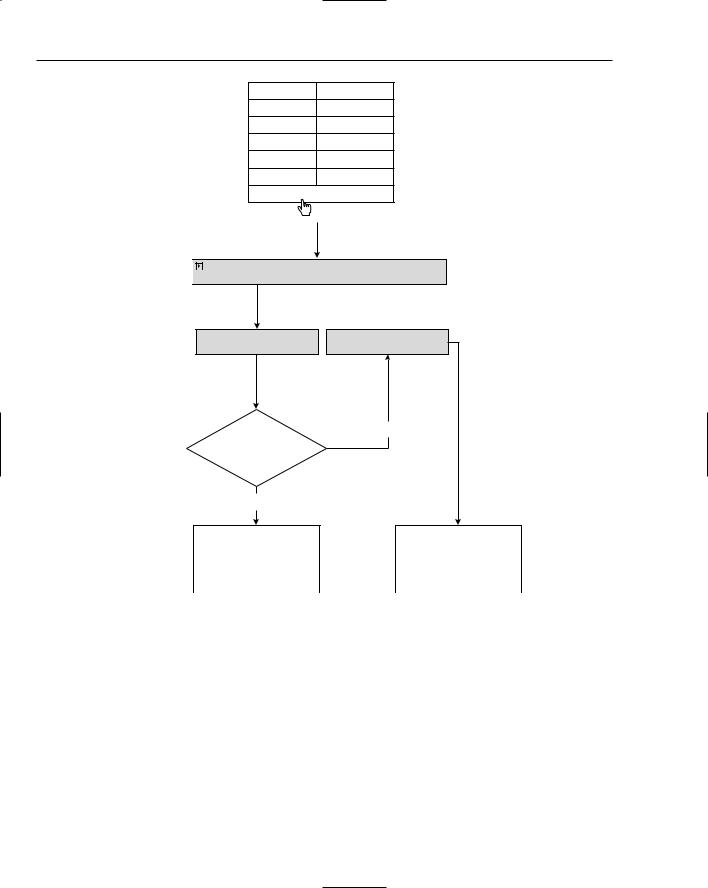
As well as providing data for the grid to show, the SqlDataSource also deals with data edits — inserting new rows, and updating and deleting existing rows, and for each of these actions there are events. One of these events is the Updated event, which is raised when the data is updated. So when you click the Update link, the SqlDataSource updates the database, and then raises the Updated event. The code in the Updated event simply tells the grid to rebind its data — to fetch it again and redisplay it. So what you’re doing is using multiple controls, with a chain of actions that result in an event, as seen in Figure 6-21.
Date Left
Update Cancel
Data Saved

 SqlDataSource - DetailsDataSource
Update
GridView1.DataBind()
FirstName |
LastName |
Position |
PictureURL |
Date |
Date |
Date |
|
|
|
|
Joined |
Left |
Left |
Aaron |
Aaronson |
Goalkeeper |
aaronson.jpg |
02-Jan-00 |
|
More details |
|
|
|
|
|
|
|
Bill |
Barker |
Goalkeeper |
aaronson.jpg |
|
|
More details |
|
|
|
|
|
|
|
Chris |
Christopher |
Right Back |
aaronson.jpg |
|
|
More details |
|
|
|
|
|
|
|
Dave |
Dickenson |
Right Back |
aaronson.jpg |
|
|
More details |
|
|
|
|
|
|
|
Eric |
Edmundson |
Central |
aaronson.jpg |
|
|
More details |
|
|
Defender |
|
|
|
|
|
|
|
|
|
|
|
Figure 6-21
202

Events and Code
You can see that although you can easily construct pages by just dropping controls onto a page and configuring properties, knowing how these controls work is important. Without knowing that the update of the DetailsView generated a similar event for the data source, you might spend time trying to work out which event on the DetailsView could be used to refresh the grid.
Canceling Events
So far in this chapter you’ve seen controls raise single events. Both the Button control and the ImageButton control raise a Click event, whereas other controls raise other events. One thing you have probably noticed is that the controls have quite a lot of events that could be raised, and you may not have realized that a single action can raise multiple events. For example, when updating data there is both an Updating and an Updated event. Likewise, there are pairs of events for adding new data (Inserting/Inserted) and for data being deleted (Deleting/Deleted). The present tense event (Inserting, for example) is raised as the action is occurring, whereas the past tense event (such as Deleted) is raised after the event. For example, when deleting a row, the Deleting event is raised just before the row is deleted, and the Deleted event is raised after the event is raised.
For some events, the fact that they are raised before the actual action takes place gives you the opportunity to cancel the event. For example, consider the EditSquad.aspx file, where the team owner can change the squad. One of the things the owner wants is to make sure that any players that left during the playing season remain in the database — so you can’t delete players between August 20 and May 31. To enable this, you need to allow deletion of players, but not within those dates. Give this a go in the next Try It Out.
Try It Out |
Canceling Events |
1.Open the EditSquad.aspx file in the Visual Web Developer designer, and add a Label control at the very end of the page.
2.Set the ID of the Label control to Message, and clear the Text property.
3.View the code file for this page and create an empty event procedure for the Deleting event for the DetailsDataSource. You can use the drop-down menus at the top of the code file editor to do this, just like you did in the Try It Out for indirect events.
4.In the empty event procedure, add the following code:
Dim today As DateTime = DateTime.Now()
Dim startYear As Integer
Dim endYear As Integer
Dim seasonStart As DateTime
Dim seasonEnd As DateTime
If today.Month > 5 Then startYear = today.Year endYear = today.Year + 1
Else
startYear = today.Year - 1
203

Chapter 6
endYear |
= today.Year |
|
End If |
|
|
seasonStart = New DateTime(startYear, 8, 20) |
‘ 20th August |
|
seasonEnd |
= New DateTime(endYear, 5, 31) |
‘ 31 May |
If today >= seasonStart And today <= seasonEnd Then e.Cancel = True
Message.Text = “Cannot delete players during the season” Else
GridView1.DataBind() Message.Text = “”
End If
5.Save the file and from the right mouse menu select View in Browser.
6.Make sure your system date is set between August 20 and May 31.
7.Select a player and try to delete him. You’ll see a message telling you that players cannot be deleted during the season, and the player is not deleted.
8.Change the system clock so that the date is out of season — that is, between June 1 and August 19.
9.Select a player and try to delete him. You may want to add a new test player just so that you can delete him, to save you deleting real squad members.
How It Works
This example relies on the fact that the Deleting event is raised before the actual action takes place, which gives you the opportunity to cancel the event. One of the keys to how this works are the parameters of the event procedure, the declaration of which is shown here:
Protected Sub DetailsDataSource_Deleting(ByVal sender As Object,
ByVal e As System.Web.UI.WebControls.SqlDataSourceCommandEventArgs) Handles DetailsDataSource.Deleting
You can see that the second parameter provides extra information, but not only that it allows you to send information back to ASP.NET. One of the properties of the parameter e is called Cancel, and if you set this to True, the event will be cancelled and the action (the deletion) will not take place. Take a look at the code used to determine whether or not the player should be deleted.
You start with some declarations, which will be used to store date information:
Dim today As DateTime = DateTime.Now()
Dim startYear As Integer
Dim endYear As Integer
Dim seasonStart As DateTime
Dim seasonEnd As DateTime
204

Events and Code
The first line sets the variable today to the current date. The variables startYear and endYear indicate the year in which the season starts and ends, and seasonStart and seasonEnd are the actual dates for the start and end of the season.
To determine the start and end year you see if the current date is after May. If it is, you know that the season has ended, or is already under way, so the start year is the current year and the end year is
next year. If the current date is before May, you are in the second half of the season, so the start year was last year and the end year is the current year:
If today.Month > 5 Then startYear = today.Year endYear = today.Year + 1
Else
startYear = today.Year - 1 endYear = today.Year
End If
Next you create the actual start and end dates of the season, using the start and end year already set:
seasonStart |
= New DateTime(startYear, 8, |
20) |
‘ |
20 |
August |
seasonEnd = |
New DateTime(endYear, 5, 31) |
|
‘ |
31 |
May |
Now you check to see if the current date falls within the season start and end dates. If it does, you set the Cancel property of the parameter e to True, so when the event procedure ends the event action (the delete) will be cancelled. You also display a message to tell the user that players cannot be deleted during the season:
If today >= seasonStart And today <= seasonEnd Then e.Cancel = True
Message.Text = “Cannot delete players during the season”
If you are outside of the season, then players can be deleted, so you simply clear any message. Because you haven’t set the Cancel property of parameter e to True (it is False by default), the action will take place, and the player will be deleted:
Else
Message.Text = “”
End If
So what you’ve seen here is that some events can be cancelled, which allows you to build logic into your applications, enabling you to control the actions that are run. This also means that events that you think will run might not. For example, it was mentioned earlier that some of these events are paired. So, as well as the Deleting event, there is a Deleted event, and if you cancel the Deleting event the Deleted event isn’t run. The logic of this is shown in Figure 6-22.
205
Chapter 6
FirstName Chris
LastName Christopher
Position Left Back
PictureURL aaronson.jpg
Date Joined
Date Left
Edit Delete New

 SqlDataSource - DetailsDataSource
Deleting |
Deleted |
Event raised
Is deletion |
Yes |
|
|
Allowed? |
|
No |
|
Event |
Event |
Cancelled |
Runs |
Figure 6-22
This process is also the same for inserted and updated items, where the Inserting and Updating event procedures are used. In all three cases you can set the Cancel property of the parameter to True to cancel the event.
Global Events
So far in this chapter you’ve seen that events are raised by controls or by pages, but there is a third type of event — an application event. Application events are raised by ASP.NET in response to certain conditions, and these are stored in the Global Application Class, global.asax, a code-only file.
206

Events and Code
The global.asax page has several events:
Application_Start, which is raised when the application first starts. This is when the first user accesses the site and should be used to set any initial start conditions.
Application_End, which is raised when the application stops.
Session_Start, which is raised when a user starts a session. This is when the user starts accessing the site for the first time, and includes the time when a user closes the browser window and opens it again.
Session_End, which is raised when a user session ends. This isn’t when the browser window is closed, because sessions have a timeout — if there is no user activity within that time, the session ends.
Application_Error, which is raised when an unhandled error occurs.
Profile_OnMigrateAnonymous, which is raised when an anonymous user logs in, and allows migration of any Profile properties.
You can create a Global Application Class in the same way as adding normal Web Forms, and when created, the first four events in the preceding list will be created for you. They’ll have no code, but will be ready for you to add code if you need it.
In the Wrox United application, none of the first four events are used, but the latter two are. The Application_Error event is covered in Chapter 15, which looks at error handling, and the Profile_OnMigrateAnonymous event is covered in Chapter 11, which looks at the Profile.
Summar y
This chapter covered a lot about events, and you’ve seen that they can be raised under a number of different circumstances. First you looked at the ASP.NET page itself, where an event is raised when the page is loaded, which allows you to take some action before anything is shown to the user. Additionally, this chapter examined the following topics:
The ASP.NET page has the IsPostback property that allows you to identify whether this is the first time the page has been displayed, or whether the user has clicked a button.
Button controls, where an event is raised when the user clicks the button. You saw that similar types of controls (the Button and ImageButton controls) have similar events (the Click event).
Events that are raised by ASP.NET itself, both directly (such as the binding of data from a database) and indirectly (such as updating database records). These events give you an opportunity to interact with the process of displaying or updating data, and allow you to fine tune the interface and provide user feedback.
How some events can be cancelled, thus canceling any action they trigger, such as another event. In the example you saw that you can stop the deletion of data by using an event procedure.
207

Chapter 6
Now that you’ve had a look at events, and especially some related to data, it’s time to look at databases in more depth. The next chapter looks at some of the data controls and shows you how data can be fetched from the database and displayed for easy use by the user.
Exercises
1.In the Chapter06 project create a new Web Form called Lists.aspx and add a ListBox control to the page, and add three list items with values of One, Two, and Three. Add a Label control and a Button control to the page. In the Click event of the Button, display the selected value of the ListBox in the Label.
2.Modify Exercise 1 so that just selecting an item in the list posts back to the server (meaning you don’t need to click the button). You’ll need to add an event procedure to the ListBox, and in that event procedure you can use the same code from the Click event of the Button to display the selected value in the Label. Hint: The terms postback and automatic might be useful in your hunt for correct properties.
3.Modify the EditSquad.aspx example so that the GridView is refreshed when a new player is added to the squad. The technique is similar to the code you already have, but you’ll need to use a different event. Remember that you can use the drop-down lists in the code view to find the events.
208