

Beginning ASP.NET 2
.0.pdfPage Design
Figure 3-32
Figure 3-33
89

Chapter 3
Figure 3-34
Figure 3-35
90

Page Design
Figure 3-36
How It Works
In this example, you’ve added a simple SiteMapPath control to a modified version of the Wrox United web site to give users some visual feedback as to which page is being viewed, and where in the site hierarchy that page resides. Adding the control to the page is enough to achieve this, because there is a Web.SiteMap file included in the application files.
The SiteMapPath control hooks in to the Web.SiteMap (if it exists) and renders content dynamically by figuring out which page the user is currently viewing, and where that page is situated in relation to the order of nodes in the site map. Here’s the Web.SiteMap code that relates to the nodes you looked at:
<siteMap>
<siteMapNode title=”Home” url=”Default.aspx” description=”Wrox United Home Page”>
...
<siteMapNode title=”About” description=”About the club” url=”about.aspx”> <siteMapNode title=”History” url=”History.aspx”
description=”The history of the club” />
91

Chapter 3
Notice that the History node resides within the About node, which in turn resides within the Home node, so when you look at the History page, you know that the page below must be the About page, and the root node is the Home node — which is exactly what you saw on the SiteMapPath control:
Home > About > History
If you’d navigated to a different part of the hierarchy (to either the Match Fixtures, Future Fixtures, or Past Fixtures pages), the display would have changed appropriately. So, navigating to
Fixtures.aspx?type=future would present the following:
Home > Fixtures > Future Fixtures
This is how the SiteMapPath control that was added to the page appears in code:
<div id=”breadcrumbs”>
<asp:SiteMapPath ID=”crumbs” runat=”server”> </asp:SiteMapPath>
</div>
Without customizing the control at all (no specific attributes have been set), the nodes are rendered. The style used for the control is all controlled in the style sheet for the page (Chapter 5 looks at styling pages).
SiteMapPath Control Properties
In the previous Try It Out you added a SiteMapPath control without modifying it in any way and the list of nodes was displayed. If you’d modified it to change the number of levels displayed, it could have been used in quite a different way; perhaps to be used to display the name of the current page in a header, for example:
<asp:SiteMapPath ID=”PageTitle” Runat=”server” ParentLevelsDisplayed=”0”> </asp:SiteMapPath>
So, with this modification, the site map node would display only the name of the current page; in the case of History.aspx, the SiteMapNode would simply say History.
Another modification that could be made would be to change the path separator character, for example:
<asp:SiteMapPath ID=”crumbs” runat=”server” PathSeparator=” : “> </asp:SiteMapPath>
Again, if you were then to navigate to the History.aspx page, you’d see the following:
Home : About : History
In addition to these two properties, you can set many other attributes to customize this control. The following table describes some of these properties in a bit more detail.
92

|
|
|
Page Design |
|
|
|
|
|
|
|
|
|
Attribute |
Description |
Options (default in bold) |
|
|
|
|
|
RenderCurrentNodeAsLink |
Specifies whether the active |
True / False |
|
|
node is clickable, or whether |
|
|
|
the current node appears as |
|
|
|
plain text. |
|
|
PathDirection |
Sets whether the breadcrumbs |
RootToCurrent / |
|
|
appear in order from the root |
CurrentToRoot |
|
|
link to the current link (from |
|
|
|
left to right) or vice versa. |
|
|
PathSeparator |
Sets the character to use as the |
>, any ASCII character |
|
|
separator marker between nodes. |
|
|
|
|
|
Having looked at how the SiteMapPath control works, it’s time to move on to look at the remaining two navigation controls: the Menu control and the TreeView control. However, to use these controls on a page, you need to add a different type of control to provide the data to these controls; the
SiteMapDataSource control.
The SiteMapDataSource Control
This control is a non-visual control, and is used to expose the nodes defined in the Web.SiteMap file in a way that the Menu and TreeView controls can understand, and to make it possible to amend the content that these controls will display.
To add this control to a site, you only have to drag a copy onto a page. That’s all there is to it. The code that’s generated for you will appear as follows in Source View:
<asp:SiteMapDataSource ID=”SiteMapDataSource1” runat=”server” />
In the next Try It Out example, you will do this for yourself so that you will be able to use the Menu control. The Menu control is used in the full Wrox United site to provide the means to navigate the Wrox United site, so you won’t have to keep typing in links; let’s see how this works in connection with the
SiteMapDataSource control.
The Menu Control
The Menu control provides a mixture of static and dynamic menu functionality. You have the option, when you add this control to a page, of making the menu completely dynamic if you want, so an entire navigational structure can be displayed in the menu, a bit like a Start menu. Alternatively, you can adopt a more traditional approach and opt for a fixed menu, or one mixing this functionality. The dynamic bits use client-side JavaScript that ASP.NET generates for you (again, without you having to lift a finger).
In order to add a menu control to the site, you first need to add the SiteMapDataSource control, which specifies what links your menu will have access to and the order in which they appear. You’ll do both of these now in a Try It Out example based on the WroxUnited application.
93

Chapter 3
Try It Out |
Adding a Menu Control to Wrox United |
1.Open up site.Master once again and switch to Design View. Position your cursor in the nav div on the left of the page, as shown in Figure 3-37.
Figure 3-37
94

Page Design
2.Now drag a SiteMapDataSource control (highlighted on the left in Figures 3-38 and 3-39) onto the page inside the nav div (you’ll find it hiding in the Data tool group on the Toolbox), and, in the Properties pane, rename the control siteData.
That’s all the groundwork you need to do — next, you’ll add the Menu control itself.
Figure 3-38
95
Chapter 3
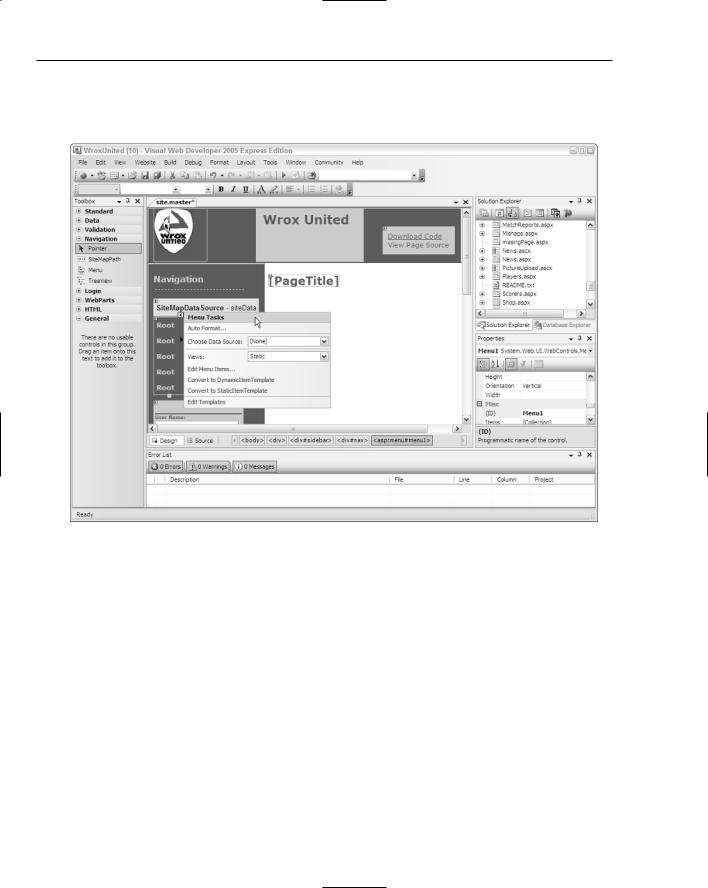
3.Drag a Menu control onto the page just next to the right edge of the SiteMapDataSource control. You will see a fly-out dialog appear as shown in detail in Figure 3-39 — this is the Smart Tasks window:
Figure 3-39
In the dialog, choose the siteData data source that you generated in Step 3. Once this has been set, the menu will change as shown in Figure 3-40:
96

Page Design
Figure 3-40
4.Click the small arrow at the top-right corner of the menu to close the pop-out menu. Now, with the menu selected, change the menu’s StaticDisplayLevels to 2 using the Properties pane. You’ll immediately notice a difference: have a look at Figure 3-41.
5.Some properties need to have values set before this control will work and behave as it does on the full version of Wrox United. Switch to Source View, and add the following properties in code:
<asp:Menu ID=”Menu1” runat=”server” DataSourceID=”siteData” StaticDisplayLevels=”2” orientation=”Vertical”
StaticSubMenuIndent=”0”
disappearafter=”200”
AccessKey=”m”
EnableViewState=”false”>
<DynamicMenuStyle CssClass=”dynamicMenu” /> <DynamicMenuItemStyle CssClass=”dynamicMenuItem” />
</asp:Menu>
97

Chapter 3
Figure 3-41
6.Now run the site again (press Ctrl+F5 to start without debugging) and you’ll see the screen shown in Figure 3-42.
Notice that you can hover over the About link and a flyout appears with submenu items, including the History page, displayed. This is out-of-the-box dynamic functionality at its finest — and isn’t it great?
98