

Beginning Ubuntu Linux - From Novice To Professional (2006)
.pdf248 |
C H A P T E R 1 5 ■ W O R K I N G W I T H T E X T F I L E S |
Figure 15-4. Use vi’s Command-Line mode to issue commands.
For a list of basic Command-Line mode commands, see Table 15-2.
Table 15-2. Some vi Command-Line Mode Commands
Command |
Description |
:w |
Save the file |
:w! |
Save the file and ignore errors such as an existing file with the |
|
same filename |
:q |
Quit vi |
:q! |
Quit vi and ignore errors such as an unsaved file |
:s/word/replacement/ |
Search from the cursor downwards and replace any instances of |
|
the word with the replacement 1 |
:help |
View help documentation |
|
|
1The search tool is very powerful and uses a number of command options for additional flexibility. Read the vi help file to learn more.
Using vi to Edit a File
As an example, let’s use vi to edit the OpenOffice.org README file. You don’t want to actually alter this file, so start by making a copy of it in your home directory:
cp /usr/lib/openoffice2/README ~
This will copy the file README01 to your /home directory, which you indicate using the ~ symbol.

C H A P T E R 1 5 ■ W O R K I N G W I T H T E X T F I L E S |
249 |
After this, you need to change the file’s permissions, because, by default, this file is readonly for all users (r--r--r--). Use the following command to change the permissions:
chmod +w README
Then fire up vi with the file, like this: vi README
■Note Windows makes a lot of use of file extensions in order to recognize files and therefore know what program to use to run them. By default, a file with a .doc extension tells Windows that it should use Microsoft Word to open the file, for example. Linux uses a different system based on the first few bytes of each file.
Because of this, file extensions are used within Linux simply to let the users know what type of file they’re dealing with. Often, they’re not used at all. If a file is called README, you can be fairly certain that it’s a text file, for example.
Once the file is opened, you’ll find yourself automatically in Command mode and will be able to move around the file using the cursor keys. Altering the text is achieved using various commands (see Table 15-1). For example, typing dd will delete the line of text that the cursor is currently within. Typing x will delete the letter under the cursor. Typing dw will delete the current word under the cursor. Try some of these to see how they work.
To actually edit a file and type text, you’ll need to switch to Insert mode. Type i to do this. Insert mode is fairly easy to understand. You can move around the text using the cursor keys, and then simply start typing wherever you want. The Backspace key will delete text behind the cursor, and the Delete key will delete text in front of the cursor.
When you’re finished, press the Esc key to return to Command mode. Once back in Command mode, you can page through the text. The Page Up and Page Down keys will move a screenful of text at a time. Pressing the up and down cursor keys will cause the screen to scroll when the cursor reaches the top or bottom.
After you’re finished editing, you’ll need to save the file. This is done in Command-Line mode. You can enter this mode by typing a colon (:). You’ll see a colon appear at the bottom of the screen, and this is where you type the commands. Note that after you type a command, you’ll immediately exit Command-Line mode, so if you want to issue another command, you’ll need to type a colon again.
To save a file, in Command-Line mode, type :w (which stands for “write”). If you want to save the current file with a different name, you’ll need to enter a filename after the w command, like this:
:w mytextfile
To quit vi, type :q. However, if you’ve edited a file, you won’t be able to quit until the file has been saved. If you want to save the file and then quit, you can type :wq. If you don’t want to save the file, type :q!. The exclamation point tells vi to override any objections it might have. You can also use it with the save command—:w!—to force the overwriting of a file that already exists.

250 |
C H A P T E R 1 5 ■ W O R K I N G W I T H T E X T F I L E S |
■Note If you don’t have the correct permissions to write a file, vi might tell you that you can use :w! to override. In this case, it’s wrong. The only way to write to a file for which you don’t have permissions is to change its permissions.
Creating a New Text File Using vi
Creating and editing a new file with vi is easy. From any command-line shell, simply type this:
vi myfile
This will start vi and give your new file a name. However, the file won’t be saved until you manually issue the save command (:w) in vi. This means that if your computer crashes before you save, the file will be lost!
■Note The version of vi provided with Ubuntu, vim, includes some elementary file-save protection. If, for any reason, vim is not shut down properly, there’s a chance you’ll be able to recover a version of file the next time vim starts. However, as with all such protection in any kind of program, you shouldn’t rely on this. You should use the :w command to save your file periodically.
As always with vi, you start out in the default Command mode. To start typing immediately, enter Insert mode by typing i. You’ll notice when typing that although the text is wrapped on each line, words are not carried over, and they often break across lines in an ugly way. This is because vi is primarily a text editor, not a word processor. For people who create text files, like programmers, having line breaks shown in this way can be useful.
When you’re finished typing a sentence or paragraph, you can press the Enter key as usual to start a new line. You should then be able to move between lines using the up and down cursor keys. You’ll notice an odd thing when you try to do this, however: unlike with a word processor, moving up a line of text that spreads across more than one line on screen will take the cursor to the start of the line, rather than into the middle of it. This again relates to vi’s text editor focus, where such a feature is useful when editing documents such as program configuration files.
When you’re finished, press the Esc key to switch to Command mode. Then type a colon to enter Command-Line mode. Type :w to save the file using the filename you gave it earlier. If you started vi without specifying a filename, you’ll need to specify a filename with the save command, such as :w myfile.

C H A P T E R 1 5 ■ W O R K I N G W I T H T E X T F I L E S |
251 |
USING GEDIT TO EDIT TEXT FILES
If all this talk of vi sounds like too much hard work, don’t forget that the GNOME desktop includes an excellent text editor in the form of Gedit. In fact, to describe Gedit as merely a text editor is to do it something of a disservice because it includes many handy word processor-like features.
You can call Gedit and open a file in it from the command-line prompt as follows:
gedit <filename>
If you need to adopt superuser powers to edit the likes of configuration files, simply preface it with sudo:
sudo gedit <filename>
You’ll find Gedit fairly straightforward to use.
Searching Through Files
You can search for particular words or phrases in text files by loading the file into less or vi (see Table 15-1). The maneuverability offered by both programs lets you leap from point to point in the text, and their use is generally user-friendly.
However, using vi or less can take precious seconds. There’s a quicker command-line option that will search through a file in double-quick speed: grep.
Using grep to Find Text
grep stands for Global Regular Expression Print. grep is an extremely powerful tool that can use pattern-based searching techniques to find text in files. Pattern-based searching means that grep offers various options to loosen the search so that more results are returned.
The simplest way of using grep is to specify some brief text, followed by the name of the file you want to search. Here’s an example:
grep 'helloworld' myfile
This will search for the phrase helloworld within myfile. If it’s found, the entire line that helloworld is on will be displayed on screen.
If you specify the * wildcard instead of a filename, grep will search every file in the directory for the text. Adding the -r command option will cause grep to search all the files, and also search through any directories that are present:
grep –r 'helloworld' *
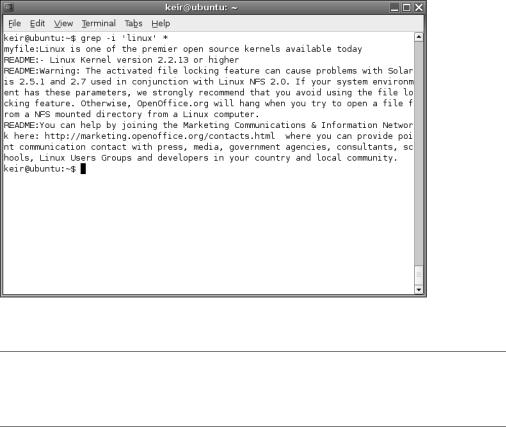
Another handy command option is -i, which tells grep to ignore uppercase and lowercase letters when it’s searching. Figure 15-5 shows an example of using grep.
252 |
C H A P T E R 1 5 ■ W O R K I N G W I T H T E X T F I L E S |
Figure 15-5. grep is a powerful tool that can search for text within files.
■Tip You might never choose to use grep for searching for text within files, but it can prove very handy when used to search through the output of other commands. This is done by “piping” the output from one command to another, as explained in Chapter 17.
Using Regular Expressions
The true power of grep is achieved by the use of search patterns known as regular expressions, or regexes for short. Put simply, regexes allow you to be vague rather than specific when searching, meaning that grep (and many similar tools that use the system of regexes, such as the find command discussed in Chapter 14) will return more results.
For example, you can specify a selection or series of characters (called a string in regex terminology) that might appear in a word or phrase you’re searching for. This can be useful if you’re looking for a word that might be spelled differently from how you anticipate, for example. The most basic form of regex is the bracket expansion. This is where additional search
terms are enclosed in square brackets within a search string. For example, suppose you want to find a file that refers to several drafts of a document you’ve been working on. The files are called myfile_1draft.doc, myfile_2draft.doc, and so on. To find any document that mentions these files, you could type this:
grep 'myfile_[1-9]draft\.doc' *
The use of square brackets tells grep to fill in details within the search string based on what’s inside the square brackets. In this case, 1-9 means that all the numbers from one to nine should be applied to the search string. It’s as if you’ve told grep to search for myfile_1draft.doc, and

C H A P T E R 1 5 ■ W O R K I N G W I T H T E X T F I L E S |
253 |
then told it to search for myfile_2draft.doc, and so on. Notice that the example has a backslash before the period separating the file extension from the filename. This indicates to grep that it should interpret the period as an element of the string to be searched for, rather than as a wildcard character, which is how grep usually interprets periods.
You don’t need to specify a range of characters in this way. You can simply enter whatever selection of characters you want to substitute into the search string. Here’s an example:
grep 'myfile[12345]\.doc' *
This will attempt to find any mention of myfile1.doc, myfile2.doc, myfile3.doc, and so on, in any file within the directory.
Here’s another example:
grep '[GgNn]ome' *
This will let you search for the word Gnome within files but takes into account any possible misspelling of the word by people who forget to use the silent G, and any use of uppercase or lowercase.
This is only scratching the surface of what regexes can do. For example, many regexes can be combined together into one long search string, which can provide astonishing accuracy when searching. Table 15-3 contains some simple examples that should give you an idea of the power and flexibility of regexes.
Table 15-3. Some Examples of Regular Expressions
Search String |
Description |
'document[a-z]' |
Returns any lines containing the string “document” followed by |
|
any single letter from the range a through z. |
'document[A-Za-z]' |
Returns any lines containing the string “document” followed by the |
|
letters A through Z or a through z. Note that no comma or other |
|
character is needed to separate possibilities within square brackets. |
'document.' |
Returns any lines containing the string “document” followed by |
|
any other character. The period is used as a wildcard signifying |
|
any single character. |
'document[[:digit:]]' |
Returns any lines containing the string “document” followed by |
|
any number. |
'document[[:alpha:]]' |
Returns any lines containing the string “document” followed by |
|
any character. |
'^document' |
Returns any lines that have the string “document” at the beginning. |
|
The caret symbol (^) tells grep to look only at the beginning of |
|
each line. |
'document$'
'document[^1-6]'
Returns any line that has the string “document” at the end of the line. The dollar sign symbol ($) tells grep to look for the string only at the end of lines.
Returns lines that have the string “document” in them but not if it’s followed by the numbers 1 through 6. When used in square brackets, the caret character (^) produces a nonmatching list—a list of results that don’t contain the string.

254 |
C H A P T E R 1 5 ■ W O R K I N G W I T H T E X T F I L E S |
grep is very powerful. It can be complicated to master, but it offers a lot of scope for performing extremely precise searches that ensure you find only what you’re seeking. It’s well worth reading through its man pages. You can also refer to books on the subject, of which there are many. A good example is Regular Expression Recipes: A Problem-Solution Approach, by Nathan A. Good (1-59059-441-X; Apress, 2004).
Comparing Text Files
If you want to compare the differences between two text files, one way to do this is to use the diff command. This is designed primarily to uncover small changes in otherwise identical documents, such as revisions made by another person. Of course, it can also be used to prove that two files are identical. If you run the files through diff, and it shows no output, it has been unable to spot any differences.
diff is ordinarily used like this:
diff mytextfile1 mytextfile2
If diff spots any differences between the files, the results are a little more complicated than you might be used to. Any lines that are different within the files will appear on screen. Those lines that are identical won’t be displayed. Lines preceded with a left angle bracket (<) are from the first file, while those with a right angle bracket (>) are from the second file.
For a different display, you could type something like this:
diff –y mytextfile1 mytextfile2
This places the two lists side-by-side and highlights lines that are different with a pipe symbol (|). However, it requires a lot more screen space than using diff without the -y option.
■Note When you use the -y command option with diff, it will struggle to fit the output in a standard GNOME Terminal window. If it is maximized on a 17-inch screen (1024×768 resolution), it should be just large enough to fit the information in, depending on the complexity of the files being compared.
By specifying the -a command option, you can make diff process binary files, too. This is a handy way of comparing virtually any kind of files, including program files, to see if they’re identical. If there’s no output from diff, then the two files are identical. If your screen fills with gibberish, then the files are clearly different.
Incidentally, if you want to compare three documents, you can use a very similar command: diff3. Check the command’s man page to learn more about how it works.
C H A P T E R 1 5 ■ W O R K I N G W I T H T E X T F I L E S |
255 |
Summary
In this chapter, we examined how text files can be manipulated. In many ways, the BASH shell is built around manipulating text, and we explored various tools created with this goal in mind. We started with the commands that can display text files (or part of them).
We then looked at how the vi text editor can be used to both edit and create documents. Next, we explored how regexes can be used with the grep command to create sophisticated search strings, which can uncover any text within documents. Finally, you saw how to compare text files.
In the next chapter, we’ll look at how you can use various command-line tools to take control of your system.

C H A P T E R 1 6
■ ■ ■
Taking Control of the System
By now, you should be starting to realize that the shell offers an enormous amount of power when it comes to administering your PC. The BASH shell commands give you quick and efficient control over most aspects of your Linux setup. However, the shell truly excels in one area: controlling the processes on your system.
Controlling processes is essential for administration of your system. You can tidy up crashed programs, for example, or even alter the priority of a program so that it runs with a little more consideration for other programs. Unlike with Windows, this degree of control is not considered out of bounds. This is just one more example of how Linux provides complete access to its inner workings and puts you in control.
Without further ado, let’s take a look at what can be done.
Viewing Processes
A process is something that exists entirely behind the scenes. When the user runs a program, one or many processes might be started, but they’re usually invisible unless the user specifically chooses to manipulate them. You might say that programs exist in the world of the user, but processes belong in the world of the system.
Processes can be started not only by the user, but also by the system itself to undertake tasks such as system maintenance, or even to provide basic functionality, such as the GUI system. Many processes are started when the computer boots up, and then they sit in the background, waiting until they’re needed (such as programs that send mail). Other processes are designed to work periodically to accomplish certain tasks, such as ensuring system files are up- to-date.
You can see what processes are currently running on your computer by running the top program. Running top is simply a matter of typing the command at the shell prompt.
As you can see in Figure 16-1, top provides very comprehensive information and can be a bit overwhelming at first sight. However, the main area of interest is the list of processes (which top refers to as tasks).
257