

Beginning Visual Basic 2005 (2006)
.pdfChapter 7
Figure 7-1
The first icon in Figure 7-1 has three names: Error, Hand, and Stop. The second icon has only one name: Question. The third icon has two names: Exclamation and Warning. The final icon in Figure 7-1 has two names: Asterisk and Information.
When building a Windows application, at times you need to prompt the user for information or display a warning that something did not happen or something unexpected happened. For instance, suppose the user of your application modified some data and is trying to close the application without saving the data. You could display a message box that carries an information or warning icon and an appropriate message — that all unsaved data will be lost. You could also provide OK and Cancel buttons to allow the user to continue or cancel the operation.
This is where the MessageBox dialog box comes in: It enables you to quickly build custom dialog boxes that prompt the user for a decision while displaying your custom message, a choice of icons, and a choice of buttons. All of this functionality also allows you to display a message box to inform users
of validation errors, and to display formatted system errors that are trapped by error handling.
Before you jump into some code, take a look at the MessageBox class. The Show method is called to display the MessageBox dialog box. The title, message, icons, and buttons displayed are determined by the parameters you pass to this method. This may seem complicated, but actually using MessageBox is very simple — as you have seen and will see in the following sections.
Available Icons for MessageBox
You saw the available icons in Figure 7-1. The following table outlines those four standard icons that you can display in a message box. The actual graphic displayed is a function of the operating system constants and (in the current implementations at least) there are four unique symbols with multiple field names assigned to them.
Member Name |
Description |
|
|
Asterisk |
Specifies that the message box displays an information icon |
Information |
Specifies that the message box displays an information icon |
Error |
Specifies that the message box displays an error icon |
Hand |
Specifies that the message box displays an error icon |
Stop |
Specifies that the message box displays an error icon |
Exclamation |
Specifies that the message box displays an exclamation icon |
Warning |
Specifies that the message box displays an exclamation icon |
Question |
Specifies that the message box displays a question mark icon |
None |
Specifies the message box will not display any icon |
|
|
206

Displaying Dialog Boxes
Available Buttons for MessageBox
There are several combinations of buttons that you can display in a message box. The following table outlines them.
Member Name |
Description |
|
|
AbortRetryIgnore |
Specifies that the message box displays Abort, Retry, and Ignore buttons |
OK |
Specifies that the message box displays an OK button |
OKCancel |
Specifies that the message box displays OK and Cancel buttons |
RetryCancel |
Specifies that the message box displays Retry and Cancel buttons |
YesNo |
Specifies that the message box displays Yes and No buttons |
YesNoCancel |
Specifies that the message box displays Yes, No, and Cancel buttons |
|
|
Setting the Default Button
Along with displaying the appropriate buttons, you can instruct the message box to set a default button for you. This allows the user to read the message and press the Enter key to invoke the action for the default button without having to click the button itself with the mouse. The following table outlines the available default button options.
Member Name |
Description |
|
|
Button1 |
Specifies that the first button in the message box should be the default button |
Button2 |
Specifies that the second button in the message box should be the default button |
Button3 |
Specifies that the third button in the message box should be the default button |
|
|
You set the default button relative to the MessageBox buttons, from left to right. Therefore, if you have the Yes, No, and Cancel buttons displayed and you choose the third button to be the default, Cancel will be the default button. Likewise, if you choose the third button to be the default and you have only OK and Cancel buttons, the first button becomes the default.
Miscellaneous Options
A couple of other options are available in the MessageBoxOptions enumeration and can be used with the message box and are shown in the following table.
207

Chapter 7
Member Name |
Description |
|
|
Default |
Specifies that the message box be displayed on the active desktop |
DesktopOnly |
|
RightAlign |
Specifies that the text in a message box will be right-aligned, as opposed |
|
to left-aligned, which is the default |
RTLReading |
Specifies that the text in a message box be displayed with the RTL (right- |
|
to-left) reading order; this applies only to languages that are read from |
|
right to left |
Service |
Specifies that the message box be displayed on the active desktop. |
Notification |
The caller is a Windows service notifying the user of an event. |
|
|
The Show Method Syntax
You call the Show method to display the message box. The following code example displays the message box shown in Figure 7-2. Notice that the code specifies the text that is displayed in the message box as the first argument, followed by the text that is displayed in the title bar. Then you specify the buttons that should be displayed, followed by the type of icon that should be displayed beside the icon. Lastly, you specify the button that you want to set as the default button — in this case Button1.
If you want to run this code, start a new Windows Application project, double-click the form in the Designer to generate the Form1_Load event, and place the following code inside that procedure:
MessageBox.Show(“My Text”, “My Caption”, MessageBoxButtons.OKCancel, _
MessageBoxIcon.Information, MessageBoxDefaultButton.Button1)
Figure 7-2
Now that you have seen the available icons, buttons, and default button fields, take a look at the Show method of the MessageBox class. You can specify the Show method in several ways; the more common syntaxes are shown in the following list:
MessageBox.Show(message text)
MessageBox.Show(message text, caption)
MessageBox.Show(message text, caption, buttons)
MessageBox.Show(message text, caption, buttons, icon)
MessageBox.Show(message text, caption, buttons, icon, default button)
208

Displaying Dialog Boxes
In the previous examples, message text represents the message that displays in the message box. This text can be static text (a literal string value) or supplied in the form of a string variable. The other parameters are optional:
Caption represents either static text or a string variable that will be used to display text in the title bar of the message box. If this parameter is omitted, no text is displayed in the title bar.
Buttons represents a value from the MessageBoxButtons enumeration. This parameter enables you to specify which of the available buttons to display in the MessageBox dialog box. If you omit this parameter, the OK button is displayed as the only button in the box.
Icon represents a value from the MessageBoxIcon enumeration. This parameter enables you to specify which of the available icons displays in the MessageBox dialog box. If you omit this parameter, no icon is displayed.
Default Button represents a value from the MessageBoxDefaultButton enumeration. This parameter enables you to specify which of the buttons is set as the default button in the MessageBox dialog box. If you omit this parameter, the first button displayed becomes the default button.
All the syntax examples shown in the previous section return a value from the DialogResult enumeration, which indicates which button in the MessageBox dialog box was chosen. The following table shows the available members in the DialogResult enumeration.
Member Name |
Description |
|
|
Abort |
The return value is Abort and is the result of clicking the Abort button |
Cancel |
The return value is Cancel and is the result of clicking the Cancel button |
Ignore |
The return value is Ignore and is the result of clicking the Ignore button |
No |
The return value is No and is the result of clicking the No button |
None |
Nothing is returned, which means the dialog box continues running until |
|
a button is clicked |
OK |
The return value is OK and is the result of clicking the OK button |
Retry |
The return value is Retry and is the result of clicking the Retry button |
Yes |
The return value is Yes and is the result of clicking the Yes button |
|
|
Example Message Boxes
Because multiple buttons can be displayed in a MessageBox dialog box, there are multiple ways to display a dialog box and check the results. Of course, if you were displaying only one button using the message box for notification, you would not have to check the results at all and could use a very simple syntax. This Try It Out demonstrates how to display two buttons in a message box and then check for the results from the message box to determine which button was clicked.
209

Chapter 7
Try It Out |
Creating a Two Button MessageBox |
1.Start Visual Studio 2005 and select File New Project from the menu. In the New Project dialog box, select Windows Application in the Templates pane and enter a project name of Simple MessageBox in the Name field. Click OK to have this project created.
2.Click the form in the Forms Designer and then set its Text property to Simple MessageBox.
3.You want to add a Button control from the Toolbox to the form that will display a message box. Set its Name property to btnShow and its Text property to Show.
4.Next, you want to add a Label control to the form. This label will display results depending on which button in the message box a user clicks. Set the Name property to lblResults and the Text property to Nothing Clicked. Resize the form so your completed form looks similar to the one shown in Figure 7-3.
Figure 7-3
5.Double-click the Show button and add the highlighted code in the Click event handler:
Private Sub btnShow_Click(ByVal sender As System.Object, _
ByVal e As System.EventArgs) Handles btnShow.Click
If MessageBox.Show(“Your Internet connection will be closed now.”, _ “Dial-Up Networking Notification”, MessageBoxButtons.OKCancel, _ Nothing, MessageBoxDefaultButton.Button1) = DialogResult.OK Then
lblResults.Text = “OK Clicked”
‘Call some method here...
Else
lblResults.Text = “Cancel Clicked” ‘Call some method here...
End If End Sub
6.Run the project and then click the Show button. You should see a message box dialog box like the one shown in Figure 7-4.
Figure 7-4
210

Displaying Dialog Boxes
7.Click the OK or Cancel button and you’ll see the results of the button clicked displayed on Form1.
How It Works
The code uses the Show method of the MessageBox class and uses an If . . . End If statement to see whether the user clicked the OK:
If MessageBox.Show(“Your Internet connection will be closed now.”, _ “Dial-Up Networking Notification”, MessageBoxButtons.OKCancel, _ Nothing, MessageBoxDefaultButton.Button1) = DialogResult.OK Then
Notice that the code specifies that the OK and Cancel buttons are to be displayed in the dialog box and also that the OK button is to be the default button.
You have to specify something for the icon parameter, because this is required when you want to set the default button parameter. You did not want to display an icon, so you used the Nothing keyword.
Also notice that you check the results returned from MessageBox using DialogResult.OK. You could have just as easily have checked for DialogResult.Cancel and written the If . . . End If statement around that.
This is great if you want to test the results of only one or two buttons. But what happens when you want to test the results from a message box that contains three buttons?
Try It Out |
Testing a Three Button MessageBox |
1.Stop your project if it is still running and open the Forms Designer for Form1.
2.Add another Button control and set its Name property to btn3Buttons and its Text property to 3 Buttons. Double-click the button and add the highlighted code to its Click event handler:
Private Sub btn3Buttons_Click(ByVal sender As System.Object, _
ByVal e As System.EventArgs) Handles btn3Buttons.Click
‘Declare a variable
Dim intResult As DialogResult
‘Get the results of the button clicked
intResult = MessageBox.Show(“The A drive is not ready.” & _ ControlChars.CrLf & ControlChars.CrLf & _
“Please insert a diskette into the drive.”, “Device Not Ready”, _ MessageBoxButtons.AbortRetryIgnore, MessageBoxIcon.Error, _ MessageBoxDefaultButton.Button2)
‘Process the results of the button clicked Select Case intResult
Case DialogResult.Abort
‘Do abort processing here...
lblResults.Text = “Abort Clicked” Case DialogResult.Retry
‘Do retry processing here...
211

Chapter 7
lblResults.Text = “Retry Clicked” Case DialogResult.Ignore
‘Do ignore processing here...
lblResults.Text = “Ignore Clicked” End Select
End Sub
3.Run the project and click the 3 Buttons button. The message box dialog box shown in Figure 7-5 will be displayed and shows an icon and three buttons. Notice that the second button is the default this time around.
Figure 7-5
How It Works
The Show method returns a DialogResult, which is an Integer value. What you need to do in a case where there are three buttons is to capture the DialogResult in a variable and then test that variable.
In the following sample code, the first thing you do is declare a variable as a DialogResult to capture the DialogResult returned from the message box dialog box. Remember that the results returned from the dialog box are nothing more than an enumeration of Integer values. Next, you set the DialogResult in the variable.
‘Declare a variable
Dim intResult As DialogResult
‘Get the results of the button clicked
intResult = MessageBox.Show(“The A drive is not ready.” & _ ControlChars.CrLf & ControlChars.CrLf & _
“Please insert a diskette into the drive.”, “Device Not Ready”, _ MessageBoxButtons.AbortRetryIgnore, MessageBoxIcon.Error, _ MessageBoxDefaultButton.Button2)
Notice that the message in the Show method syntax is broken up into two sections separated with ControlChars.CrLf. This built-in constant provides a carriage-return-line-feed sequence, which allows you to break up your message and display it on separate lines.
Finally, you test the value of the intResult in a Select Case statement and act on it accordingly:
‘Process the results of the button clicked Select Case intResult
212

Displaying Dialog Boxes
Case DialogResult.Abort
‘Do abort processing here...
lblResults.Text = “Abort Clicked” Case DialogResult.Retry
‘Do retry processing here...
lblResults.Text = “Retry Clicked” Case DialogResult.Ignore
‘Do ignore processing here...
lblResults.Text = “Ignore Clicked” End Select
In each of the Case statements, you write the name of the button selected in the label to indicate which button was clicked.
Now you have a general understanding of how the MessageBox dialog box works and you have a point of reference for the syntax. To familiarize yourself further with the MessageBox, try altering the values of the caption, text, buttons, icon, and button parameters in the previous examples.
Be careful not to overuse the MessageBox and display a message box for every little event. This can be a real annoyance to the user. You must use common sense and good judgment on when a message box is appropriate. You should display a MessageBox dialog box only when you absolutely need to inform the users that some type of error has occurred or when you need to warn the users that an action that they have requested is potentially damaging. An example of the latter is shutting down the application without saving their work. You would want to prompt the users to let them know that, if they continue, they will lose all unsaved work and give them an option to continue or cancel the action of shutting down the application.
The OpenDialog Control
A lot of Windows applications process data from files, so you need an interface to select files to open and save. The .NET Framework provides the OpenFileDialog and SaveFileDialog classes to do just that. In this section you’ll take a look at the OpenFileDialog dialog control, and in the next section you’ll look at the SaveFileDialog control.
When you use Windows applications, such as Microsoft Word or Paint, you see the same basic Open dialog box. This does not happen by accident. There is a standard set of application programming interfaces (API) available to every developer that allows you to provide this type of standard interface; however, using the API can be cumbersome and difficult for a beginner. Fortunately, all of this functionality is already built into the .NET Framework, so you can use it as you develop with Visual Basic 2005.
The OpenFileDialog Control
You can use OpenFileDialog as a .NET class by declaring a variable of that type in your code and modifying its properties in code, or as a control by dragging the control from the Toolbox onto the form at design time. In either case, the resulting objects will have the same methods, properties, and events.
213
Chapter 7
You can find the OpenFileDialog control in the Toolbox under the Windows Forms tab, where you can drag and drop it onto your form. Then, all you need to do is set the properties and execute the appropriate method. To use OpenFileDialog as a class you declare your own objects of this type in order to use the dialog box. Then you have control over the scope of the dialog box and can declare an object for it when needed, use it, and then destroy it, thereby using fewer resources.
This section focuses on using OpenFileDialog as a control. Once you have a better understanding of this dialog box and feel comfortable using it, you can then expand your skills and use OpenFileDialog as a class by declaring your own objects for it. Using classes and objects is discussed in greater detail in Chapter 10.
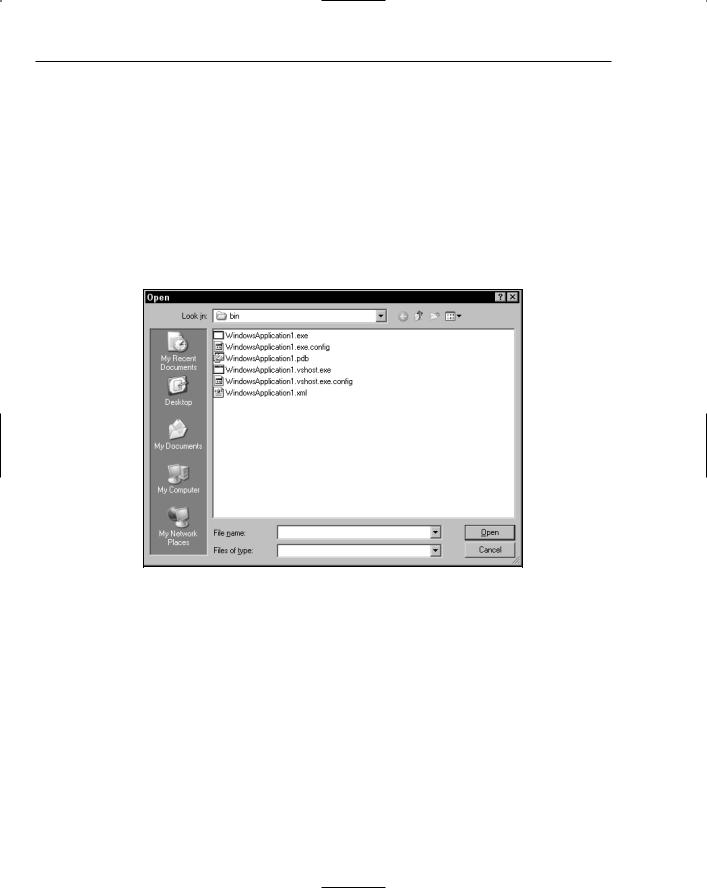
You can use OpenFileDialog by simply invoking its ShowDialog method, producing results similar to that shown in Figure 7-6.
Figure 7-6
The Properties of OpenFileDialog
Although the dialog box shown in Figure 7-6 is the standard Open dialog in Windows, it provides no filtering. You see all file types listed in the window and are unable to specify a file type for filtering, because no filters exist. This is where the properties of OpenFileDialog come in. You can set some of the properties before the Open dialog box is displayed, thereby customizing the dialog box to your needs.
The following table lists some of the available properties for the OpenFileDialog control.
214

|
|
Displaying Dialog Boxes |
|
|
|
|
Property |
Description |
|
|
|
|
AddExtension |
Indicates whether an extension is automatically added to a file- |
|
|
name if the user omits the extension. This is mainly used in the |
|
|
SaveFileDialog, which you will see in the next section. |
|
CheckFileExists |
Indicates whether the dialog box displays a warning if the user |
|
|
specifies a filename that does not exist. |
|
CheckPathExists |
Indicates whether the dialog displays a warning if the user speci- |
|
|
fies a path that does not exist. |
|
DefaultExt |
Indicates the default filename extension. |
|
DereferenceLinks |
Used with shortcuts. Indicates whether the dialog box returns the |
|
|
location of the file referenced by the shortcut (True) or whether it |
|
|
returns only the location of the shortcut itself (False). |
|
FileName |
Indicates the filename of the selected file in the dialog box. |
|
FileNames |
Indicates the filenames of all selected files in the dialog box. This is |
|
|
a read-only property. |
|
Filter |
Indicates the current filename filter string, which determines the |
|
|
choices that appear in the Files of type: combo box in the dialog |
|
|
box. |
|
FilterIndex |
Indicates the index of the filter currently selected in the dialog box. |
|
InitialDirectory |
Indicates the initial directory displayed in the dialog box. |
|
Multiselect |
Indicates whether the dialog box allows multiple files to be |
|
|
selected. |
|
ReadOnlyChecked |
Indicates whether the read-only check box is selected. |
|
RestoreDirectory |
Indicates whether the dialog box restores the current directory |
|
|
before closing. |
|
ShowHelp |
Indicates whether the Help button is displayed in the dialog box. |
|
ShowReadOnly |
Indicates whether the dialog box contains a read-only check box. |
|
Title |
Indicates the title that is displayed in the title bar of the dialog box. |
|
ValidateNames |
Indicates whether the dialog box should only accept valid WIN32 |
|
|
file names. |
|
|
|
The Methods of OpenFileDialog
Although many methods are available in the OpenFileDialog, you will be concentrating on the Show Dialog method in these examples. The following list contains some of the other available methods in OpenFileDialog:
Dispose releases the resources used by the Open dialog box.
OpenFile opens the file selected by the user with read-only permission. The file is specified by the FileName property.
215