

Hacking Wireless Networks For Dummies
.pdf130 Part II: Getting Rolling with Common Wi-Fi Hacks
At Layer 3, you can use a tool such as AiroPeek, CommView for WiFi, or any other programmable sniffer (say, NFR) to look for either the obvious network anomalies or the second-order effects of some of dsniff’s active attacks. If you want to learn how to use a packet analyzer for security, try one of Laura Chappell’s network analysis or troubleshooting books that you can download for a fee from www.packet-level.com/books.htm.
Also, anti-sniffing programs such as l0pht’s AntiSniff (http://packet stormsecurity.nl/sniffers/antisniff/) can uncover dsniff’s passive monitoring tools.

Chapter 9
Wardriving
In This Chapter
Installing and configuring Network Stumbler
Running NetStumbler
Interpreting the results
Mapping and viewing the results
When most people think of wireless security (or the lack of it), they think of someone driving around their neighborhood discovering their
access point and trying to connect. This is a striking image: A nerd in a car by himself with his beloved laptop and some arcane software. It’s an activity called wardriving, and though it seems hostile at first blush, the reality is actually a lot more diverse. In effect, wardriving is an educational opportunity for everyone — especially for ethical hackers. Peter, for example, actually goes wardriving with his teenage daughter. After all, the family that drives together, strives together.
In this chapter, we take our first look at wardriving. To understand this genre of software, we will look at Network Stumbler (a.k.a. NetStumbler). We’ll also see how to map the results of your work. In Chapter 10, we discuss other examples of wardriving software, such as Kismet and Wellenreiter.
Introducing Wardriving
The term wardriving is derived from the phrase war dialing. But it really doesn’t involve guns or offensive weapons of any kind. Wardriving is just the term coined for wireless network discovery. Nothing more or less. In Chapter 4, we outlined the tools you need for your wardrive, but all you need to wardrive is some software and a wireless network interface card or adapter. If you really want to get into it, you can add an external antenna to enhance the signal strength of any access points that you find. This enables you to detect these access points at a greater distance than when you were
only using the built-in antenna of your wireless NIC alone. You could also add a global positioning system (GPS) to map the latitude and longitude of the networks you find.

132 Part II: Getting Rolling with Common Wi-Fi Hacks
Driving a car and watching your computer is a dangerous activity. It may even be illegal. So when you go wardriving, please take someone with you so you can concentrate on the road. We don’t want you ending up as “warkill.”
Network Stumbler is the application for wardrivers who favor the Windows platform. It runs on Windows 3.9x, Me, 2000, and XP. NetStumbler uses the active scanning method to discover access points; and when it’s equipped with a GPS unit, it records the latitude and longitude of any discovered access points. You can later graph the recordings with mapping software.
NetStumbler uses the active scanning method described by the IEEE 802.11 specification to discover wireless networks. It sends multiple probe requests, and records probe responses. You may wonder why this would work, but when you think about it, it makes perfect sense. The developers of this standard made the active scanning option available so clients with multiple unique networks could find all of their available networks.
Once an access point receives a probe request, it typically responds with a probe-response management frame containing the network BSSID and the WLAN SSID. Some access points can “cloak” their SSID by responding to probe requests with only a single space for the SSID, forcing users to have prior knowledge of the network SSID before joining the networks. NetStumbler cannot report access points that cloak their SSID. You’ll need to skip to Chapter 10 and read about Kismet in that case.
When NetStumbler locates a network, it records the following information:
The signal, noise, and signal-to-noise ratio (SNR) of the discovery: This simplistically can indicate how close you are to the device.
The operating channel: In North America, this is a number between 1 and 11.
Basic SSID (BSSID): This is actually the MAC address of the access point.
Service Set Identifier (SSID): The SSID is a 32-character unique identifier for the network embedded to the header of frames sent over a WLAN.
The access point’s “nickname”: This is the access point’s name.
NetStumbler also has a very useful way of graphing the signal strength of the received APs and other Wi-Fi clients in your surrounding area. This signal strength meter may be used with a directional antenna (such as a cantenna) to help figure out the location of the signal.
We know you want to get started. So let’s go.
Chapter 9: Wardriving 133
Installing and Running NetStumbler
Installing NetStumbler is easy. Go to www.netstumbler.com/downloads/ and download it. Run the self-installer and you will have the usual Windows installation-wizard experience. When prompted, select to install all options. You can always delete the shortcut or move things later. If you want to view the files you’ve installed and their locations, you can do so by clicking the Show details button. You may want to read the README file before you start using NetStumbler.
Running NetStumbler is as easy. Either double-click the Network Stumbler icon on the desktop or choose Network Stumbler under All Programs from the Start menu. Then you see the NetStumbler 0.4.0 splash screen, which shows the adapter, driver information, and MAC address. When NetStumbler starts, it needs no prompting: It immediately attempts to open a new document, locate a wireless adapter and a GPS, and start scanning. NetStumbler starts to capture data in a file labeled YYYYMMDDHHMMSS.ns1, which is based on the date and time of the capture.
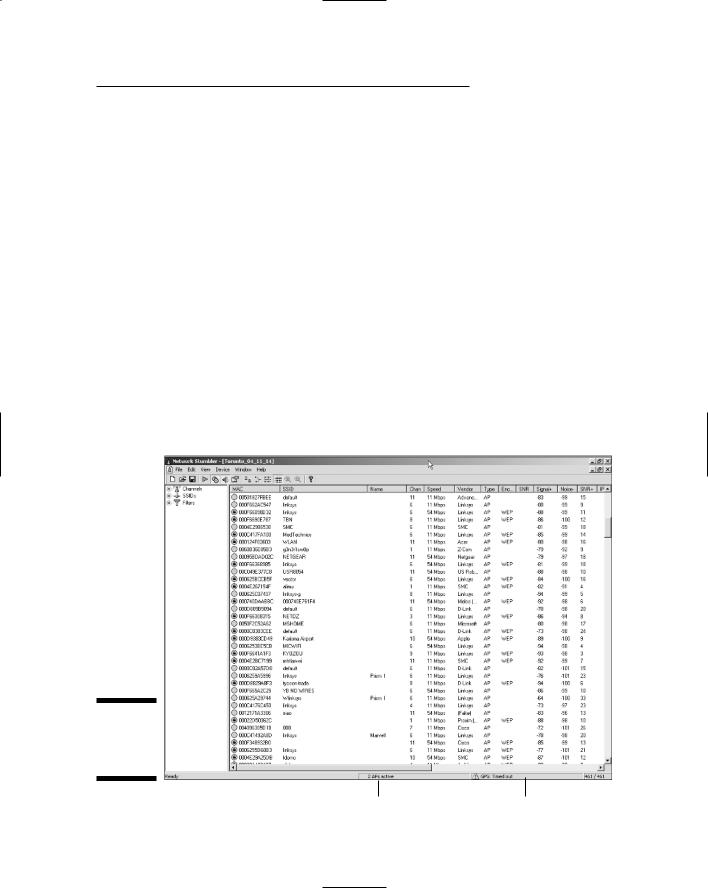
Figure 9-1 gives you an example of what you see when you start NetStumbler.
Figure 9-1:
Network
Stumbler
window.
Active access points |
Status information |

134 Part II: Getting Rolling with Common Wi-Fi Hacks
Setting Up NetStumbler
After NetStumbler starts, you may want to set the options to maximize your wardriving experience.
Figure 9-1 shows data from an actual wardriving session, shot after the session. Looking at the window, you can see a left and a right pane. The status bar beneath the panes provides some valuable information. The message in the middle of the status bar tells you how many access points are active. To the right of that is the status information. You can find descriptions of the possible status messages in Table 9-1. The last piece of information on the far right tells you how many networks NetStumbler found. In our case, it found 461. The number before the slash tells you how many networks meet the criteria or filter that you selected from the left pane. If you are looking at the main screen and not filtering anything, then the first and second number are the same. Anytime you select anything from the left-hand pane, the first number will change. For example, when I select the Encryption Off under Filters, the number is 253 of 461, or about 55 percent of my neighbor’s networks don’t use encryption. (You can get a closer look at the two panes later in the chapter, after we talk about the setup options.)
Table 9-1 |
Status Message |
Message |
Description |
Card not present |
Wi-Fi card not detected. Make sure you have installed a |
|
wireless NIC. |
|
|
A device attached |
Problem working with the Wi-Fi card. Switch interface |
to the system is not |
mode on the device menu. |
functioning |
|
|
|
Not scanning |
Scanning is not enabled. Click the arrow or start from the |
|
File menu. |
|
|
No APs active |
Wi-Fi card is working, but not detecting any networks at |
|
the time. |
|
|
x APs active |
Wi-Fi card is working and detecting x number of networks. |
|
|
GPS: Acquiring |
NetStumbler is receiving a message from the GPS. |
|
|
GPS: Disabled |
The GPS is disabled. Start it to record network |
|
coordinates. |
|
|
GPS: Disconnected |
The GPS was working but stopped. Check the GPS power. |
|
|

|
|
|
Chapter 9: Wardriving 135 |
|
|
|
|
||
|
|
|
|
|
|
Message |
Description |
|
|
|
GPS: Listening |
NetStumbler is attempting to make a connection to the |
||
|
|
GPS. |
||
|
|
|
|
|
|
GPS: No position fix |
The GPS is working but cannot find a signal. Move the |
||
|
|
GPS or your laptop. |
|
|
|
GPS: Port unavailable |
The communication port is locked by another program, |
||
|
|
such as Streets & Trips. Close the other program and try |
||
|
|
again. |
||
|
|
|
|
|
|
GPS: Timed out |
A connection could not be made to the GPS. Try a differ- |
||
|
|
ent port or turn the GPS on. |
|
|
|
GPS: N:x W:y |
Indicates your GPS is working, and these are your |
||
|
|
coordinates. |
||
|
|
|
|
|
|
x/y |
Currently displaying the x AP in the list of y APs. |
||
|
|
|
|
|
You’ll also see that there is the usual Windows drop-down menus, such as File and Edit. There also are some icons that we will discuss shortly. The logical place to start is with the menus. Under the File menu, you see New, Open, Close, and Save As. These features work similar to any other Windows-based program. There is a Merge feature that allows you to merge a previous scan with the current one. This allows you to merge all your scans into one scan. Another option on the File menu is Export. We cover exporting files in Summary, Text, or Wi-Scan format later in the chapter. You can use File Enable to start the scan when you previously disabled it. (If Enable is not checked, then it is not enabled.) Alternatively, you can use Ctrl+B to enable a scan.
There are many choices under the View menu. First, you can decide whether you want to display the Toolbar at the top of the window or the Status Bar at the bottom of it. You use the Split option to size the two panes. Of course, you can select the bar running between the two panes and drag it either left or right. Select either Large Icons or Small Icons depending on your eyesight. Similarly, select either List or Details to change the amount of information displayed in the right pane. Zoom In/Zoom Out is sometimes grayed out, but you can use it with the Signal/Noise view to zoom in or out. Should you wish, you can use the Arrange Icons to view the icons By Name or let the program do it when you select Auto Arrange. Also, you can use the Line up Icons option to line up the icons in the right pane in List view. You can save the defaults by selecting Save Defaults. Network Stumbler displays information using the 8-point MS Sans Serif regular font style. Don’t like this font? Then change it by selecting Font. The last selection under View is Options, which we detail later in the chapter.
Use the Device menu to select the device when you have more than one to use for scanning. In Figure 9-2 you can see the drop-down menu with multiple devices to select for your scan.

136 Part II: Getting Rolling with Common Wi-Fi Hacks
Figure 9-2:
Network
Stumbler
devices.
The Window menu allows you to adjust the window panes. And the Help menu offers the usual help information. (You may find older versions of NetStumbler that had no help information.)
Next, set up the options: Select Options from the View menu and you should see a dialog box like that shown in Figure 9-3.
Figure 9-3:
Network
Stumbler
general
options.
The next subsections take a look at the tabs, starting with the General tab, which is shown on top when you select Options.

Chapter 9: Wardriving 137
Selecting General options
For scan speed, there’s a sliding scale from Slow to Fast on the left side of the General tab. Use the information in Table 9-2 as a rule of thumb for setting this parameter for your stumbling.
Table 9-2 |
Scan Speed Settings |
|
Setting |
Interval |
Description |
Slow |
1.50 seconds |
For walking |
|
|
|
- |
1.25 seconds |
For fast walking, jogging, and |
|
|
inline skating in a crowd |
Midpoint |
1.00 seconds |
For inline skating and biking |
|
|
|
- |
0.75 seconds |
For low-speed driving up to 25 |
|
|
Mph (about 40 Km/h) |
|
|
|
Fast |
0.50 seconds |
For driving above 25 Mph |
|
|
(about 40 KM/h) |
|
|
|
Table 9-3 describes the remaining parameters for the dialog box.
Table 9-3 |
General Scan Options |
Option |
Description |
Auto adjust using GPS |
Use this parameter to use your GPS positioning to deter- |
|
mine the scan speed. It automatically adjusts the scan |
|
speed to the GPS velocity measurement. As your GPS |
|
reports speeds to NetStumbler, the timer frequency is set |
|
in the range of 2 to 6 times per second. |
New document |
Use this parameter to force a new scan when you open a |
starts scanning |
new document. |
|
|
Reconfigure card |
Use this parameter to allow NetStumbler to reconfigure |
automatically |
your wireless card using a null SSID and BSS mode. If you |
|
use this mode, then you may end up disassociated from an |
|
access point. |
|
|
Query APs for names |
Use this parameter to ask the device whether it supports |
|
names so NetStumbler can record the names. |
|
|
Save files |
Use this file to save the current scan file automatically — |
automatically |
every 5 minutes and when you close NetStumbler. |
Those are the General options. Click the Display tab to see further options.

138 Part II: Getting Rolling with Common Wi-Fi Hacks
Selecting Display options
The Display options are really the Display option, since there is only one — the angle format. What you see in Figure 9-4 is a drop-down list controlling the GPS latitude-and-longitude format. The default value is degrees and minutes to the one-thousandth — in the format DºMM.MMM. The other options follow:
Degrees to the ten-thousandth, in the format D.DDDDº
Degrees to the hundred-thousandth, in the format D.DDDDDº
Degrees and minutes, and ten-thousandths of a minute, in the format DºMM.MMMM
Degrees, minutes, and seconds, in the format DºM_S_
Degrees, minutes, seconds, and hundredths of a second in the format DºM_S.SS_
Figure 9-4:
Display options.
You’ll probably want to leave the default alone unless you have a compelling reason to change it (this assumes you understand why you may want to change it).
Selecting GPS options
Click the GPS tab and you should see a dialog box like the one in Figure 9-5.
Figure 9-5:
GPS options.

Chapter 9: Wardriving 139
Table 9-4 lists the parameters, describes them, and provides the options or settings you may choose.
Table 9-4 |
GPS Options |
|
Option |
Description |
Settings |
Protocol |
Format of the GPS data |
NMEA 0183, Earthmate, |
|
|
Garmin Binary, Garmin Text, |
|
|
or Tripmate |
|
|
|
Bits per second |
Transfer rate from the GPS |
110 to 256000 |
|
|
|
Data bits |
Number of bits used |
5 to 8 |
|
for data |
|
|
|
|
Parity |
Parity bits |
Mark, One, Odd, or Space |
|
|
|
Port |
Communication port |
Disabled or COM1 to COM16 |
|
for the GPS |
|
|
|
|
Stop bits |
Number of bits used for |
1, 1.5, or 2 |
|
communication |
|
|
|
|
Flow control |
Handshaking protocol |
None, Hardware, or Xon/Xoff |
|
|
|
The NMEA standard sends a signal to NetStumbler every 2 seconds, whereas the Garmin standard sends it once per second.
Check the manual that comes with your GPS; it should tell you the settings you need.
Selecting Scripting options
NetStumbler lets you modify its operation through the use of scripts. You may choose to use common scripting languages such as PerlScript, Python, VBScript, Jscript, Windows Script Components, Windows Script Host, and Windows Script Runtime version. After you write your script, install it on the same system as Network Stumbler and then make it known by clicking the Scripting tab of the Network Stumbler Options dialog box. Do so and you should see the options shown in Figure 9-6.
Select the Type, File name, scripting Language, and Status of the script. Then when NetStumbler starts, it will execute the script. You can find a scripting guide at www.stumbler.net/scripting.html. Also, you might want to check out the Scripts Forum at
http://forums.netstumbler.com/forumdisplay.php?s=&forumid=24