

9 - 70 3.0L ENGINE |
|
Ä |
|
(5) Engine mount adjustment, Refer to Engine Mount Insulator Adjustment of this section.
LEFT SIDE MOUNT
(1)Raise vehicle on hoist and remove left front wheel.
(2)Remove inter splash shield.
(3)Support the transmission with a transmission
jack.
(4)Remove the insulator thru bolt from the mount.
(5)Remove the transmission mount fasteners and remove mount.
(6)Reverse removal procedure for installation. Refer to (Fig. 3) for bolt tightening specifications.
(7)Engine mount adjustment, Refer to Engine Mount Insulator Adjustment of this section.
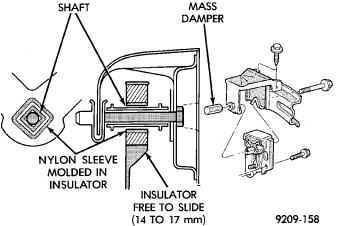
ENGINE MOUNT RUBBER INSULATORS
Insulator location on (right side) and transmission bracket (left side) are adjustable to allow right/left drive train adjustment in relation to drive shaft assembly length.
Check and reposition right engine mount insulator (left engine mount insulator is floating type and will adjust automatically (Fig. 3). Adjust drive train position, if required, for the following conditions:
²Drive shaft distress: See Driveshafts in Suspension, Group 2.
²Any front end structural damage (after repair).
²Insulator replacement.
ENGINE MOUNT INSULATOR ADJUSTMENT
(1)Remove the load on the engine motor mounts by carefully supporting the engine and transmission assembly with a floor jack.
(2)Loosen the right engine mount insulator yoke screw and two turns on yoke nut, then loosen the front engine mount bracket to front crossmember screws and nuts.
Left engine mount insulator is sleeved over shaft and long support bolt to provide lateral movement adjustment with engine weight removed or not.
(3)Pry the engine right or left as required to achieve the proper drive shaft assembly length. See Drive Shaft in Suspension Group 2 for driveshaft identification and related assembly length measuring.
(4)Tighten right engine mount insulator yoke nut to 102 Nzm (75 ft. lbs.). Then tighten front engine mount screws and nuts to 54 Nzm (40 ft. lbs.) and center left engine mount insulator.
(5)Recheck drive shaft length.
Fig. 3 Left Insulator Movement
ENGINE ASSEMBLY
REMOVAL
(1)Disconnect battery.
(2)Mark hood position at hinges and remove hood.
(3)Drain cooling system. Refer to Cooling System Group 7 for draining procedure.
(4)Disconnect all electrical connections.
(5)Remove coolant hoses from radiator and engine.
(6)Remove radiator and fan assembly.
(7)See Fuel System Group 14, For procedures to release fuel pressure, disconnect fuel lines and accelerator cable.
(8)Remove air cleaner assembly.
(9)Hoist vehicle and drain engine oil.
(10)Remove air conditioning compressor mounting bolts and set compressor aside.
(11)Disconnect exhaust pipe at manifold.
(12)Remove transmission inspection cover and mark flex plate to torque converter position.
(13)Remove screws holding torque converter to flex plate and attach C-clamp on bottom of converter housing to prevent torque converter from coming out.
(14)Remove power steering pump mounting bolts and set pump aside.
(15)Remove two lower transmission to block screws.
(16)Remove starter.
(17)Lower vehicles and disconnect vacuum lined and ground strap.
(18)Install transmission holding fixture.
(19)Attach engine lifting hoist and support engine.
(20)Remove upper transmission case to block bolts.
(21)See Engine Mounting in (Fig. 2) and separate mount/insulators as follows: