

Beginning ASP.NET 2.0 With CSharp (2006) [eng]
.pdfChapter 6
Figure 6-2
Adding Events to the Page
Adding events to ASP.NET pages is simple because Visual Web Developer (VWD) provides a way to do this for you. It allows you to select the page or a control and for the allowable events to be listed. You can then instruct VWD to create the event procedure for you. The first thing that needs to be discussed is where the events are created, because there are two places where events can be created. The first is in the same file as the ASP.NET controls, and this is called code inline. The second place to create events and code is in a separate file and this is called code-behind. Where the code is created depends upon a simple checkbox on the Add New Item dialog, as shown in Figure 6-3.
Figure 6-3
You can use either code inline or code-behind, because it doesn’t make any difference to ASP.NET, but code-behind is the accepted standard, and all of the pages in the Wrox United application use codebehind, as do all of the examples in this chapter.
178

Events and Code
In the following Try It Out, you give events a go and add some events to a page.
Try It Out |
Adding Page and Control Events |
1.Start Visual Web Developer, and open the web site at C:\BegASPNET2\Begin\Chapter06. You should see a screen similar to Figure 6-4.
Figure 6-4
2.Open the Default.aspx file and switch from Source View to Design View.
3.Drag a Label, a TextBox, and two Button controls onto the page, so that it looks like Figure 6-5.
Figure 6-5
4.In an empty area of the page, double-click the left mouse button to load the code file associated with the page and create an empty event procedure for you, called Page_Load, as shown in Figure 6-6.
179

Chapter 6
Figure 6-6
5.Switch back to the page design and double-click the first button, Button1. The event procedure Button1_Click for this button is created (see Figure 6-7), underneath the event procedure for the page.
Figure 6-7
6.Repeat step 5, but for the second button, Button2, which will create the event procedure Button2_Click, as shown in Figure 6-8.
Figure 6-8
180

Events and Code
7.In the Page_Load event procedure, add the following line of code:
Label1.Text = “You entered “ + TextBox1.Text;
The event procedure will now look like this:
protected void Page_Load(object sender, System.EventArgs e)
{
Label1.Text = “You entered “ + TextBox1.Text;
}
8.In the Button1_Click event, add the following line of code:
TextBox1.Text = “You clicked button 1”;
9.In the Button2_Click event, add the following line of code:
TextBox1.Text = “You clicked button 2”;
10.Press F5 to run the example. Click OK if the Debugging Not Enabled dialog appears, accepting the default selection for adding a new Web.config file with debugging enabled. This is shown in Figure 6-9 and will only appear if debugging is not enabled, so clicking the OK button enables debugging and stops the dialog from appearing again. You may also receive another dialog or pop-up from a firewall if you have one running; this might be to warn you that a program is trying to access the Internet and if you have an option you should allow the access.
Figure 6-9
11.When the browser window appears you’ll see a screen similar to Figure 6-10. Don’t worry if the numbers after localhost are different, because VWD picks this number.
Figure 6-10
Notice that the label has the text you set in the Page_Load event, but nothing else.
181
Chapter 6
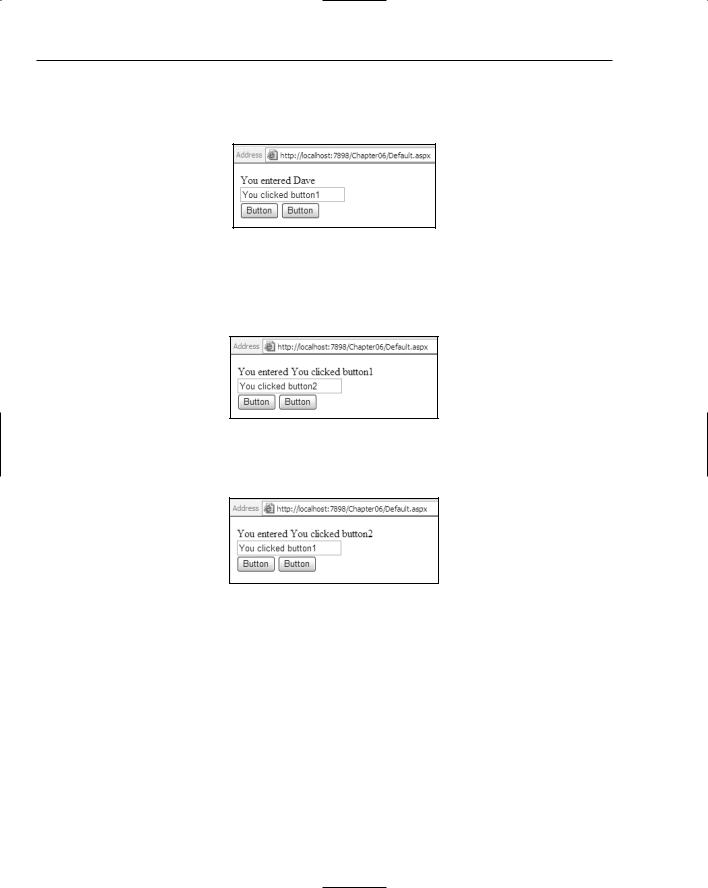
12.Enter your name into the text box and click the first button. For example, I entered Dave because that’s my name, so the figures show Dave. Now the label has the text you entered (as shown in Figure 6-11), but the text box has the text set from the Button1_Click event.
Figure 6-11
13.Now click the second button. Figure 6-12 shows that the label text has changed to what the text box contained in the previous step, and the text box contains the text from the Button2_Click event.
Figure 6-12
14.Now click the first button again, and you’ll see something similar to Figure 6-13.
Figure 6-13
How It Works
Take a look at how this works, starting with the Page_Load event.
protected void Page_Load(object sender, System.EventArgs e)
This is known as the declaration, and tells you lots about the procedure. It has two main areas: the bits before the parentheses, and the bits within the parentheses. So at the beginning of the line you have the following:
protected void Page_Load
182

Events and Code
protected tells you about who can use the procedure. In this case it means that only other programs within the same class can use this procedure. You don’t need to worry about this for now; Chapter 9 looks at this in more detail.
void tells you that this is an event procedure, and that it doesn’t return a value. That means ASP.NET can simply call this and not expect anything back.
Page_Load is the name of the event procedure. The name of event procedures can be anything, but you’ll find certain standard usages appearing that are descriptive of the actual event. The Page_Load event is very descriptive because this event procedure will be used whenever the page is loaded into ASP.NET for processing.
Next you have the middle section; these are the parameters. There are two parameters, separated from each other by a comma:
object sender, System.EventArgs e
The parameters are simply variables that get passed into the event procedure by ASP.NET. Chapter 9 covers variables in more detail, so the actual syntax isn’t explained here, but some details are worth knowing. By and large all events in ASP.NET have two parameters. The first, typically called sender, is the object that raised the event. In this case it is the actual page, because the page is saying “Hey, I’ve loaded and you can do your stuff now.” For other events, such as those that buttons raise, the sender would be the button. The second parameter, e, is any additional information that the event procedure might need. For the Page_Load event there is no additional information, but later in the chapter you’ll look at events where you do need some extra detail. Neither of these arguments is needed for your event procedure, but they are provided by ASP.NET in case they are required.
The way that these event procedures are run depends upon the event procedure. For the Page_Load event, this is automatic — ASP.NET automatically looks for a procedure called Page_Load and will run it when the page loads. For other controls, such as the buttons you placed on the form, the event procedure is linked to the control by way of an attribute — this is explained after you’ve looked at the code for the button event procedure.
Now that you’ve actually hooked your procedure into the event handling system of ASP.NET, you can run your own code:
Label1.Text = “You entered “ + TextBox1.Text;
This line of code simply sets the text for the label to some static text plus whatever text was entered into the text box. Don’t worry too much about what the plus (+) means — Chapter 9 looks at that sort of thing in more detail.
Here are the event procedures for the buttons:
protected void Button1_Click(object sender, System.EventArgs e)
{
TextBox1.Text = “You clicked button 1”;
}
183

Chapter 6
The declaration is very similar to the Page_Load one, apart from the name of the procedure. The big difference is that this event procedure isn’t automatically linked to the button — this is done in the source of the page, and was added for you when you doubled-clicked the button. The source of the button is:
<asp:Button ID=”Button1” runat=”server”
OnClick=”Button1_Click” Text=”Button” />
Here the event you are handling is the Click event, which is raised whenever the button is clicked. For each event there is an associated attribute, with the same name as the event but with On in front of it. So for the Click event you have an attribute called OnClick, and the contents of that attribute is the name of the event procedure. In the above code example, the OnClick attribute contains Button1_Click, which is the name of the event procedure. You could name the procedure anything you like, but having sensible names means it’s easy to see what the event procedure does. The event procedure for the second button is similar, but with the obvious changes of the names and text.
Now look at what happens when the examples are run. When the page is first loaded, the Page_Load event procedure runs and the text for the label is set. However, because there is no text in the text box, the label only has “You entered” as its text. When you enter some text into the text box and click the first button, the page is loaded again, so the Page_Load event procedure is run, followed by the Button1_Click event procedure. So the text you entered into the text box is displayed in the label, and then the text box has new text set from within the Button1_Click event procedure. The important thing to note is that both event procedures run; the Page_Load event procedure will always be before event procedures for controls on the page.
This process is repeated as you continue to click the buttons.
The Postback Architecture
One of the problems you might have spotted is that the Page_Load event always runs, even when a button is clicked. There may be times when you want code to run when the page is first loaded, but not when buttons are clicked. For example, consider the previous example, where you displayed the contents of a text box in a label. When the page first loaded there was nothing in the text box so your label text was incomplete. The next Try It Out corrects this.
Try It Out |
Checking for Postback |
1.If you are still running the browser from the previous example, close it.
2.In Visual Web Developer, change the Page_Load event procedure so that it looks like this:
protected void Page_Load(object sender, System.EventArgs e)
{
if (Page.IsPostBack)
{ Label1.Text = “You entered “ + TextBox1.Text;
}}
3.Save the page and press F5 to run it. Notice that the label text is Label — this is the default text for a Label control and you didn’t change it when you placed the Label on the page. Enter some text and click a button, and you’ll see that the label now has text. Close the browser.
4.Now change the Page_Load event to this:
184

Events and Code
protected void Page_Load(object sender, System.EventArgs e)
{
if (Page.IsPostBack)
{
Label1.Text = “You entered “ + TextBox1.Text;
}
else
{
Label1.Text = “Enter some text and press a button”;
}
}
5.Save the page and press F5 to run it. Now you have this more useful, new text when the page first loads, and different text when a button is pressed.
How It Works
Having different text at the first page load from subsequent page loads works because the ASP.NET page has a property called IsPostBack, which identifies whether or not the page has been posted back to — that is, whether a button has been pressed. If so, IsPostBack will be true. If it’s the first time the page has loaded — that is, a button has not been pressed — IsPostBack will be false.
In the first code change you only displayed text if IsPostBack was true — if a button had been pressed. The second code change, in step 4, had different text for the two different situations.
It is important to know that this postback design only works when you are dealing with a single page, because IsPostBack gets reset when you move to another page. Consider two pages, Page1 and Page2, each with a Page_Load event procedure and a Button1_Click event procedure for a button. They also have a hyperlink to each other, allowing you to jump between the pages. You start with Page1, the Page_Load event procedure runs, and IsPostBack is false. You press the button and the Page_Load event is run again, followed by the Button1_Click event; in both event procedures IsPostBack would be true. You click the link to jump to Page2 and the Page_Load event procedure on that page runs, and IsPostBack in the Page_Load event on Page2 is false. Now you click the link to jump directly back to Page1, where the Page_Load event runs once more, but this time IsPostBack is false as well. The use of IsPostBack only works when you remain on the same page, so don’t think that “the first time the page is loaded” means the very first time. The following table might help to make this clear.
Action |
Page |
Control |
Events |
IsPostBack |
|
|
|
|
|
Page loads |
Page1 |
|
Page_Load |
false |
Button clicked |
Page1 |
Button1 |
Page_Load |
|
|
|
|
Button1_Click |
true |
Navigate to Page 2 |
Page2 |
|
Page_Load |
false |
Navigate to Page 1 |
Page1 |
|
Page_Load |
false |
|
|
|
|
|
185

Chapter 6
What Events Are Available?
In the first example in this chapter you created event procedures by double-clicking the page and control. The questions that might be poised on your lips are what events are there, how can I find the events, and which events should I use? Well, the first two questions can be answered in the same way, and there is one main place to look — the Properties area on the page designer. Above the list of properties is an icon that looks like a lightning bolt, which only shows when the page is in Design View; clicking this icon shows a list of events for the control, as shown in Figure 6-14. If you double-click in the space to the right of an event, the code window will be displayed and the event procedure created for you, or like the code window selection, you’ll be shown the event procedure if it already exists. By and large the events you’ll be interested in will be grouped under Action or Data.
Figure 6-14
The other place to find a list of events is in the Help files, where details of each event and what they are used for is listed.
Which Events Should I Use?
If you start looking into the events that are available you’ll soon realize that there are quite a few, and it’s not always obvious which ones should be used. The following table details some of the most common controls and events; this isn’t all of them, just the ones you’ll find most useful.
Control |
Event |
Is raised when... |
|
|
|
Button |
Click |
The button is clicked. |
LinkButton |
|
|
ImageButton |
|
|
DropDownList |
SelectedIndexChanged |
The selection on the list changes. |
ListBox |
|
This is useful for performing some |
|
|
action based on the new selection. |
CheckBox |
CheckChanged |
The status of the CheckBox or |
RadioButton |
|
RadioButton changes. That is, |
|
|
when they either become checked or |
|
|
unchecked. |
|
|
|
186

|
|
|
Events and Code |
|
|
|
|
|
|
|
|
|
Control |
Event |
Is raised when... |
|
|
|
|
|
CheckBoxList |
SelectedIndexChanged |
The selection on the list changes. |
|
RadioButtonList |
|
|
|
Calendar |
SelectionChanged |
The selected date is changed. |
|
|
VisibleMonthChanged |
The month is changed. |
|
Login |
Authenticate |
The user is authenticated. |
|
|
LoggedIn |
The user has logged in. |
|
|
LoginError |
There is an error during the login |
|
|
|
process. |
|
DataList |
DataBound |
An item is taken from a database |
|
|
|
and bound to the list. |
|
GridView |
RowDeleting |
The current row is being deleted. |
|
|
RowUpdating |
The current row is being updated. |
|
|
SelectedIndexChanged |
The selected row has changed. |
|
SqlDataSource |
Deleted |
A row has been deleted from the set |
|
|
|
of data. |
|
|
Inserted |
A row has been inserted into the set |
|
|
|
of data. |
|
|
Updated |
A row has been updated in the set |
|
|
|
of data. |
|
Menu |
MenuItemDataBound |
An item is being bound to the menu. |
|
|
|
|
Some of these are fairly obvious in their usage. For example, you’ve already seen the Click event of the button, and you can see that all of the button type controls have that same event. So if you don’t want to have a standard button, but want to maybe have an image instead, you still use the Click event. Give this a try in the following Try It Out, but this time you’ll use a different method for hooking into the event.
Try It Out |
Manually Creating Events |
1.If you have a running browser window, close it, and open Default.aspx in Visual Web Developer.
2.Create a Regular Folder called Images under the web site. You can use the right-click Add Folder menu on the web site for this, as shown in Figure 6-15.
3.Copy AddToCart.gif from the Images folder of the Wrox United site and place it in the Images folder you have just created.
4.In Design View place an ImageButton on the form, and set the ImageUrl property to
~/images/AddToCart.gif.
5.Select the TextBox and change the Columns property from 0 to 50.
187