

Beginning ASP.NET 2.0 With CSharp (2006) [eng]
.pdfChapter 4
site, the next chapter explores some of the features available to ASP.NET developers to give users a more personalized user interface and browsing experience.
A useful addition to any personalized site is to provide feedback to logged-in users to confirm that they have been correctly identified. The LoginName control is a simple way to add this functionality. In this Try It Out, you learn how this control is used. For this example, you will need to enable anonymous access.
Try It Out |
Displaying User-Specific Information |
1.You can choose which way you want to enable anonymous access — you can either edit the Web.config file (refer to the previous “How It Works”) or you can launch the Web Site Administration Tool. To relaunch the tool, right-click the administration site icon in your system tray and select Open in Web Browser. Alternatively, to modify the Web.config file, simply open it up in VWD and change the following highlighted line of code:
<authorization> <allow users=”?” />
<allow users=”administrator” /> <allow users=”chrishart” />
</authorization>
The question mark represents all unknown (anonymous) users, so by changing deny to allow, you can enable anonymous access.
2.Next you need to make a slight change to the web page code to add the LoginName control. Open Default.aspx and pop up the Common Task menu next to the LoginView control (click the small right-hand arrow next to the control and select the LoggedInTemplate, as shown in Figure 4-19). Change the text to You are logged in as, and then drag a LoginName control to the end of the text.
Figure 4-19
118

Membership and Identity
3.There is no need to make any amendments to the LoginName control after it’s been added to the page, so all that remains is to save your changes and run the page. The first thing you should see is the anonymous user’s perspective on the site, shown in Figure 4-20.
Figure 4-20
4.Click the Login link and log in to the site. When you are logged in, you should see something similar to Figure 4-21, depending on which user account you used.
Figure 4-21
How It Works
The LoginName control is a quick and easy way to display a user’s currently logged-in identity on a site. If you switch to Source View for the page, you can see the LoginName control, shown here with a gray background:
<LoggedInTemplate> You are logged in as
<asp:LoginName ID=”LoginName1” runat=”server” /> <br />
</LoggedInTemplate>
119

Chapter 4
Some HTML code has been added to my code. Because I pressed Return after the LoginName control (so that the LoginStatus control would appear on the next line), there’s a <br /> HTML tag in the code. This is the HTML code for a simple line break. You’ll often find tags like this, added to your code after you switch from Design View to Source View. The two most common tags are the character, which is a non-breaking space (a space character that keeps the items immediately before and after it on the same line), and <br />, which is a simple line break. The bit of code that is most relevant in this case is not the HTML, but the LoginName’s source. Again, there’s hardly anything exciting to see in the generated source, because ASP.NET does all the hard work of finding out what the currently logged-in user’s name is behind the scenes, and inserts it when the page is rendered.
Note that the LoginName control was not added to the Anonymous template, but then there’s no reason to do so — if you view the site as an anonymous user, the control will not display anything when it is rendered.
Earlier in the chapter, the concept of roles was discussed. The following section takes a look at what roles are and how they are used to refine the membership characteristics of a site.
Membership
Defining which users can access a site is a perfectly viable way to build a small site, but it would have to be very small and remain small to be a manageable solution. A far better solution would be to define a set of user roles, and add user accounts to the appropriate roles. When users are members of a role, you can assign permissions based on a role.
For example, consider a typical site configuration scenario: all the members of an Administrators role can access the site, and can access all areas of the site. All members of a Users role can access the site, but cannot access certain restricted areas. All anonymous users will see a cut-down version of the site, but without any personalization, and certainly without any permissions for visiting restricted areas of a site.
Chapter 11 examines roles in more detail, including refining the Wrox United site to make good use of roles. In the meantime, you can experience roles for yourself in the next Try It Out, because the Chapter04 example site is extended to include roles. In this example, you will be defining two roles: Users and Administrators. These roles have to be created before you can add users to the roles.
Try It Out |
Adding Users to Roles |
1.Start by launching the Web Site Administration Tool. If you’ve been running the tool recently, you can right-click the icon in your system tray for the administration site and select Open in Web Browser. Or, as an alternative, you can click Website ASP.NET Configuration from the main VWD menu bar. When the tool is up and running, select the Security tab and click the Enable Roles link, as shown in Figure 4-22.
2.The Create or Manage Roles link should be enabled, so click it to enter the Create New Role screen. Create the two roles, Users and Administrators, by entering a role name in the text box and clicking Add Role (see Figure 4-23).
120

Membership and Identity
Figure 4-22
Figure 4-23
121

Chapter 4
3.Click the Manage link for the Administrators group, and then search for the Administrator user account, using the search tools shown in Figure 4-24. The easiest way to find the Administrator account is to search for all accounts beginning with the letter A, so type a* in the text box and click Find User. Add the Administrator account to the Administrators role by checking the User Is In Role check box.
Figure 4-24
4.Add the remaining user accounts to the Users role in the same way.
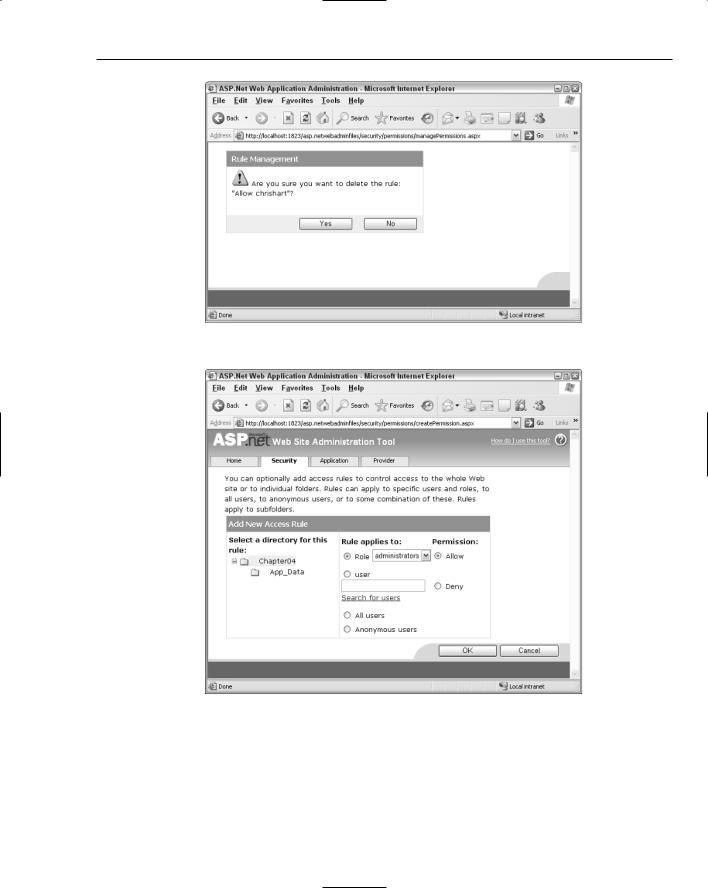
5.Click the Security tab to return to the main Security section of the Administration Tool. Then click the Manage access rules link to return to managing the access rules for the site. In the same interface as you used in the earlier example for managing access rules (see Figure 4-13), remove the access rules for the individual user accounts, and instead grant access to the site to both the Administrators and Users groups. As you delete rules, you’ll be prompted as shown in Figure 4-25.
6.Add the new permissions on a role-by-role basis with the interface shown in Figure 4-26. After you have added the rules, you should see the list of rules shown in Figure 4-27.
122
Membership and Identity
Figure 4-25
Figure 4-26
123

Chapter 4
Figure 4-27
7.If you run the application again now, you should be able to log in as any of the user accounts and access the site as before. If you change the permissions for one of the roles, all members of that role will be affected, hence you could block access to all non-administrative users if you wanted.
How It Works
All of the changes in this example were made via the magic Web Site Administration interface, which simplifies the process of adding role definitions and access rules. If you were to do this by hand, as you will see in just a moment, you would have to manipulate the contents of the Roles table in the AspNetDB.mdf database that was shown earlier to include two role definitions, and then add users to those roles by changing the UsersInRoles table by hand. Then you would have to manipulate the Web.config file to change the access permissions to the site.
This configuration process was all handled for you automatically by the tool, so it’s made configuration and administration quite a lot simpler. However, this is a Visual Web Developer and Visual Studio 2005 feature, not an ASP.NET feature, so you would have to do this by hand if you didn’t have access to the VWD environment.
If you return to the Source View of your Web.config file, you’ll see the following changes have been made (shown with a gray background):
<roleManager enabled=”true” /> <authorization>
124

Membership and Identity
<allow users=”?” />
<allow roles=”administrators” />
<allow roles=”users” /> </authorization>
In addition, the process of enabling roles has modified the user profile database slightly, by adding two new tables: one to store roles and one that tells you which users are members of which roles (see Figure 4-28).
Figure 4-28
Authentication
One area not yet discussed is that of how the authentication works for this application, and what options are available in ASP.NET for authentication. The examples so far have relied on what’s known as Forms authentication. So, what is Forms authentication, and what are the other options available?
Forms authentication: Login requests are made by filling in a form on a web page and submitting that form to the server. When the server receives the request, a cookie is written to the user’s local machine, and this cookie is passed back to the server by the browser along with each request that is sent so that the user remains authenticated for as long as is required.
Windows authentication: Login pages pass user credentials to a web server (IIS only, not the web server built into VWD). The web server then handles the authentication using whichever method is configured on the virtual directory that the application is running within. IIS hooks in to the Windows operating system and Active Directory domain structures, which means that it can rely on user profiles that are stored externally, and use standard Windows credentials to log in to the site. Depending on the configuration of your site, and depending on which user account you used to log in to your machine, you may not even have to log in to the site directly, because your current Windows credentials can be passed to the web server automatically for authentication. This is really handy when it comes to developing intranet applications.
125
Chapter 4
Passport authentication: Login credentials are passed to a Microsoft Passport server where user profiles are stored centrally. You may be familiar with this from logging in to a Hotmail account. And because you can configure Windows to log on to a Passport account on startup, you can access your Hotmail inbox without even having to type a password.
Forms Authentication Model
This section looks at how Forms authentication works. Consider the following scenario:
The user — let’s call him Bob — wants to view Page A, which can’t be accessed by anonymous users, so when Bob tries to view Page A, the browser instead displays a login page, as shown in Figure 4-29.
Browser sends request for Page A to the server
Browser |
Server |
Server refuses anonymous access and sends login page instead
Figure 4-29
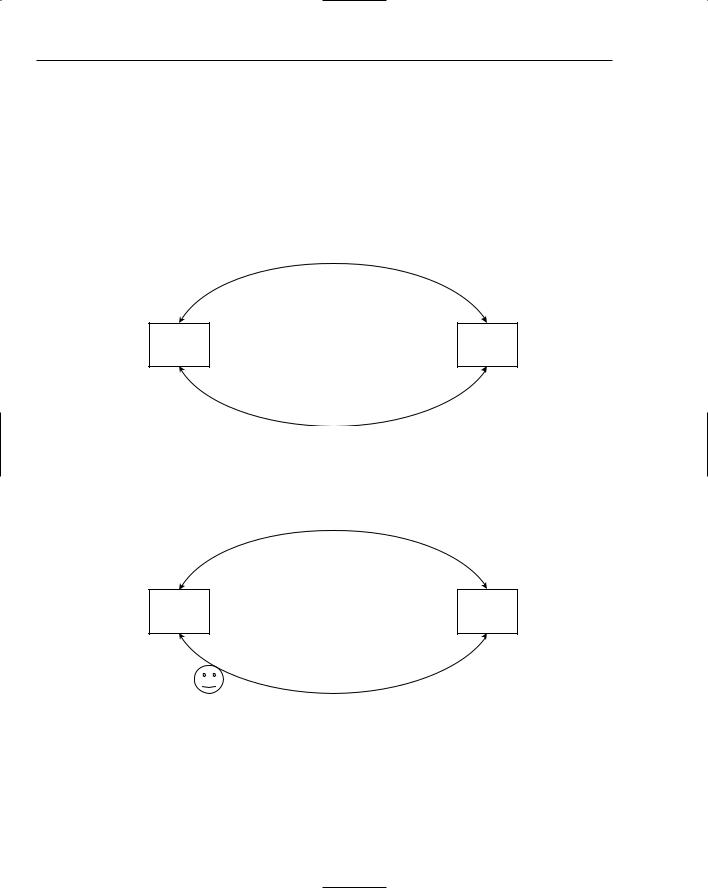
Bob is now looking at a login page. Because Bob registered with this site previously, he logs in to the site using his username and password combination. Figure 4-30 shows the interaction between Bob’s browser and the server.
Browser sends a login request to the server
Browser |
Server |
Server authenticates Bob and returns Page A along with a cookie to the browser
Figure 4-30
Bob can now view Page A and is a happy user. Next, Bob wants to view Page B by following a link from Page A. Along with the request for the page, Bob’s browser sends a copy of the cookie to the server to let the server know that it’s Bob who’s trying to view the page. The server knows who Bob is, and likes Bob, so it sends Bob Page B as requested, as shown in Figure 4-31.
126

Membership and Identity
Browser requests Page B and passes a copy of the cookie
Browser |
Server |
Server accepts cookie and sends back Page B
Figure 4-31
If Bob now requests the site’s home page, the browser will tack on the cookie to the request, so even though the home page is not restricted content, the cookie is still sent to the server. Because the page isn’t restricted, the server doesn’t worry about the cookie, ignores it, and sends back the home page.
Bob then heads back to Page A. Because the cookie is fresh on Bob’s machine, the cookie is sent to the server. The server is still happy with Bob, so it lets Bob view the page.
Bob goes off and makes himself a coffee. He then makes some lunch. By the time he gets back to his computer, 25 minutes have elapsed. Bob now wants to view Page B again, but the cookie on his machine has expired. The server doesn’t receive a cookie along with the page request, so Bob has to log back in again.
Cookies on a user’s machine are normally set to expire after a specific amount of time has elapsed. In this scenario, the server gives out cookies with a 20-minute expiry, which means that as long as the user keeps making requests within 20 minutes of each other, the cookie will remain active. However, more than 20 minutes away from the site and the user will have to log back in to the site to view restricted content.
The login page built in the earlier examples included a box that offered you the “remember my details for next time” option. This writes a more permanent cookie to your browser’s cookie collection so that your account name is pre-populated when you revisit the site. Because you should never store password information in a cookie, you should always have to enter your password, but at least your username field is filled in for you on each visit.
Other methods of authentication — Windows and Passport — provide the end user with a similar experience. For example, the Windows authentication model relies on the web server (which will likely be IIS) to control access to the site, but it can also incorporate the timeout mechanism to block users that have been idle for too long. To configure Windows authentication, you need to specify which users or roles from the corporate Active Directory (AD) domain can access a site. These users can then access the site whenever they are logged on using their login details to a PC on the corporate network.
It’s also possible to view a Windows authenticated site from outside of the corporate environment, though you are asked to enter your standard Windows logon credentials when you attempt to access a page protected by Windows authentication.
127