

Beginning ASP.NET 2.0 With CSharp (2006) [eng]
.pdfChapter 3
<div>
<div style=”float:left”>Left-hand content here</div> <div style=”float:right”>Right-hand content here</div> <br />
</div>
Switch the validation target back to Internet Explorer 6.0 and you will see that the highlighted errors will all disappear. Building a site for a specific browser, like IE 6.0, gives you more flexibility with the code you write, but you cannot guarantee that your site will appear as designed on other browsers.
The rules of XHTML are also followed in any code that ASP.NET generates dynamically. You haven’t created much in the way of dynamic content so far, so let’s move on to looking at how you can make pages a bit more exciting.
Dynamic Content
In order to move from the static world of HTML to the dynamic world of ASP.NET, it’s important to know what is meant by dynamic content.
When you click a button on a form on a web page, you expect something to happen — and most of the time (if the page has been coded correctly), something does happen. You might submit an order form for a stack of CDs by clicking a button. You might also select an item on a menu on a page — take, for example, a menu from the Wrox United web site. Clicking the menu causes the menu contents to pop out (see Figure 3-15) and become selectable in a similar way to clicking your Start button.
Figure 3-15
68

Page Design
Now notice that there’s no lag between clicking the menu and clicking a different menu — the page responds just like your own system. Your browser’s actually executing some local code in order to display these items. Click a button or a hyperlink on a form and the page will likely take longer to respond. Clicking buttons, hyperlinks, or other similar elements on a page causes your browser to start talking to the server, asking for something, or sending some data.
Dynamic Client Code and Dynamic Server Code
Hovering over the menu on the Wrox United web site will run some code on the page that is likely written in JavaScript, a programming language that most browsers can understand and run, and is used to provide quick responses to user input. The page won’t flicker and refresh (unlike clicking a hyperlink) because the browser already knows what to display when you hover over the menu. This is an example of dynamic client code.
When a more complicated response is required (for example, when you submit an order on a shopping site or when you want to search for a specific item on a shopping site), the page submits information back to the web server for processing. The processing on the server is dynamic server code, and this is the code that you will learn to write over the course of this book.
Server-side code can be written in many different languages, not just ASP.NET with VB.NET, C#, or other .NET languages. You probably have heard of PHP and perhaps JSP (Java Server Pages) — these are just two examples of other languages used by developers to write server-side code. Each language has its strengths and weaknesses, but you’ll be hard-pressed to find a server-side technology that’s as easy to use and as powerful as ASP.NET.
When it comes to creating dynamic pages in ASP.NET, the fastest way to build a dynamic page is to drag server controls onto the page, set properties on those controls, and eventually write code to customize their functionality. This drag-and-drop architecture has improved greatly in the latest edition of ASP.NET, making it possible to create the structural framework for an entire site without having to write any code.
Introduction to Ser ver Controls
When you look at the Visual Web Developer Toolbox, you’ll notice several different sections, each containing a different set of tools. Many of these tools are server controls, and you’ll be using these controls regularly when you develop ASP.NET applications.
A server control appears on the source code for an ASP.NET page as a tag; for example, <asp:textbox ... />. These tags are not standard HTML elements, so a browser will not be able to understand them if they appear on a page. However, when you request an ASP.NET page from a web server, these tags are converted into HTML elements dynamically, so the browser only receives HTML content that it can understand.
This section starts by taking a look at some of the categories of controls available to you, and then discussing how they work.
69

Chapter 3
The Server Control Toolbox
At first glance, the array of server controls in the Toolbox can be quite overwhelming. Not only do you have standard web page elements to choose from (such as radio buttons, hyperlinks, and drop-down lists), but other categories of controls are also available (shown minimized in Figure 3-16) that contain even more controls. The Toolbox changes appearance depending on which type of page is being edited, so Figure 3-16 is the standard appearance when you’re working on ASP.NET pages.
Figure 3-16
The categories of controls available are as follows:
Standard: Common controls that make up 90 percent of all pages.
Data: Controls used to connect to data sources (databases or XML files).
70

Page Design
Validation: Controls that can be added to a page to validate user input (for example, to ensure that certain text boxes contain data or that data has been entered in the correct format).
Navigation: Controls used to provide a simple and quick solution to making a site navigable (for example, dynamic menus and breadcrumbs of hyperlinks).
Login: A set of controls that make it simple to move from a completely open site to one that has personalized areas.
WebParts: Controls that make it possible to create Sharepoint-style sites with drag-and-droppable sections, known as Web Parts, which enable the user to rearrange their view of a site.
HTML: Simple HTML elements.
Throughout the rest of this book, you’ll be introduced to many of the controls in each category. Later in this chapter, you can play with some of the navigation controls when you build some menus for the Wrox United site.
What Are Server Controls?
Let’s start from first principles. When you create a simple HTML page and save it to your local file system, you can view that page in your browser by double-clicking the file. This is fine if you’re putting together a static HTML site and want to test the output, but there’s no point in developing a web site that users would have to download to view. That’s why, when a web site is deployed, it is uploaded to a web server, which everyone can access via its URL (Uniform Resource Locator).
When the site is hosted on a web server, people can access the site from other machines and browse through the HTML pages. However, if the server has the right software installed, you can then do much more than offer static HTML pages. When you request an HTML page, the server looks up the file and sends it to you. When you request an ASP.NET page (a page with the file extension .aspx), the server looks up the file on its file system and reads the file, and then it performs some processing before sending the resulting page back to you. The “performs some processing” bit is the magic that makes ASP.NET work.
The extra processing that the server performs includes the capability to read an ASP.NET page and convert the server controls in that page into HTML that the browser can understand. Remember, your browser doesn’t speak ASP.NET. A web browser is a simple thing that only speaks HTML and possibly JavaScript — it cannot process ASP.NET code. The server reads the ASP.NET code and processes it, converting anything that is ASP.NET-specific to HTML and (as long as the browser supports it) a bit of JavaScript, and sends the freshly generated HTML back to the browser.
The process of converting ASP.NET code to HTML is how server controls work — you can happily create pages that contain server controls when you are developing the source .aspx page, yet the browser that requests that page from the web server will only receive HTML and JavaScript (see Figure 3-17). This is a key concept to understand, and the process is discussed in more detail in Chapter 6.
71

Chapter 3
Browser
http://server/Page.aspx
Figure 3-17
Server
Page.aspx
Server code
Client code
You can see how this works with the aid of a simple example. The following Try It Out is a really simple example to demonstrate the differences between the ASP.NET code and HTML code.
Try It Out |
Adding Server Controls in Design View |
1.Reopen the Chapter03 web site.
2.Right-click the root of the web site and select Add New Item.
3.In the dialog box that appears (shown in Figure 3-18), select Web Form, call the page ServerControls.aspx, select your preferred language from the drop-down list, and leave both of the check boxes unchecked.
Figure 3-18
72
Page Design
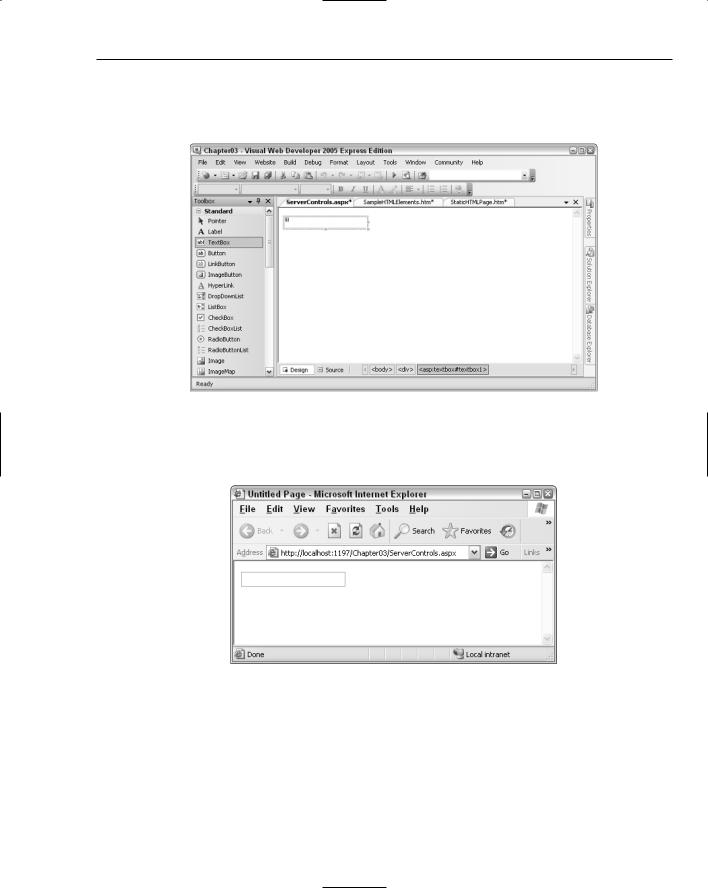
4.If you are not already in Design View, switch into that mode and double-click a TextBox control from the Standard section of the control toolbox on the left (see Figure 3-19) to add it to the main body of the page.
Figure 3-19
5.You’re actually ready to view the page now, so right-click on the page and select View in Browser. Your browser should start and display the page shown in Figure 3-20.
Figure 3-20
Note that the number displayed in the address bar (after the word “localhost”) is a fairly random number that is generated whenever you first request a server-side page from a project.
How It Works
In this example, you only added a single server control to an ASP.NET page and viewed the page in the browser. It’s not exactly the most exciting example in the world, but the point is to see how server-side code is changed into client-side code.
73

Chapter 3
Click the View menu in the browser and select View Source. You should see the code shown in Figure 3-21 appear within Notepad.
Figure 3-21
This code is the client-side code — the rendered output of the page. Compare this with the original code — return to VWD and click the Source View of the page (see Figure 3-22).
Figure 3-22
74

Page Design
Note the lines that describe the control with the ID of TextBox1. Here are those lines, as they appear in the original source code for the page:
<div>
<asp:TextBox ID=”TextBox1” runat=”server”></asp:TextBox>
</div>
And here is the equivalent line in the rendered source code:
<div>
<input name=”TextBox1” type=”text” id=”TextBox1” />
</div>
Notice that the original TextBox1 control has been converted from an ASP.NET control to an HTML element. The server received the request for the page and was able to glean, from the original request, that the browser could understand HTML, so the server produced an HTML version of the control along with the rest of the page back to the browser. The browser then does the legwork in converting that HTML code to a viewable web page.
Source View in VWD
Visual Web Developer has two main modes when it comes to building and editing pages. The Design View is one that you’ve spent a little while working in now, and it’s the Design View that you’ll concentrate on using (where you can) in this book to avoid having to type too much code. However, Source View is really useful for editing a page and fixing nagging problems, so it’s worthwhile taking a look at this now and gaining some familiarity. Add another control to the page you were just working on, this time in Source View.
Try It Out |
Adding Server Controls in Source View |
1.Head back into VWD and ensure that you are in Source View for the ServerControls.aspx page (click the link at the bottom of the window to switch between Design View and Source View). In the code that appears, click the line immediately below the code representing the TextBox control that you added in the previous example.
<div>
<asp:TextBox ID=”TextBox1” runat=”server”></asp:TextBox>
</div>
2.You have two options available to you when you add server controls in Source View: you can either type the code, or drag and drop the control from the Toolbox, much like the technique used in Design View. Do it the hard way first — start typing the following code:
<asp:Image
Before you even finish the word “Image,” you’ll notice some handy tooltips popping up, as shown in Figure 3-23, trying to guess what you’re typing.
75

Chapter 3
Figure 3-23
This is a feature available to VWD and Visual Studio known as IntelliSense, and it’s designed to make your life as a developer a little easier. To accept a suggestion, you can scroll through the list with the arrow keys and then press the Tab or Enter key or the spacebar, or click the suggestion with your mouse. To forcibly show any relevant IntelliSense, press Ctrl+Space and the popup will appear.
3.Continue to enter the code as follows:
<div>
<asp:TextBox ID=”TextBox1” runat=”server”></asp:TextBox>
<asp:Image ID=”MyImage” runat=”server” ImageUrl=”~/azoreschurch.jpg” /> </div>
Notice that VWD presents you with a list of local images when you enter the ImageUrl property (see Figure 3-24).
4.Add one more control to the page; this time, add it using the double-click technique. Add a blank line before the </div>, position your cursor in this line, and double-click the Hyperlink control (see Figure 3-25) in the Toolbox to add it to the page.
76

Page Design
Figure 3-24
Figure 3-25
77