

Beginning Ubuntu Linux - From Novice To Professional (2006)
.pdf28 |
C H A P T E R 4 ■ P R E I N S T A L L A T I O N S T E P S |
You need to have at least 2GB of free space in your Windows partition for Ubuntu to use. You’ll need more space if you wish to install a lot of programs. If you don’t have enough free space, you have several options: reclaim space, remove Windows, or use a second hard disk.
Reclaiming Space
On Windows XP, you can run the Disk Cleanup tool to free some space on your hard disk. Click the Disk Cleanup button beneath the pie-chart diagram showing the free disk space (see Figure 4-2). Disk Cleanup is also accessible by choosing Start All Programs Accessories System Tools Disk Cleanup.
You might also consider turning off System Restore. This consumes a lot of disk space, which you can therefore reclaim. However, deactivating System Restore will mean that you lose the possibility of returning your system to a previous state should anything go wrong.
To access the System Restore control, right-click My Computer, click Properties, and then click the System Restore tab.
If you still cannot free up enough disk space, consider uninstalling unused software via the Add/Remove Programs applet within Control Panel. If you have any large games installed, consider removing them first, because they usually take up substantial amounts of hard disk space. You might also consider deleting movie and MP3 music files, which are renowned for eating up hard disk space. The average MP3 is around 4MB, for example, and one minute of video typically takes up 1MB of disk space!
Removing Windows
Some users might prefer a second, more radical option: getting rid of Windows completely and letting Ubuntu take over the entire hard disk. If you feel confident that Ubuntu will fulfill your needs, this is undoubtedly the most straightforward solution. You’ll be able to do this during installation. However, this will also mean that any personal data you have will be lost, so you should first back up your data (as described shortly).
■Caution You should be aware that installing Windows back onto a hard disk that has Ubuntu on it is troublesome. Windows has a Darwinian desire to wipe out the competition. If you attempt to install Windows on a Ubuntu hard disk, it will overwrite Linux.
Using Another Hard Disk
A third option for making room for Ubuntu is attractive and somewhat safer in terms of avoiding the potential for data loss, but also potentially expensive: fitting a second hard disk to your PC. You can then install Ubuntu on this other hard disk, letting it take up the entire disk. Unlike Windows, Ubuntu doesn’t need to be installed on the primary hard disk and is happy on a secondary drive.
A second hard disk is perhaps the best solution if you’re low on disk space and want to retain Windows on your system. However, you’ll need to know how to install the new drive or find someone to do it for you (although step-by-step guides can be found on the Web—just search

C H A P T E R 4 ■ P R E I N S T A L L A T I O N S T E P S |
29 |
using Google or another search engine). In addition, if your PC is less than 12 months old, there is a possibility that you’ll invalidate your guarantee by opening up your PC.
If you have an old PC lying around, you might also consider installing Ubuntu on it, at least until you’re sure that you want to run it on your main PC. As noted in Chapter 1, one of the best features of Ubuntu is that it runs relatively well on older hardware. For example, a Pentium II with 256MB of memory should allow for very good performance.
NO-INSTALL LINUX
If you want to use the Linux operating system but leave your hard disk untouched, you might consider a number of additional options. Perhaps the most popular is to use a “live” version of Linux. A live version of Linux is one that boots and runs entirely from a CD (or DVD); it doesn’t touch the user’s hard disk. The most popular is Knoppix (www.knoppix.org). The distribution we discuss throughout this book, Ubuntu, also has a live CD version, which you can download from www.ubuntulinux.com (click the Download link and select the location closest to you).
Using Linux in this way involves downloading an ISO image (a single large file of around 650MB), which then must be burned to CD using a Windows program like Nero. Once the CD has been created, you simply boot from it in order to run Linux (after you ensure that your PC’s BIOS is set to boot from CD, as explained in Chapter 5).
Alternatively, you might consider using virtual PC software. This type of software runs under Windows and re-creates an entire PC hardware system within software—effectively a PC within a PC. The hard disk is contained within one or two Windows files. Linux can then be installed on these virtual PC systems. When the program is switched to full-screen mode, it’s impossible to tell you’re running inside a computer system created in software. Two commercially available examples are considered worthwhile by many: VMware (www.vmware.com) and Microsoft’s Virtual PC (www.microsoft.com/windowsxp/virtualpc/). You should be aware that both are designed to be professional-level tools, so they are quite expensive. You can also obtain open-source renditions of virtual PC software, such as QEMU (http://fabrice.bellard.free. fr/qemu/).
Another option in its infancy at the time of writing is Cooperative Linux, or coLinux for short (www.colinux.org). This is a set of Windows programs that aims to let Linux run under Windows using emulation. Unfortunately, setting up and using coLinux requires some expert knowledge, so you might want to wait until you have more experience with Linux.
Backing Up Your Data
Whichever route you decide to take when installing Ubuntu, you should back up the data currently on your computer beforehand. Possibly the easiest way of doing this is to burn the data to CD-R/RW discs using a program like Nero and a CD-R/RW drive.
If you take the coexistence route, installing Ubuntu alongside Windows, backing up your data should be done for insurance purposes. Although the Ubuntu Foundation tests all its software thoroughly and relies on community reporting of bugs, there’s always the chance that something will go wrong. Repartitioning a hard disk is a major operation and carries with it the potential for data loss.
If you intend to erase the hard disk when installing Ubuntu (thereby removing Windows), you can back up your data, and then import it into Ubuntu.

30 |
C H A P T E R 4 ■ P R E I N S T A L L A T I O N S T E P S |
Table 4-1 shows a list of common personal data file types, their file extensions, where they can be typically found on a Windows XP system, and notes on importing the data into Ubuntu. Note that earlier versions of Windows (95, 98, and Me) may differ when it comes to data storage locations.
Table 4-1. Data That Should Be Backed Up
Type of File |
File Extensions |
Typical Location |
Notes |
Office files |
.doc, .xls, |
My Documents |
Microsoft Office files can be opened, |
|
.ppt, .pdf, etc. |
|
edited, and saved under Ubuntu using |
|
|
|
the OpenOffice.org suite. PDF docu- |
|
|
|
ments can be viewed with the Evince |
|
|
|
program. |
E-mail files |
N/A |
N/A |
The Evolution mail client used by |
|
|
|
Ubuntu cannot import data directly |
|
|
|
from Microsoft Outlook or Outlook |
|
|
|
Express. However, there is a convo- |
|
|
|
luted but effective workaround, which |
|
|
|
is described in the next section. |
Digital images |
.jpg, .bmp, |
My Pictures (within |
Ubuntu includes a variety of programs |
|
.tif, .png, |
My Documents) |
to both view and edit image files. |
|
.gif, etc. |
|
|
Multimedia files |
.mp3, .mpg, |
Various |
With some additional downloads, |
|
.avi |
|
discussed in Chapter 18, programs |
|
|
|
under Ubuntu can play MP3 music files |
|
|
|
and some movie file formats. |
Internet Explorer |
None |
\Documents and Settings\ |
Your Favorites list cannot be imported |
Favorites |
|
<username>\Favorites |
into Ubuntu, but the individual files |
|
|
|
can be opened in a text editor in order |
|
|
|
to view their URLs, which can then be |
|
|
|
opened in the Ubuntu web browser. |
Miscellaneous |
Various |
Various |
You might also want to back up web site |
Internet files |
|
|
archives or instant messenger chat logs, |
|
|
|
although hidden data such as cookies |
|
|
|
cannot be imported. |
|
|
|
|
Backing Up E-mail Files
Microsoft e-mail cannot be easily imported into Ubuntu because Microsoft prefers to create its own proprietary file formats, rather than use open standards recognized by the rest of industry. Most e-mail programs use the MBOX format, and this is true of Ubuntu as well as programs created by the Mozilla Foundation (the organization behind the Firefox web browser). However, Microsoft uses its own DBX file format for Outlook Express and PST format for Outlook.
As a workaround, you can download and install the free Mozilla Thunderbird e-mail client (available from www.mozilla.com) on your Windows system. In Thunderbird, select Tools Import to import your messages from Outlook, Outlook Express, or even the popular Eudora mail client. You will then be able to back up Thunderbird’s mail files and import them into Evolution under Ubuntu.

C H A P T E R 4 ■ P R E I N S T A L L A T I O N S T E P S |
31 |
To find where the mail files are stored, in Thunderbird, select Tools Account Settings, and then look in the Local Directory box. Back up each file that corresponds to a folder within your mail program (for example, Inbox, Sent, and so on). Note that you only need to back up the files without file extensions. You can ignore the .sbd folders as well as the .msf files.
Making Notes
When you’re backing up data, a pencil and paper come in handy, too. You should write down any important usernames and passwords, such as those for your e-mail account and other online services. You might want to write down the phone number of your dial-up connection, for example, or your DSL/cable modem technical settings. Figure 4-3 shows an example of some information you might want to record.
Figure 4-3. Don’t forget to back up “hidden” data, such as Internet passwords.
In addition, don’t forget to jot down essential technical details, such as your IP address if you are part of a network of computers using static addresses (this will usually be relevant only if you work in an office environment).
■Tip If you’ve forgotten any passwords, several freeware/shareware applications are able to “decode” the asterisks that obscure Windows passwords and show what’s beneath them. A good example is Asterisk Password Reveal, which you can download from www.paqtool.com/product/pass/pass_001.htm. Sites like www.download.com offer similar applications.
Note that you don’t need to write down information such as hardware interrupt (IRQ) or memory addresses, because hardware is configured automatically by Ubuntu. However, it might

32 |
C H A P T E R 4 ■ P R E I N S T A L L A T I O N S T E P S |
be worth making a note of the make and model of some items of internal hardware, such as your graphics card, modem (dial-up, DSL, or cable), and sound card. This will help if Ubuntu is unable to automatically detect your hardware, although such a situation is fairly unlikely to arise. You can garner this information by right-clicking My Computer on your desktop, selecting Properties, and then clicking the hardware tab. Then click the Device Manager button. Instead of writing everything down, you might consider taking a screenshot by pressing the Print Scr button and then using your favorite image editor to print it.
■Tip Ubuntu works with a wide variety of hardware, and in most cases, it will automatically detect your system components. If you’re in any doubt, you can consult the forums at www.ubuntuforums.org, in particular, the Hardware Help forums. You might also consider subscribing to one or more of the Ubuntu mailing lists at http://lists.ubuntu.com. Remember that an important element of Ubuntu is its community of users, many of whom will be very willing to answer any questions you might have!
Once you’re certain that all your data is backed up, you can move on to the next chapter, which provides a step-by-step guide to installing the operating system.
Summary
The aim of this chapter has been to prepare both you and your computer for the installation of Ubuntu. We’ve looked at how your hard disk will be partitioned prior to installation and the preparations you should make to ensure your hard disk has sufficient free space. You also learned about the types of files you might choose to back up, in addition to vital details you should record, such as usernames and passwords for your online accounts.
In the next chapter, we move on to a full description of the Ubuntu installation procedure. The chapter guides you through getting Ubuntu onto your computer.

C H A P T E R 5
■ ■ ■
Installing Ubuntu
It’s now time to install Linux. This chapter details how to install Ubuntu, the version of Linux supplied with this book. Ubuntu offers a special installation program for this purpose.
Installing Linux is a surprisingly quick task and shouldn’t take more than 30 minutes on a modern PC. It’s also relatively simple, with very few decisions to make throughout. Ubuntu’s installation program automates the task to a high degree.
However, you should examine all the options you’re offered to make sure they’re correct. Installing an operating system involves a couple of serious maneuvers that, via an incorrect click of the mouse or accidental keystroke, bring with them the possibility of data loss. Read and consider every warning message you see, and be sure to keep your wits about you. Above all, make a backup of your data, as described in the previous chapter.
An Overview of the Installation Process
Installing Ubuntu requires little more of you than the ability to use the keyboard. The installation program is a little old-fashioned in that it doesn’t use a mouse. Instead, you choose options by highlighting them using various keys and then pressing Enter. Don’t worry—it’s really easy, and you’ll quickly get the hang of it. In fact, in most cases, the default choices are best, so throughout the entire procedure, you’ll have to do little more than hit Enter a few times.
If you used MS-DOS in the old days, you’ll have a head start when it comes to navigating around the screen. Pressing the Tab key moves the highlighted selection from option to option on the screen. Alternatively, you can use the arrow keys: press the right arrow to move the selection to the next option and the left arrow to move it to the previous one. Sometimes, you might need to move up and down in a list and, as you might expect, you can use the up and down arrow keys for that navigation!
When it comes to making a selection from a list, simply use the Tab or cursor keys to highlight the correct choice, and then press Enter. In the case of two or more choices, you might need to highlight each selection in turn, press the spacebar to choose it, and then move the highlight down to an option before hitting Enter. When you reach a list like this, how it works will be pretty obvious.
The installation works through a few stages in order to get Linux on your computer’s hard disk. After a few preliminary setup options, you’ll need to partition your hard disk in order to create space for Ubuntu. After this, Ubuntu is installed onto your hard disk. This is done in two phases. Initially, the software is copied onto your hard disk, and then, in a second automated phase, it’s installed and set up on your computer.
33

34 |
C H A P T E R 5 ■ I N S T A L L I N G U B U N T U |
Occasionally during the installation, you might have to answer a few questions. When the software that controls your monitor is installed, for example, you may be asked what resolution to use. You’ll also need to set a username and password.
At the end of the procedure, your PC will boot straight into the Ubuntu login screen, and you’re set to go. There’s no need to mess around configuring hardware because that’s done automatically. Neat, eh?
In most cases, the installation of Ubuntu will run smoothly without a hitch. But if you do run into problems, head over to Chapter 6, which addresses many of the most common issues and provides solutions.
Step-by-Step Guide
As outlined in Chapter 4, you shouldn’t start the installation process until you’ve made sure there is enough space for Ubuntu on your hard disk and you have backed up all your data. With those preparations complete, you’re ready to install Ubuntu. The remainder of this chapter guides you through the process.
Step 1: Boot from the CD-ROM
With your computer booted up, insert the Ubuntu disc into the CD/DVD-ROM drive. Close the tray, and then reboot your computer.
Ubuntu is installed by booting the installation program from CD-ROM. Therefore, the first step is to ensure your computer’s BIOS is set to boot from the CD-ROM drive. How this is achieved depends on your particular computer, but it’s always done via the BIOS setup program. Most PCs let you enter BIOS setup by pressing the Delete key just after the computer is first booted, although some use another key or key combination. Review the information displayed on your particular screen at boot time for more information.
When the BIOS menu appears, look for an option such as Boot and select it (you can usually navigate the BIOS menu by using the cursor keys and select options by pressing Enter). On the new menu, look for a separate entry such as Boot Device Priority or perhaps Boot Sequence.
Ensure that the entry for the CD-ROM is at the top of the list, as shown in Figure 5-1. Arrange the list so that it’s followed by the floppy drive and then your main hard disk (which will probably be identified as IDE-0 or First Hard Disk). You can usually press the F1 key for help on how the menu-selection system works.
Once you’ve made the changes, be sure to select the Exit Saving Changes option on the main BIOS setup menu. Your PC will then reset and boot from the Ubuntu CD-ROM, and you’ll be greeted by the Ubuntu welcome screen, as shown in Figure 5-2. Press Enter to start the installation program.
■Note In most cases, you can simply hit Enter once the Ubuntu welcome screen is displayed. This will start the installation program and get the ball rolling. However, by hitting the F2 key, and then the F1 key (the function keys run along the top of the keyboard), you can view a number of troubleshooting options. It’s extremely unlikely you’ll need to make use of these, but they’re worth bearing in mind for future reference.

C H A P T E R 5 ■ I N S T A L L I N G U B U N T U |
35 |
Figure 5-1. Before starting, make sure your computer can boot the CD-ROM.
Figure 5-2. Press Enter to start the installation program.
36 |
C H A P T E R 5 ■ I N S T A L L I N G U B U N T U |
Step 2: Select Your Language
One of the design goals of Ubuntu is to be usable by just about anyone in the world. Ubuntu supports a massive list of languages, and the first step in the installation routine is to select one, as shown in Figure 5-3. It offers many eastern and western European languages, as well as Asian languages. The default is English.
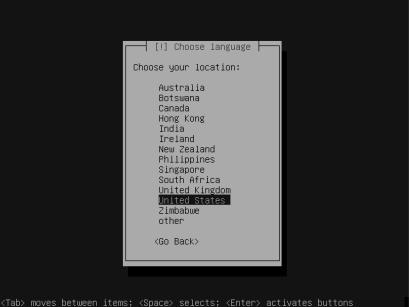
Figure 5-3. Choose your language and then your locale.
This will be your first experience with Ubuntu’s keyboard-based navigation system, and it’s a good example of how easy it is to use. Just use the up and down arrow keys to highlight whichever language you want to select, and then press the Enter key.
Following this, you may be asked to select your exact version of the language, which will be based on your locale. For example, residents of the United Kingdom might want to choose UK English. Once again, simply use the cursor keys to highlight your selection, and then hit Enter.
Step 3: Confirm Your Keyboard Layout
Next, you’ll be asked to confirm the keyboard layout you’ll be using. This should correspond to your language and locale settings, and will be automatically selected, so you can just hit Enter.
If, for whatever reason, you don’t know what keyboard layout you’re using, you can opt to discover it. Use the cursor keys to highlight “Find your layout by pressing some keys.” This will take you through a quiz during which the installation program uses a process of logical deduction to discover your keyboard layout.
Alternatively, if you think your choice is correct, you might want to test it by selecting the “Test your keyboard” option. If you find the keyboard doesn’t work as expected, choose the option to discover its layout.

C H A P T E R 5 ■ I N S T A L L I N G U B U N T U |
37 |
Step 4: Wait During Hardware and Networking Autodiscovery
Next, you can sit back for a few moments while Ubuntu probes your hardware and configures everything to ensure that installation progresses smoothly. You’ll see a progress bar indicating its status, as shown in Figure 5-4.
Figure 5-4. Ubuntu will automatically discover your hardware to ensure the installation runs smoothly.
Ubuntu will also attempt to configure your network connection at this stage. It may fail in this attempt, reporting an error relating to something called DHCP (Dynamic Host Configuration Protocol), but this isn’t a problem. Just press Enter in the error dialog box, and then use the cursor keys to highlight “Do not configure the network at this time” (being offline won’t hinder installation in any way).
Step 5: Set a Hostname
Following autodiscovery, you’ll be asked to set a hostname for the computer, a slightly archaic requirement. The hostname is the name under which your computer is identified in networking environments, as well as at the command line. (Part 4 of this book describes how to use the command line.)
Although the hostname is essential to how Linux works, it’s not something you need worry about. You can enter your own name or go with the default choice of ubuntu—it’s up to you! Once you’ve made your choice, simply press Enter to move on.