


Chapter 5 n Planning Your Shoot |
117 |
Try These Planning Exercises
1.Storyboarding: In Chapter 2, “Writing and Scheduling,” you were introduced to a scene from Shakespeare’s Richard III. If you performed the script breakdown exercise at the end of that chapter, then you’ve already acquainted yourself with that scene. The script is located in the Chapter 2 folder on the companion Web site. Though it’s a simple dialogue scene between two characters, there’s a lot of dramatic tension and rhythmic interplay. Finding a way to shoot this scene to showcase the actors, enhance the drama, and reveal the tension is an excellent exercise. (After all, this is one of the rare instances as a director where you know you can trust your material.) Create a set of storyboards for this scene. In addition to planning your shots, go ahead and give some thought as to how and where you might like to stage it. Do you want to shoot it in a traditional period British setting? Or restage it for a different location. Because it’s primarily talking heads, you don’t need any exceptional rendering skill, even stick figures will do.
2.Shot Lists: Now that you’ve created a set of storyboards for the Richard III scene, create
the associated camera diagrams and shot lists. In addition to helping you understand where you’re going to want your camera, this process will also give you an idea of how many times you might have to run the scene to get the shots you want, and when you might need to shoot some things out of sequence. Remember, to get all the angles that you need, because your actors will have to be prepared to perform many takes.
3.Production Design: Don’t worry, we’re not going to send you shopping or set-building. Rather, we’re simply going to ask you to write up a narrative description of how you might design the Richard III scene. You should have already chosen a setting during the storyboarding exercise. (If you really want to exercise your skills, go ahead and scout around for some locations, take some pictures of them, and determine if you think you could shoot your storyboarded scene there.)
Now you can start thinking about how you might want to dress your location, what kind of wardrobe you might want the actors to wear, and what sorts of props you’ll want to use. In addition, give some thought to overall color palette and tone of the scene. The obvious palette and tone choice is dark and muted, but perhaps there are other options—not so obvious—that are equally as powerful.
4.Budget: You’ve now done the bulk of the planning that you need to actually pull off a shoot of this scene. With your breakdown sheets, production design, and shot lists in hand, give some thought as to how much it would cost to shoot it. Write up a budget to generate a cost estimate to cover the shoot. Obviously, you’ll need a camera, and possibly lights and audio gear, as well as two actors and a crew of at least one person and a camera operator. In addition, you might need to rent props or costumes, or pay for access to your location. If you’re really going gung-ho on this, then you might even need to budget for set dressing or construction. (Bear in mind that it’s also possible to do this scene for free with a skeleton crew. That’s one reason we picked it. One great thing about Shakespeare: everything you need is in the text, so you can pull off this scene with minimal production. Nevertheless, it’s fun to imagine a lavish production as well.)
Effects Planning
If your shoot requires any special effects, then you have a whole extra planning job ahead of you. Special effects must be carefully planned out for all the reasons that any shot needs to be planned (to save time on the set and to make sure you get the footage you need). But effects planning is also the time when you have to figure out how you’re going to create the effect you want.

118 The Digital Filmmaking Handbook, 4E
Your first question when creating a special effect shot should always be, “Do I really need it?” Effects are time-consuming, complicated, and expensive. You should never include anything in a story if it doesn’t really belong there, but you definitely shouldn’t include something as complex as a special effects shot if it doesn’t really belong there.
If you decide that you do need the effect, your next question is to determine if the effect is going to be created digitally (in the computer), or practically (using “real” props and sets, and clever camerawork), or some combination of both. As amazing as digital effects can be, it’s often easier and faster to create an effect using special props and backdrops on the set.
Obviously, to determine the best way to create an effect, you need to know something about creating effects, both digital and practical. We talk much more about effects creation in Chapter 17, “Titles and Effects.” Hopefully, if you’re not comfortable with effects work, you can find someone who is and get him or her to help you with your effects planning.
Once you’ve determined how to create the effect you need, you might want to shoot some simple test shots and see if the effect really works. Alternatively, maybe you’ll want to create animatics, animated shots (usually 3D) that serve as a “moving storyboard.” Animatics can provide good visual references for everyone, from designers to effects crews to actors. For example, you can use a 3D program to create animatics that can be shown to actors and crew and that can even be used as placeholder video while you’re editing.
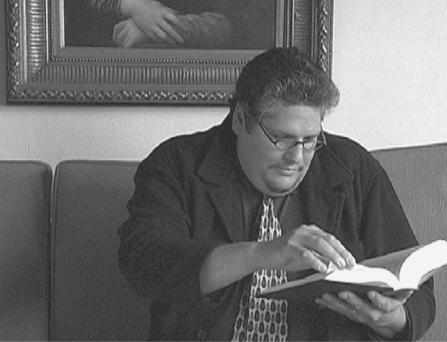
Perhaps the best way to understand the importance of effects planning is with an example. The shot in Figure 5.12 is from a short film about a guy with a remote control. In one scene, the script calls for a painting of the Mona Lisa to appear on the wall behind the man and for the wall to change color.
When shooting, we first thought about compositing the Mona Lisa in digitally, but then realized it would be easier to simply create a Mona Lisa prop (which we did by printing a digital file of the Mona Lisa on a large-format printer and then mounting it inside a rented frame).
The change in wall color, though, was achieved through a digital effect called rotoscoping. Simply put, we repainted the wall color in postproduction. Unfortunately, the first time we shot, we didn’t realize that the actor’s head needed to remain in front of the painting at all times, to ease the rotoscoping process.
With better planning and some good tests, we could have avoided this. As it was, we had to reshoot, or face an incredibly difficult rotoscoping job.
WHAT TO WATCH
Animated works, such as The Incredible Adventures of Wallace and Gromit, offer the most extreme production design examples, because everything that you see on-screen has to be designed. Even if you’ve already seen these excellent animated shorts, take a look at them again with an eye toward the production design. From the custom-designed wallpaper themes to the characteristic “industrial era” look of Wallace’s inventions, these works are masterpieces of production design.
Chapter 5 n Planning Your Shoot |
119 |
Figure 5.12
Due to bad effects planning, this shot was unusable. Since the actor’s head did not remain in front of the Mona Lisa at all
times, repainting the wall became prohibitively difficult.
Creating Rough Effects Shots
If your feature requires complex effects shots—battling spaceships, giant flying insects, waving computer-generated cornfields—you’ll want to start preparing such shots early in production. There’s no reason you can’t have your effects department quickly rough-out low-res, low-detail animations that can serve as animated storyboards. With these rough animations, you can more easily plan and direct shots. Having low-res proxy footage also means that you can go ahead and start editing before your final effects are rendered.
Filmmakers have always had to engage in meticulous planning before rolling their cameras. As a digital filmmaker, you have a decided advantage. With digital tools for storyboarding, you can more easily try out different visualizations. Moreover, with digital editing, your storyboards, animatics, and early work files can actually be repurposed to save time in postproduction.