


7
Using the Camera
Photo credit: Jason Hampton

The sweeping panoramas of Lawrence of Arabia, the evocative shadows and compositions of The Third Man, the famous dolly/crane shot that opens A Touch of Evil— when we remember great films, striking images usually come to mind. Digital video
cameras are the hot topic among filmmakers these days, and shooting your film is the single most important step in a live-action production. Shooting good video requires more than just recording pretty images. As a director, the ability to unite the actors’ performances with the compositions of the cinematographer, while managing all of the other minutiae that one must deal with on a set, will be key to the success of your project. Central to all of the above is the ability to use the camera.
The camera is the primary piece of equipment in any type of production, so in this chapter, you’re going to get familiar with your camera. Professional cinematographers know their cameras inside and out. Many of them will only work with certain types of cameras, and some will only work with equipment from specific rental houses. The advantage of most digital video cameras is that you can point and shoot and still get a good image. However, if you want to get the most from your camera, you should follow the example of the pros and take the time to learn the details of your gear.
In Chapter 4, “Choosing a Camera,” we explained how digital video cameras work, in Chapter 5, “Planning Your Shoot,” we discussed different types of shots. In this chapter, we’ll show you how to use the various features of a typical film or video camera and we’ll discuss how to put it all together using exposure, strong compositions, and camera movement to tell your story.
Shooting good footage involves much more than simply knowing what button to push and when. There are many creative decisions involved in setting up your shots, and in this chapter, we’re going to cover all of the controls at your disposal and learn how they affect your final image.
Shooting with DSLRs
Shooting HD video with still cameras differs significantly from shooting with “normal” video cameras. We discuss shooting with DSLRs in detail in Chapter 10 “DSLRs and Other Advanced Shooting Situations.”
Setting Focus
Focus is possibly the most basic part of using a camera. All modern cameras come with autofocus mechanisms, but in order to truly master the camera, you need to learn how to set and control the focus yourself.
Before you can focus your camera, make sure the viewfinder is adjusted to match your vision. Most cameras, like the ones in Figures 7.1 and 7.2, have an adjustment ring, or diopter, on the viewfinder. (Refer to your camera documentation for specifics.) Set the camera lens out of focus, then look through the viewfinder and move the viewfinder focus adjustment until you can see the grains of glass or the display information in the viewfinder itself.

144 The Digital Filmmaking Handbook, 4E
Figure 7.1
A typical entry-level professional camcorder from Sony.
Figure 7.2
Typical features of a professionallevel shoulder-mount camcorder.
Chapter 7 n Using the Camera |
145 |
If your camera allows, turn off the auto-focus mechanism. Auto focus will always focus on the middle of the frame. Since you might want to be more creative than this, stick with manual focus.
To focus a zoom lens manually, zoom all the way in to your subject and focus the image. Now you can zoom back to compose the shot at the focal length you desire. As long as your subject doesn’t move forward or backward, your image will be in focus at any focal length available.
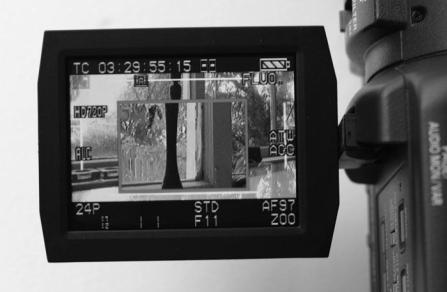
Many video cameras have a special focus assist view that displays a zoomed in portion of the frame so that you can double-check the focus. This is especially helpful if you do not have a field monitor (see Figure 7.3)
You can also focus by composing your shot first and then adjusting the focus ring on the lens, the same way you would with a prime lens. The only problem with this method is that the wider your shot, the harder it will be to tell if your subject is truly in focus and if the subject or camera moves, you will have to make an adjustment to keep the shot in focus.
Figure 7.3
The focus assist button makes it easier to check focus on the fly.
Luckily, most images have a depth of field that exceeds the depth of focus. In Figure 7.4, the depth of focus is eight feet from the camera, but the depth of field—the part of the image that appears in focus—starts a couple of feet in front of the subject and extends to infinity. Anything behind the subject will appear in focus, even though it is not on the plane of focus.
If you’re having trouble focusing, use your manual iris control to iris down (go to a higher f-stop number). This will increase your depth of field and improve your chances of shooting focused. Under most normal, bright lighting conditions, especially daylight, the field of focus will extend from your subject (the plane of focus) to infinity (see Figure 7.4).
146 The Digital Filmmaking Handbook, 4E
Figure 7.4
In this illustration, the plane of focus is eight feet from the lens, but the depth of field is much bigger. Everything behind the plane of focus appears in focus as well.
Generally, focus won’t present much of a problem. In fact, one of the biggest complaints about the look of digital video is that the focus is too sharp throughout the image. Film typically has a much more shallow depth of field than video, so often only the subject is in focus (see Figure 7.13). One way to get more of a film-like image is to control the lighting and exposure so that the depth of field is shallow. With a video camera, this is very difficult to do under bright, uncontrolled lighting conditions such as daylight. (More about how to get shallow depth of field in Chapter 10.)
The only time you’re likely to encounter a focus problem is when you’re shooting in low-light conditions. When there isn’t a lot of light, the field of focus becomes very small, and it’s hard to judge focus in the viewfinder or LCD display when there isn’t much light on the subject.
If focus is critical and the lighting conditions are challenging, the only way to be absolutely sure that your shot is in focus is to measure the focus with a tape measure and then change, or “pull” the focus on the lens as the camera or subject moves. We explain how to measure and pull focus in Chapter 10.
Use a Field Monitor
Feature film directors connect “video assist” monitors to their 35mm film cameras so that they can see what the camera operator sees through the viewfinder. A field monitor lets you do the same thing with a video camera. Even if you’ll be operating the camera yourself, a field monitor can be an asset, making it much easier to focus and frame your shots, and it lets others see what the camera operator is seeing. To see a true HD image, you’ll need to use the HD output on the camera and the HD input on the monitor. (For more on monitoring video on the set, see Chapter 10.)