


208 The Digital Filmmaking Handbook, 4E
Organization on the Set
All productions benefit from having someone keep a record of what happens on the set. The traditional Hollywood method uses a script supervisor to record all the shots as they occur, along with important details. Using a script supervisor is not necessary for non-scripted projects, such as documentaries and corporate videos. Instead, a field producer keeps careful notes about the shoot. Either way, on-set records are used later during postproduction to help the editor and others who were not present on the set understand what was shot, how it was shot, and why it was shot. When problems occur during the shoot, the script supervisor’s or field producer’s notes offer an explanation and often point to a solution.
Script Supervising for Scripted Projects
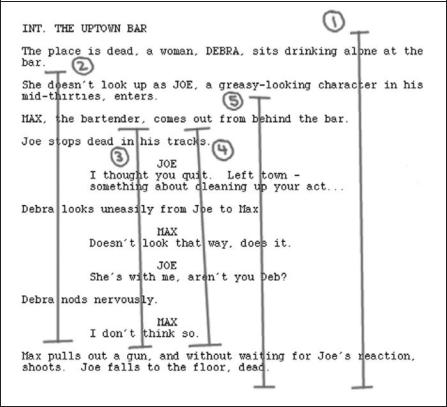
The script supervisor’s job is to keep track of the number of pages that are shot each day and to make sure that the camera angles and eyelines are framed correctly to cut together later on, that continuity is maintained, and that the camera slates are marked with the correct take numbers and other information. As if this weren’t enough to keep track of, they are also responsible for creating a lined script during the shoot (see Figure 9.2).
Continuity
During a shoot, continuity is the process of keeping track of dialogue changes, matching camera angles, actors’ positions, and wardrobe and props so that the footage from shot-to-shot, and day-to- day, will cut together. You can use a digital still camera to take photos to keep track of continuity.
When a script is prepared for production, each scene is given a scene number. In turn, each shot in that scene is given its own shot number. Generally, the master shot is named according to the scene number; for example, scene 23, and each take is numbered consecutively: 23-1, 23-2, 23-3, and so on. The next shot in the scene, say a close-up of the lead actor, would be called 23a, and so on. This information is recorded on the slate and also on the notes kept on the shooting script by the script supervisor, usually handwritten on the facing page of the shooting script itself (see Figure 9.2). Usually, the best takes are marked with a circle around the shot number. These circled takes are the shots that the director thought were the best takes during the shoot.
For complicated scenes, a script supervisor’s notes might include diagrams of the set, still images for continuity, and more. In addition, the script supervisor lines the script, drawing lines with arrows to show the portion of the script that each shot covers. Be aware that these lines indicate the dialogue that was actually covered during the shot, as opposed to the director’s idea of what should be covered.
Clearly, script supervising isn’t necessary for every shoot, but the longer your project and the more complicated the shoot, the more valuable this information can be later on.
Chapter 9 n Shooting and Directing |
209 |
Figure 9.2
A lined script and script supervisor’s marks.
Documentary Field Notes
For documentaries, there is no such thing as a script supervisor; however, there is usually someone on the set to take field notes. Field notes are not as formalized as script supervisor notes, but they contain the same sorts of information: content, technical notes, and so on. If the shoot involves multiple takes—such as the taping of an on-camera host—the takes are numbered, and the director selects circled takes, just as they do on a scripted project. With documentaries, separate “takes” don’t always exist—rather the camera operators simply cover the scene as best they can without stopping the camera unnecessarily. The field notes serve to describe what happened and to give the timecodes of key moments so that later on, people working in postproduction can quickly find important material.
Once your project is shot, and you’ve got it “in the can,” it’s time to move on to postproduction. The rest of this book covers building a workstation for postproduction, editing picture and sound, color correction, titling, rotoscoping for special effects, and outputting your final project.
10
DSLRs and Other Advanced
Shooting Situations
Photo credit: William MacCollum

One of the biggest recent trends in digital filmmaking is the use of DSLR cameras to shoot HD video. With their extremely good image quality, low price, great low-light performance, and huge selection of lenses, a DSLR can be a great option for the filmmaker on a budget. But since DSLR cameras weren’t designed for shooting moving images, there are many challenges associated with their use, and shooting video with them is complicated. In this chapter, we’ll go over all of the special issues and gear that can make your
DSLR video shoot a success.
Many of the advanced shooting techniques in this chapter apply to shooting with DSLR cameras, but they are not limited to DSLRs. In fact, many of these techniques are used when shooting traditional 35mm film and also high-end digital cinema. Interchangeable lenses, double-system sound, advanced camera rigging and supports, viewing live video on the set, and using tapeless media are all covered in this chapter. In addition, we provide a discussion of shooting with multiple cameras, recording double-system sound and the special requirements that are necessary for shooting blueor green-screen special effects footage.
Thanks to the DSLR trend, advanced filmmaking technology is now affordable for indie filmmakers. Using this technology requires more equipment, and more expertise on the set, but in return you’ll get extremely high production values.
What’s Different with a DSLR?
DSLR cameras that shoot HD video can be found on all types of shoots, from indie features to network TV shows. Why? Because they’re cheap, and the footage looks fantastic.
So what’s different when shooting with a DSLR?
Still camera bodies differ greatly from video camera bodies. Still cameras are designed with a handgrip on the right side, which leaves your left hand free to make adjustments to the lens. This works great for still photographs, but it can be a challenge when shooting handheld video. A professional camera has a body style that lets you balance the camera on your right shoulder. This allows you to use your body to stabilize the camera, takes the weight of the camera off your arms, and serves to make the camera an extension of your body: when you turn, the camera turns as well.
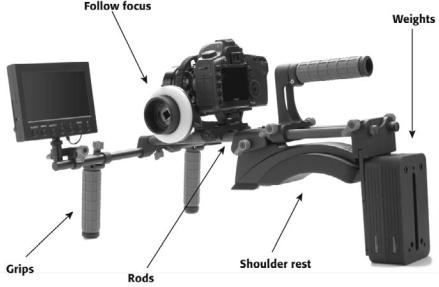
To make a DSLR more ergonomic, and to provide a shooting experience that is more like a “real” video camera, you’ll want to buy a special rig that eases handholding (Figure 10.1). Think of a rig as a hard exoskeleton that your still camera failed to develop on its own, or a video camera–shaped cage for your DSLR. Even if you are not going to be doing much handholding, a rig includes a rod that can be used to provide support for a large lens, especially if the lens is bigger than your camera.
212 The Digital Filmmaking Handbook, 4E
Figure 10.1
A still camera enhanced with the Cinema Field Bundle from Red Rock Micro. This rig is designed to provide better handholding ergonomics and includes rods, counter weights, grips, and a follow focus mechanism.
One of the big advantages of a DSLR is that you can change the lens, which opens up a huge arena of custom shooting options. A standard video camera has a built-in zoom lens that is designed to cover a variety of shooting situations from wide field of view to very telephoto. But if you want an extreme wide angle or an extreme telephoto shot, you are out of luck. With a DSLR, you can have a selection of lenses on hand for any special shooting needs.
Or you might select a lens that can handle low-light situations. Lenses with an f-stop rating of 1.2 or 1.4 can do very well shooting on a city street at night without the need for additional lighting or heavy gain boosting. This can be a huge advantage to filmmakers who want to shoot night exteriors with a limited budget.
Those wider apertures (and the larger sensors used in DSLRs) also give you the option for a more shallow depth of field, something that is very difficult to achieve with a normal video camera. While the ability to shoot shallow depth of field gives you more creative options, it also means you have to be extra careful about focus, and focusing with a DSLR can be a challenge, especially if the camera or subject is moving. Most DLSRs do not allow for auto focusing while recording video, and if they do, auto focus is often slow and jerky. To get the most out of your camera, you’ll need to use manual focus.
Another difference is that there is no motorized zoom when using a DSLR. Some filmmakers do not like zooms, preferring to use a dolly or other device to move the camera closer to the subject, to preserve a uniform sense of depth in the scene. But for documentaries and other unscripted projects, zooming can be an invaluable tool. Any lens that is equipped with a manual zoom knob will work great, and you might find you prefer it to a motorized zoom. If zooming is important to you, be sure to use a lens that has a zoom knob (or a place to install one).
We mentioned in Chapter 4, “Choosing a Camera,” that DSLRs are not great at recording audio. They only have two channels of audio, they don’t have high-quality XLR audio inputs, and every time you touch the camera body or lens, that noise will get recorded. The most common work-around for this is to record your audio to a separate device, a process known as double-system sound. We’ll explain how to record double-system sound later in this chapter.

Chapter 10 n DSLRs and Other Advanced Shooting Situations |
213 |
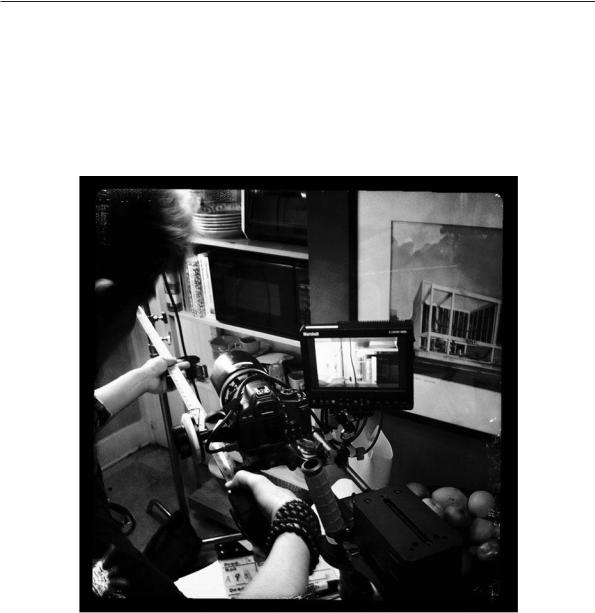
While shooting HD video, the optical viewfinder in most DSLRs is disabled, leaving only the LCD viewfinder. It can be tough to judge focus or even see an LCD display at times, so there are several types of enhanced viewfinders on the market to compensate for this, such as the one shown in Figure 10.2.
Figure 10.2
A still camera outfitted with a Zacuto base plate and Z-finder enhanced viewfinder.
And finally, DSLRs can overheat. While overheating doesn’t mean that you end up with a melted handful of plastic and metal slag, it does mean that the camera might shut itself down after about 20 minutes to cool down. So, if your project requires very long takes, a DSLR might not be practical.
All told, these various accessories can add up to a lot of gear attached to your camera (Figure 10.3). That’s another reason that DSLR rigs are popular. We’ve got a selection of photos throughout this chapter showing different types of DSLR rigging.
Figure 10.3
A fully-accessorized Canon DSLR camera outfitted with a matte box, camera-top monitor, double-system audio recording device, LED light and wireless microphone receiver—all held in place with a Norbert Filmmaker rig by K-Tek.