

Уход за прибором
Приведенные ниже рекомендации по эксплуатации и уходу за детектором позволят Вам пользоваться детектором CRUNCH долгие годы.
Никогда не оставляйте детектор на лобовом стекле или на "торпеде" после парковки автомобиля. Температура в салоне автомобиля, особенно в летнее время, может достигать недопустимого для рабочего состояния детектора значения.
Чтобы уберечься от кражи, также настоятельно рекомендуем убирать детектор с лобового стекла или "торпедо", даже если Вы оставляете автомобиль на короткое время.
Не подвергайте детектор воздействию влажности. Капли росы, дождя, масла и других жидкостей могут повредить внутренние компоненты прибора, что негативно отразится на его работоспособности.
Спецификация
|
Канал приема радиосигналов Тип приемника:
Тип антенны: Тип детектора: Диапазоны частот:
Канал приема сигналов лазера Тип приемника: Тип детектора: Оптический сенсор: Спектральная зона:
Общие Рабочий диапазон температур: Требования к питанию:
Размеры (Высота, Ширина, Длина): Вес:
|
Супергетеродин с двойным преобразованием частоты Линейно поляризованная, рупорная Частотный дискриминатор Х-диапазон 10.500 -10.550 ГГц К- диапазон 24.050 - 24.250 ГГц Ка- диапазон 33.400 - 36.000 ГГц
Приемник импульсных лазерных сигналов Цифровой процессор Фотодиод с выпуклой оптической линзой 905 ±50 нм
от -20 до +70°С 12-15В постоянный ток, 80мА (Отрицательное заземление)
28 х 63.5 х 91 мм 65 г |
Приведенная спецификация является общей, спецификация отдельных устройств может отличаться.
Спецификация может быть изменена производителем без уведомления
CRUNCH 214B
All BLACK line Crunch radar-detectors are made on the basis
of the newest SAMSUNG microprocessors, which makes
possible to significantly decrease percentage of false alarms
OPERATION MANUAL
X-, K-, Superwide Ka-Band
Radar and Laser detector
CONTENTS
СОДЕРЖАНИЕ 2
ВВЕДЕНИЕ 2
КОМПЛЕКТАЦИЯ: 3
ОСНОВНЫЕ ФУНКЦИИ 3
Органы управления 4
УСТАНОВКА 6
РАБОТА ЛАЗЕР/РАДАР-ДЕТЕКТОРА 8
Режимы работы 9
ВОЗМОЖНЫЕ НЕИСПРАВНОСТИ 11
УХОД ЗА ПРИБОРОМ 12
СПЕЦИФИКАЦИЯ 13
CONGRATULATIONS! 15
PACKAGE CONTENTS 16
BASIC FEATURES AND CONTROLS 17
INSTALLING THE UNIT 19
OPERATION 20
OPERATION SETTINGS 21
CARE AND MAINTENANCE 23
TROUBLESHOOTING 23
SPECIFICATIONS 25
CONGRATULATIONS!
You have acquired the CRUNCH 214B, the newest radar/laser detector.
The CRUNCH 214B incorporates the advanced new antenna technology and extremely low power-consuming circuitry to ensure top-class performance. The CRUNCH 214B is a complete integrated laser/radar detector, which detects all police radar guns, including Ultra-X and Ultra-K pulse mode radars, as well as laser guns.
Besides, CRUNCH 214B is able to detect signals of VG-2 (devices detecting radar-detectors).
The CRUNCH 214B provides distinct visual and audio alerts to warn you of the presence of X-, K-, Ka- band and VG2 radar signals as well as laser signals in front of you for 180º round.
You can drive with confidence when you bring along the CRUNCH 214B.
Note: Some local regions and federal regulations may prohibit the use of detection device. Please check with authorities regarding the use of this device in your area before operating it.
PACKAGE CONTENTS
Your CRUNCH 214B package includes the following components:
-
CRUNCH 214B radar/laser detector
-
Coiled 12-volt DC power cord and fuse
-
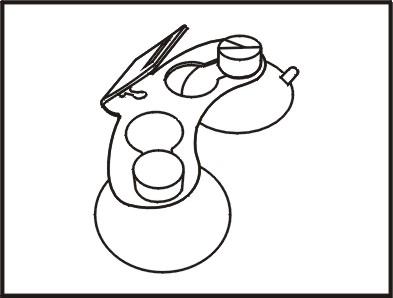
Windshield mounting bracket with two suction cups and bumper
-
Dashboard mounting hook and loop fasteners (two each)
-
Operation manual
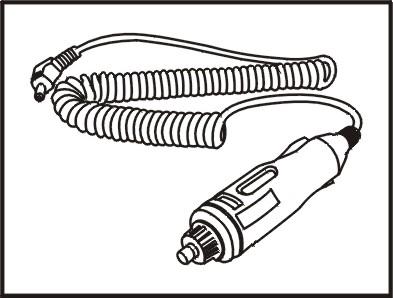
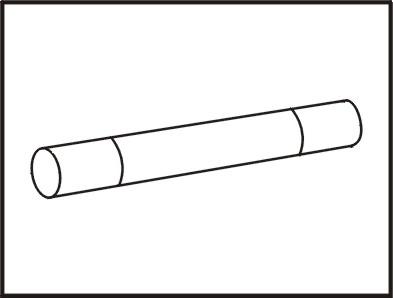

Power Cord Spare Fuse Mounting Bracket Fastener Tape
BASIC FEATURES AND CONTROLS
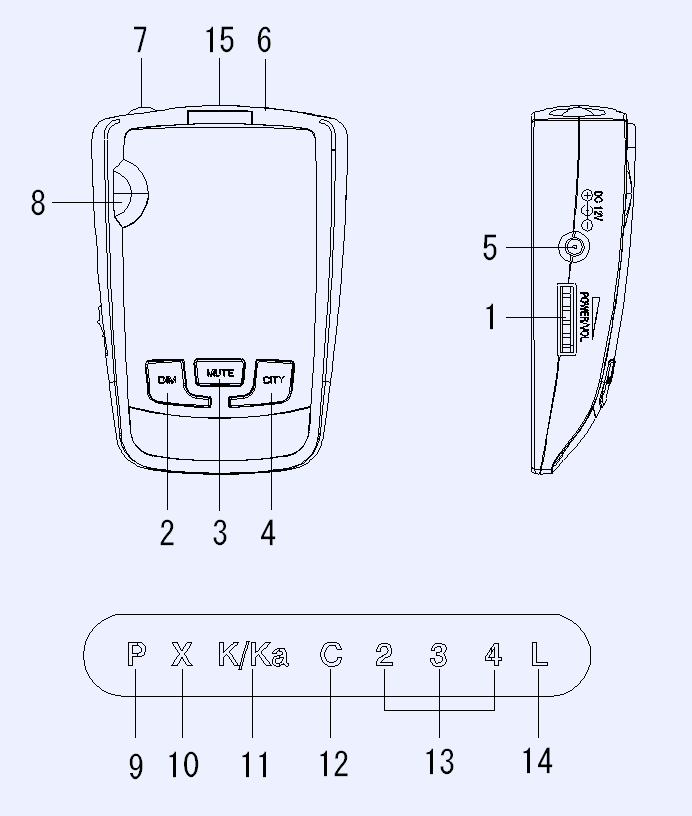
1. Power On-Off/Volume Control
Turns the detector on/off and controls the volume level.
2. Dim Button
Dim Mode reduces the illumination of the display. You can adjust the brightness of the display. There are three variants of brightness, choose which you prefer: Bright – Dim – Dark (display is off)
It’s rather convenient at night (when the display brightness might be dimmed in order to prevent eyes weariness) as well as in daytime (when it’s necessary to increase the brightness).
3. Mute Button
Silence the audio alarm.
4. City Button
Press the City button to help reduce false alarms while driving in the city. While driving on the highways or rural, press the City button again to turn off the City Mode for long-range detection.
5. DC12V Power Input
Connect the DC Power cord here.
6. Radar Antenna
Receive the radio signals emitted by traffic radars.
7. Laser signal detection lens
The CRUNCH 214B detector has laser detection lens with detection angle of 360.
8. Rear Laser signal detection lens
Receive the laser signal from the rear by traffic lasers.
9. Power-On Indicator ‘P’ lights to indicate power is being supplied to the detector and the detector is turned on.
10. X-band Signal Indicator ‘X’ lights and blinks to indicate the presence of an X-band radar signal. The blink rate increases as the radar source gets closer. A distinct audio alert is also heard.
11. K-band and Superwide Ka-Band Signal Indicator ‘K/Ka’ lights and blinks to indicate the presence of a K- band or Ka- band radar signal. The blink rate increases as the radar source gets closer. A distinct audio alert is also heard.
12. City Mode Indicator ‘C’ lights to indicate when you selected City Mode by
pressing the CITY button.
13. Signal Strength Meter
Indicate the strength level of presence radar or laser signal.
14. Laser Signal Indicator ’L’ lights and blinks to indicate the presence of a laser signal. A distinct audio alert is also heard.
15. Mounting Bracket Location
Slot holds mounting bracket firmly.
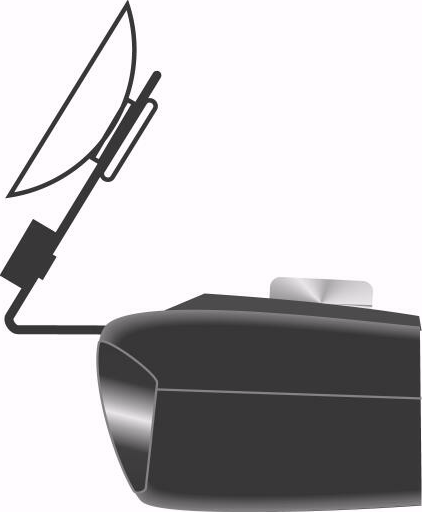
INSTALLING THE UNIT
Mounting Guidelines
For the best performance, select the proper location for the detector where it
has a direct view of the road. Remember, the radar antenna and laser sensor
are located behind the rear panel of the unit. The antenna and sensors should
not be obstructed by metal or metallic surfaces and should be pointed at the
horizon for accurate long-range detection.
Choose a location that does not block the driver's vision.
Mount the detector in a level position.
Do not mount the detector behind the metal surfaces, windshield antenna, wiper blades, and ornaments mirrored sunscreen.
Window tinting reduces the received strength of laser signals; do not mount the detector behind tinted glass. Do not mount the detector where the driver or passenger might hit in a sudden stop or accident.
Mounting Type
There are two ways of installation of CRUNCH laser/radar detector
Hook-and Loop Mounting
The hook-and-loop tape included with your detector might be the best mounting method for some dashboards.
 Follow
these instructions to use the hook-and-loop tape.
Follow
these instructions to use the hook-and-loop tape.
-
Use a damp cloth to thoroughly clean both the bottom of the detector and the dashboard.
-
Peel off the tape's paper backing and apply the tape to the bottom of the detector.
-
Remove the paper backing from the other side of the tape and press the detector onto the dashboard.
Windshield Mounting
The supplied windshield bracket and suction cups let
you quickly mount the detector to your vehicle's
windshield.
Follow these steps to use mounting bracket kit.
-
Install the suction cups onto the bracket by fitting them into their holes.
-
Attach the bracket to windshield.
-
Attach Detector to bracket.
-
Bend bracket for correct detection angle (if necessary), do not use the CRUNCH 214B to bend bracket.
-
Plug power cord DC12V into detector.
-
Plug power cord into cigarette lighter.
Cautions: Some new models of cars have a plastic safety coating which is applied to the windshield. The suction cups may leave permanent marks on the windshield once they are removed. Check vehicle owner's manual to see if your car has the plastic safety coating.
Connecting the Power
The detector is designed to operate on most DC12V negative ground vehicle electrical systems. The power cord provided with the detector has a cigarette lighter socket plug at one end and a small connector at the other.
1. Insert the small connector into the jack on the side of the detector.
2. Insert the other end into the cigarette lighter socket of your vehicle.
If the detector does not operate when you turn it on, remove the adapter from the cigarette lighter socket and carefully check the socket for debris. Also, check the fuse in the adapter and your vehicle's fuse box.
Replacing the Fuse
If the detector CRUNCH 214B stops operating, the fuse in the cigarette lighter plug might be blown. If it has blown, follow these steps to replace it:
1. To replace the fuse, unscrew the top of the plug.
2. Remove the fuse and check the fuse to see if it has blown. If it has, replace it.
OPERATION
Power on and Self-Test
To turn the detector on, connect power and turn the On/Off volume control away from you until it clicks.
When powered up, the detector sounds a distinctive tone for each signal and flashes in sequence as a self-test. Then all display turn off except the ‘P’.
Memory confirmation
All features selected are retained in the memory. , which are Highway/City, Brightness, Tone Sound, and VG-2.
Adjusting Volume
To change the detector's volume, turn volume control either away or toward you.
Dim Mode
Dim Mode reduces the illumination of the display. When pressing the button, the illumination reduces up to 50 %. When pressing the button for the second time – all illumination is reduced except the ‘P’. Pressing and holding the power button a third time restores full illumination to the display.
Tutorial Mode
Pressing CITY button for three seconds, the detector will demonstrate how it operates when each radar and laser band signal is detected. To exit Tutorial Mode, press any button after completing demonstration.
OPERATION SETTINGS
City Operation
In modern cities there are many weak signals which have no relation to the traffic signal controllers. The City mode reduces the detector's sensitivity to weak signals and eliminates responses to false sources.
It’s important to notice that old or poorly shielded detectors in other vehicles can sometimes transmit weak radar signals. So don’t forget to switch on the City mode where it is necessary.
-
To select the City mode, press CITY button.
-
Press CITY button again to go back Highway mode
The Highway mode provides maximum sensitivity for open road driving
where there are no false signals
Mute Operation
To silence the detector, press MUTE. You can also press MUTE button while the audio alert is sounding to silence it. Press MUTE button again to restore audio alarm.
Tone Operation
To change the tone sound, press MUTE for three seconds. The unit will change the tone sound.
Receiving and Identifying Radar and Laser Signals
When your detector identifies radar signals, the following will occur:
-
Distinctive audible alarms will be emitted for X-, K-, and Ka-band radar
signals.
The alarm sounds will occur faster and faster as the signal gets stronger
(as you get closer to the source).
When the signal gets very strong, the alarm sounds become continuous
tones.
2. The appropriate visual alarm indicator will flash in unison with the audio tones.
When the pulses of laser light from a laser gun are detected by your detector
a. The audible alarm will emit a distinctive sound for laser.
b. The “L” indicator will flash and start blinking.
c. Laser detection will override all radar bands.
VG-2 Alerts
The VG-2, also known as a “radar detector detector”, is a special receiver used by police to detect signals radiated by a radar detector.
When a VG-2 signal is detected, the alert is sounded and both ‘X’ and ‘K/Ka’ band indicators will flash.
VG-2 Select Operation
Pressing both DIM and CITY buttons for three seconds, your CRUNCH will disengage VG-2 feature with two beeps sound.
Pressing both DIM and CITY buttons again, your CRUNCH will engage VG-2 feature with one beep sound. Factory default is ‘VG-2 On’.
Pulse Protection
Pulse (or instant-on) radar is more difficult to detect than conventional radar because it remains “off” until activated to measure the speed of a targeted vehicle.
When a pulse type transmission is detected, your CRUNCH detector sounds an urgent audio warning and flashes the Alert strength indicators at their fastest rate.
CARE AND MAINTENANCE
Your CRUNCH is an example of superior design and craftsmanship.
The following suggestions will help you to handle your detector in a proper way so you can enjoy it for years.
Never leave the detector on the windshield or dashboard when you park your vehicle. The temperature in the vehicle in summer can reach levels above what is considered to be safe for this detector.
To make you less susceptible to break-in and theft, remove the detector from your windshield or dashboard when you leave your vehicle.
Do not expose the detector to moisture. Rain dew, road splash, or other liquids can damage the internal components and reduce sensitivity of the detector.
TROUBLESHOOTING
If the detector does not turn on:
-
Check the power cord. Be sure all power connectors are properly installed.
-
Check the fuse that controls power to the cigarette lighter socket. See your vehicles owner's manual
-
The cigarette lighter socket might be dirty. Clean it with fine emery cloth to ensure a good, clean connection.
-
Vehicle electrical problem exists.
-
Make sure that the volume control is in the ON position.
Caution: Do not place any metal object other than the cigarette lighter or a cigarette lighter plug in the cigarette lighter socket.
If the detector gives a false alert when the vehicle hits or bumps:
-
Check the vehicle's electrical system, including main battery cable and alternator connections.
-
Install a filter capacitor (470uF.25volts) on the back of the cigarette lighter socket, across the power connections.
If the receiving signals are weak:
-
Check the angle of detector.
-
Point detector to the horizon.
-
Radar antenna / laser sensor is obstructed.
-
Relocate the detector clear of any obstruction outside the windshield, such as a wiper blade (see mounting manual).
SPECIFICATIONS
RADAR
|
Receiver Type: |
Dual Conversion Superheterodyne |
|
Antenna Type: |
Linear Polarized. Self-Contained Antenna |
|
Detector Type: |
Frequency Discriminator |
|
Frequency of Operation: |
X-Band 10.500-10.550GHz K-Band 24.050-24.250GHz Ka-Band 33.400-36.000GHz |
LASER
Receiver Type: Pulsed Laser Signal Receiver
Detector Type: Digital Signal Processor
Opto Sensor: Photo Diode with Convex Condenser Lens
Spectral Response : 905 ± 50nm
General
Temperature Range: -20 to + 70°C
Power Requirements: 12~15V DC, 80mA (Negative Ground)
Dimensions HxWxD: 28 x 63.5 x 91mm
Weight: 65g
*Specifications are typical. Individual units might vary.
Specifications are subject to change without notice.