

Pro Visual C++-CLI And The .NET 2.0 Platform (2006) [eng]-1
.pdf138 |
C H A P T E R 3 ■ O B J E C T - O R I E N T E D C + + / C L I |
Summary
This chapter covered the basics of objected-oriented development using C++/CLI. You started with a quick refresher on what objects are and their fundamental concepts. From there, you saw how these concepts fit into the world of C++/CLI. You looked at ref classes in general, and then you broke down a ref class into its parts: member variables, member methods, and member properties. You finished the chapter by looking at abstract ref classes and interfaces.
Unlike the basics, C++/CLI has implemented many changes to traditional C++. Though none of the changes are complex—in fact, many simplify things—this chapter should be read carefully by experienced C++ programmers.
You will continue to examine C++/CLI in the next chapter, but now that you have covered the basics, you can move onto a few more complex and, dare I say, fun topics.

C H A P T E R 4
■ ■ ■
Advanced C++/CLI
You have learned the basics of C++/CLI and moved on to explore its object-oriented nature. Now it is time to start looking at some of the more advanced features of C++/CLI. Unlike the previous chapters, this one does not have a common thread from start to finish; instead, it consists of an assortment of more advanced topics that didn’t fit into the previous two chapters.
This chapter covers the following topics:
•Working with preprocessor directives
•Using multifile libraries and building an assembly from them
•Referencing the custom-built assemblies in your applications
•Templates
•Generics
•Handling errors in C++/CLI using exceptions
•Working with delegates
•Using delegates in events
Preprocessor Directives
Before any actual compiling occurs on a piece of program source code in C++/CLI, it must first go through the preprocessor, just as in traditional C++. The purpose of the preprocessor is to prepare the program source code for compiling using a number of instructions called preprocessor directives.
These preprocessor directives enable the programmer to do tasks such as include or exclude code based on conditions, define constants, and so on. All of the directives are prefixed with the # symbol (variously called pound, number sign, and hash), which makes them stand out from the rest of the program source code. Table 4-1 shows a complete set of all preprocessor directives for C++/CLI.
139

140 C H A P T E R 4 ■ A D V A N C E D C + + / C L I
Table 4-1. C++/CLI Preprocessor Directives
Directive |
Description |
#define |
Defines or undefines a meaningful name to a constant or macro in your program. |
#undef |
|
#if |
Allows for conditional compilation of program source code. |
#ifdef |
|
#ifndef |
|
#elif |
|
#else |
|
#endif |
|
#error |
Intended to allow you to generate a diagnostic error when something goes wrong |
|
in the preprocessor stage. |
#include |
Provides header file insertion. |
#line |
Redefines the compiler’s internally stored line number and filename with the |
|
provided line number and filename. |
#pragma |
Provides machine/operating system–specific features while retaining compatibility |
|
with C++. Most likely, the only #pragma directives that you will encounter in |
|
C++/CLI are once, which causes an include file to be only included once, and |
|
managed and unmanaged, which allow for function-level control of compiling functions |
|
as managed or unmanaged. |
#using |
Imports .NET assembly metadata into program source code using C++/CLI. |
|
|
The three directives that you’ll most likely deal with using C++/CLI are the defining, conditional, and include directives. Other than the #using directive, there’s no difference between C++/CLI and traditional C++ when it comes to the available processor directives, though the #import and many #pragma directives don’t make sense and won’t be used with C++/CLI. This is appropriate, given that C++/CLI wasn’t designed to change how C++ works; instead, it’s supposed to expand C++ so that it works seamlessly with .NET.
By convention, preprocessor directives are placed near the top of the source code. In actuality, other than a select few exceptions (the #using preprocessor directive comes to mind as it needs global scope) you can place a preprocessor directive on its own line almost anywhere in the code— basically wherever it makes sense. The #define declarative, for instance, just needs to be placed before it is used.
Defining Directives
The #define directive is used to execute a macro substitution of one piece of text for another. Here are the three basic syntaxes for implementing #define:
#define identifier
#define identifier token-string
#define identifier(parameter1,..., parameterN) token-string
The first syntax defines the existence of a symbol. The second syntax allows for the substitution of text identified by the identifier with the following token-string. The third syntax provides the same
C H A P T E R 4 ■ A D V A N C E D C + + / C L I |
141 |
functionality as the second, and the passed parameters are placed within the token-string. Listing 4-1 shows the source code before it has been passed through the preprocessor.
Listing 4-1. Original #defined Code
using namespace System; #define DISAPPEARS #define ONE 1
#define TWO 2
#define POW2(x) (x)*(x)
void main ()
{
Console::Write("The following symbol disappears->" DISAPPEARS); Console::WriteLine("<-");
int x = TWO;
int y = POW2(x + ONE);
Console::WriteLine(y);
}
Listing 4-2 shows the source code after it has passed through the preprocessor. Notice that all identifiers have been substituted with their token-string, or lack of token-string in the case of the DISAPPEARS identifier.
Listing 4-2. Processed #defined Code
using namespace System;
void main ()
{
Console::Write("The following symbol disappears->" ); Console::WriteLine("<-");
int x = 2;
int y = (x + 1)*(x + 1);
Console::WriteLine(y);
}
The #undef directive’s purpose is to remove a previously defined symbol. Unlike #define, there is only one syntax:
#undef identifier
The #undef directive undefines symbols that have been previously defined using the #define directive or the /D compile-time switch. If the symbol was never defined, then the #undef directive will be ignored by the preprocessor. If you forget to #undef a symbol before you #define it again, the compiler will generate a warning but will let you continue. It is probably a good idea whenever you see this warning to #undef the variable just before you #define it again to get rid of the warning, but there is nothing saying you have to.
Another approach that you can use to get rid of the warning for an already assigned symbol is to use the #pragma push_macro() and #pragma pop_macro() directives in conjunction with the #undef and #define directives. With this approach, the value of the symbol is stored so that it can be reassigned later after the application no longer needs the new symbol definition. Here is a simple example:

142 C H A P T E R 4 ■ A D V A N C E D C + + / C L I
#define MY_SYMBOL "Original"
#pragma push_macro("MY_SYMBOL") #undef MY_SYMBOL
#define MY_SYMBOL "New Value" Console::WriteLine(MY_SYMBOL);
#pragma pop_macro("MY_SYMBOL") Console::WriteLine(MY_SYMBOL);
Conditional Directives
Conditional directives provide the ability to selectively compile various pieces of a program. They work in a similar manner to the if flow control construct covered in Chapter 2. The big difference is that instead of not executing a particular section of code, now it will not be compiled.
The basic syntax for conditional directives is as follows:
#if constant-expression // code
#elif constant-expression
//code #else
//code #endif
Similar to the if flow control construct, the first #if or #elif constant-expression that evaluates to nonzero or true will have its body of code compiled. If none of the constant-expressions evaluates to true, then the #else body of code is compiled.
Only one of the blocks of code will be compiled, depending on the result of the constantexpressions. The constant-expressions can be any combination of symbols, integer constants, character constants, and preprocessor operators (see Table 4-2).
Table 4-2. Preprocessor Operators
Operator Description
+Addition
-Subtraction
*Multiplication
/Division
%Modulus
&Bitwise AND
|Bitwise OR
^Bitwise XOR
&&Logical AND
||Logical OR
<<Left shift

C H A P T E R 4 ■ A D V A N C E D C + + / C L I |
143 |
Table 4-2. Preprocessor Operators
Operator Description
>>Right shift
==Equality
!= Inequality
<Less than
>Greater than
<= |
Less than or equal to |
>= |
Greater than or equal to |
defined |
Symbol is defined |
!defined |
Symbol is not defined |
|
|
Though usually quite simple, an expression can become quite complex, as the following example suggests:
#define ONE |
1 |
#define TWO |
2 |
#define THREE |
3 |
#if ((ONE & THREE) && (TWO <= 2)) || defined FOUR Console::WriteLine("IF");
#else
Console::WriteLine("ELSE");
#endif
The #if directive has two special preprocessor operators called defined and !defined. The first evaluates to true on the existence of the identified symbol. The second, obviously, evaluates to true if the identified symbol does not exist. To simplify the syntax, and because the defined and !defined operators are the most commonly used preprocessor operators with the #if directive, special versions of the directive were created: #ifdef and #ifndef.
These two directives are equivalent:
#if defined symbol #ifdef symbol
and so are these two:
#if !defined symbol #ifndef symbol
Include Directive
The #include directive causes the compiler to insert a piece of code into another piece of code. The most common usage of the #include directive is to place header files containing type definitions at the top of a piece of source file to ensure that the types are defined before they are used.
There are two different #include directive syntaxes for including a file in a source. The first uses angle brackets (<>) to enclose the file’s path, and the second uses double quotes (""):
144 |
C H A P T E R 4 ■ A D V A N C E D C + + / C L I |
#include <file-path-spec> #include "file-path-spec" #include <windows.h> #include "myclassdef.h"
#include "c:/myincludes/myclassdef.h"
Each directive syntax causes the replacement of that directive by the entire contents of its specified file. The difference when processing the two syntaxes is the order that files are searched for when a path is not specified. If the file’s path is specified, then no search is done, and the file is expected to be at the location specified by the path. One major drawback is that the path cannot be a network path (per the Universal Naming Convention [UNC]). In a corporate, multideveloper site, this inability could be quite a nuisance or possibly even crippling. Table 4-3 summarizes the differences between the angle bracket and double quote syntax search methods when no path is specified.
Table 4-3. #include Syntax Search Differences
Syntax Form |
Search Method |
#include <...> |
Check for files along the path specified by the /I compiler option and then |
|
along paths specified by the INCLUDE environment variable. |
#include "..." |
Check for files in the same directory of the file that contains the #include |
|
statement, then along the path specified by the /I compiler option, and |
|
finally, along paths specified by the INCLUDE environment variable. |
|
|
■Caution Though the C++/CLI compiler supports the INCLUDE environment variable, Visual Studio 2005 does not.
Using Directive
#using is a preprocessor directive specific to C++/CLI. When compiled, it generates metadata that is used by the common language runtime (CLR) to identify which assemblies to load. If you are an experienced C++ programmer, you can think of this directive as being similar to the #include directive, except that instead of including an .h file, you are now including a compiled .dll assembly file.
The syntax of the #using directive purposely resembles that of the #include directive. This makes sense, as the #using directive’s function resembles that of the #include directive. The only difference in the syntax between #using and #include is that you replace “include” with “using”:
#using <assembly-path-spec> #using "assembly-path-spec" #using <mscorlib.dll> #using "myassembly.dll"
#using <DEBUG/myassembly.dll>
There is no difference between using quotes and angle brackets with #using as there is with the #include directive. Because this is the case, you will generally see angle brackets with #using directives. With either the double quote method or the angle bracket method, the compiler searches for the assembly using the following path:

C H A P T E R 4 ■ A D V A N C E D C + + / C L I |
145 |
•The path specified by the #using directive
•The current directory
•The .NET Framework system directory
•Directories added with the /AI compiler option
•Directories in the LIBPATH environment variable
■Caution The #using directive is only used to help the compiler and the Visual Studio 2005 IDE find the assembly. It does not tell the CLR where to find it. To run the application, you must still place the assembly in a location where the CLR knows to look for it.
It should be noted that the keyword using and the preprocessor directive #using are different. The using keyword enables coding without the need of explicit qualifications. The using keyword says, “Whenever a class or variable does not exist in the current scope, check the scope of the namespace specified by the using statement, and if it is there, use it just like it is part of the current scope.”
Okay, now after that nice long explanation, I should tell you that you will probably never use the #using directive if you are developing C++/CLI code within Visual Studio 2005 because in VS .NET the best way to add assembly references is via Solution Explorer.
Multifile Libraries
So far, in every example, you have used only one file as the source of an application. For small example or demonstration programs, this might be okay, but for more complex applications, using multiple source files to break up an application to make it more readable is a much better approach.
Breaking up the source code of an application into its possible many parts can be done in any number of ways. One of the most common approaches is to break off the source into groups of common functionality, better known as libraries. Libraries are a powerful means of breaking up an application because they are more conducive to code reuse, and only at the cost of some minor up-front design work.
The first thing that you will confront when building multifile libraries is that all types need to be declared before they are used in C++/CLI. This is not a problem in a single file, because all you have to do is place the declaration of the type before it is used.
With multifile libraries, you run into the problem of how to access a type that is declared in a different file. You could define a whole bunch of classes and then cut and paste all of the class definitions that you need in every file that uses them, but then you are going to be living in maintenance hell for the lifetime of the library. A better solution is to use header files to hold all these definitions and then #include them at the start of any source file that uses these definitions.
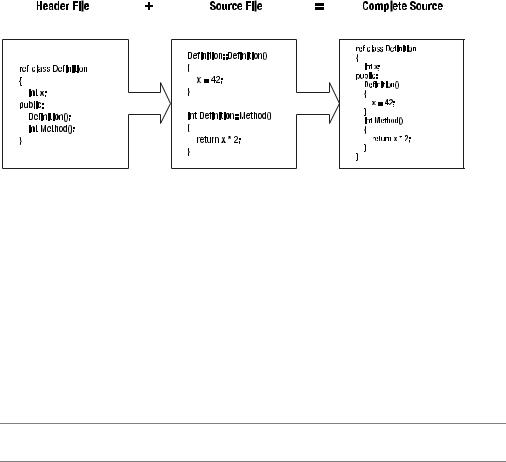
Almost all C++/CLI libraries (and applications, for that matter) should be broken up into two types of files: header files and source files. A header file is made up of the code needed to describe the types that are used, and a source file is made up of all the code that implements these types.
146 |
C H A P T E R 4 ■ A D V A N C E D C + + / C L I |
With this split, it is a simple thing to place all needed definitions of types by a source file at its top. You discovered earlier that it is a simple matter to place all the declarations in a header file and then insert the contents of the header into the main source code using the #include directive. Coding this way also ensures that all types will be declared before they are used, just as they need to be, by C++/CLI.
Okay, you know that you can split source code into two parts, and you know how to actually include the definition part of the source. Let’s examine the two parts in more detail.
Header Files
Header files look very similar to all the examples that you have seen in this book so far. Instead of ending in .cpp, they usually end in .h, but that is not mandatory—they can actually end with anything. The only real difference between what you have seen in Chapter 3’s class definitions and the class definitions found in header files in this chapter is that the header files now only contain the definition portion of functions, member properties, and member methods.
■Note Header files are made up of function prototypes and class definitions.
It is legal to place the implementation of a class within a header file. In fact, so far that is how I have been coding every class in the book. To a C++ programmer this is called inline coding.
Here is an example of a header file:
//square.h
ref class Square
{
public:
Square ( int d); int Area();
private:
int Dims;
};
Notice that the only difference between this file and what you have seen previously is that there is no main() function, and that the constructor Square() and the member method Area() are only declared and have no implementation. You could, in fact, have implemented both the constructor and the member method, and the header file still would have been valid because classes in C++/CLI are just definitions. What you can’t include in header files are function implementations—for example, the main() function. What you can include are only function prototypes.
C H A P T E R 4 ■ A D V A N C E D C + + / C L I |
147 |
Source Files
You have seen source files previously in this book. They are C++/CLI files that end with .cpp. With traditional C++ source files, the definition is not found in the source file, unlike all the examples you have seen thus far. Instead, they contain only the implementation of the definitions specified in the header file.
The syntax for implementing member methods in a separate source file from their definitions is similar to that of the function, which was covered in Chapter 2, except that the member method is prefixed with the name of the class it is implementing and the scope resolution (::) operator.
The following example shows the source file for the square.h header file listed previously. Its structure is very typical of all C++/CLI source files. It starts with the standard using namespace System; statement. Next comes the include statement for the header file, which this source file will be defining, and finally, the actual implementations of all the unimplemented member methods.
// square.cpp
using namespace System;
#include "square.h"
Square::Square ( int d)
{
Dims = d;
}
int Square::Area()
{
return Dims * Dims;
}
Namespaces
Adding a namespace to a library is optional but highly recommended. Remember that all identifiers have to be unique in C++/CLI, at least within their own scope. When you develop code on your own, keeping identifiers unique should not be a problem. With careful coordination and a detailed naming convention, a small group of programmers can keep all their identifiers unique. However, with the addition of third-party source code, unique identifiers become increasingly harder to maintain. That is, unless namespaces are used.
Namespaces create a local-scope declarative region for types. In other words, namespaces allow programmers to group code under a unique name. Thus, with a namespace, it is possible for programmers to create all types with any names they like and be secure in the knowledge that the types will be unique within the application if they are placed within a uniquely identified namespace.
The basic syntax of a namespace is simply this:
namespace name
{
// all types to be defined within the namespace
}