

Pro Visual C++-CLI And The .NET 2.0 Platform (2006) [eng]-1
.pdf148 |
C H A P T E R 4 ■ A D V A N C E D C + + / C L I |
If you want a namespace called Test to provide local scope to the Square class defined previously, you would simply code it like this:
namespace Test
{
public ref class Square
{
public:
Square (int d); int Area();
private:
int Dims;
};
}
Those of you with a traditional C++ background may have noticed the additional keyword public placed in front of the class declaration. C++/CLI handles namespaces differently from traditional C++. Types within a namespace have private access. Thus, to make the class accessible outside the namespace, it has to be declared public. In traditional C++, all types are public within a namespace.
Personally, I don’t like the new syntax, as it is inconsistent with C++. It should be public: (be careful, this is invalid syntactically), as it is in classes and structures. This syntax resembles C# and Java.
■Caution If you fail to make any of the classes within the namespace public, then the namespace will not be accessible and will generate an error when you attempt to use the using statement for the namespace.
The syntax to implement a member method within a namespace does not change much. Simply add the namespace’s name in front of the class name, delimited by the scope resolution (::) operator.
using namespace System;
#include "square.h"
Test::Square::Square ( int d)
{
Dims = d;
}
int Test::Square::Area()
{
return Dims * Dims;
}

C H A P T E R 4 ■ A D V A N C E D C + + / C L I |
149 |
If you are observant or have a good memory, you might remember that you could use the using statement to simplify the preceding code to this:
using namespace System;
#include "square.h" using namespace Test;
Square::Square ( int d)
{
Dims = d;
}
int Square::Area()
{
return Dims * Dims;
}
Be careful to place the using statement after the #include directive because the namespace Test is defined in the included header file.
Building Assemblies from Multifile Libraries
I don’t cover assemblies until Chapter 18, so let’s not get bogged down with the details of what an assembly really is until then. For now, think of an assembly as a specially formatted .dll or .exe file that is executed by the CLR.
A key feature that you need to know about assemblies is that they’re self-describing. What does that mean to a C++/CLI programmer? Simply put, you don’t need header files to use the types placed within an assembly. Or, in other words, all those header files you meticulously created when you built your library are no longer needed once you finish creating your assembly. This is a major change from traditional C++.
■Note Header files are not needed with assemblies!
Building Multifile Library Assemblies
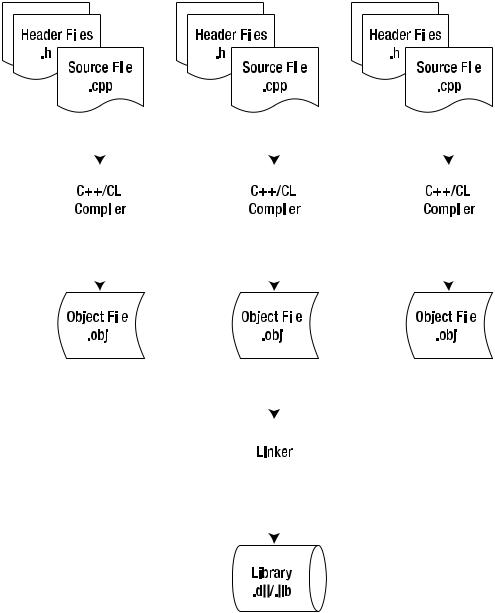
You will learn how to actually access an assembly later in this chapter. The common C++ way of creating a library, either static or dynamic, is to create a set of header files to describe all the functionality found within the library. Then, in separate source files, implement all the functionality defined by these header files. All of the source code, along with all the associated header files, is run through the compiler to generate object files. Then all the object files are linked together to create a library file.
150 |
C H A P T E R 4 ■ A D V A N C E D C + + / C L I |
|
|
|
|
|
|
|
|
|
|
|
|
|
|
||||||||
|
|
|
|
|
|
|
|
|
|
|
|
|
|
|
|
|
|
|
|
|
|
|
|
|
|
|
|
|
|
|
|
|
|
|
|
|
|
|
|
|
|
|
|
|
|
|
|
|
|
|
|
|
|
|
|
|
|
|
|
|
|
|
|
|
|
|
|
|
|
|
|
|
|
|
|
|
|
|
|
|
|
|
|
|
|
|
|
|
|
|
|
|
|
|
|
|
|
|
|
|
|
|
|
|
|
|
|
|
|
|
|
|
|
|
|
|
|
|
|
|
|
|
|
|
|
|
|
|
|
|
|
|
|
|
|
|
|
|
|
|
|
|
|
|
|
|
|
|
|
|
|
|
|
|
|
|
|
|
|
|
|
|
|
|
|
|
|
|
|
|
|
|
|
|
|
|
|
|
|
|
|
|
|
|
|
|
|
|
|
|
|
|
|
|
|
|
|
|
|
|
|
|
|
|
|
|
|
|
|
|
|
|
|
|
|
|
|
|
|
|
|
|
|
|
|
|
|
|
|
|
|
|
|
|
|
|
|
|
|
|
|
|
|
|
|
|
|
|
|
|
|
|
|
|
|
|
|
|
|
|
|
|
|
|
|
|
|
|
|
|
|
|
|
|
|
|
|
|
|
|
|
|
|
|
|
|
|
|
|
|
|
|
|
|
|
|
|
|
|
|
|
|
|
|
|
|
|
|
|
|
|
|
|
|
|
|
|
|
|
|
|
|
|
|
|
|
|
|
|
|
|
|
|
|
|
|
|
|
|
|
|
|
|
|
|
|
|
|
|
|
|
|
|
|
|
|
|
|
|
|
|
|
|
|
|
|
|
|
|
|
|
|
|
|
|
|
|
|
|
|
|
|
|
|
|
|
|
|
|
|
|
|
|
|
|
|
|
|
|
|
|
|
|
|
|
|
|
|
|
|
|
|
|
|
|
|
|
|
|
|
|
|
|
|
|
|
|
|
|
|
|
|
|
|
|
|
|
|
|
|
|
|
|
|
|
|
|
|
|
|
|
|
|
|
|
|
|
|
|
|
|
|
|
|
|
|
|
|
|
|
|
|
|
|
|
|
|
|
|
C H A P T E R 4 ■ A D V A N C E D C + + / C L I |
151 |
The main reason for all these header files is that when the class is implemented, all the classes, structures, variables, and so on are defined and thus are accessible.
This exact process can be used to generate library assemblies as well. The only difference in the process would be that the C++/CLI flags are turned on for the compiler and linker.
The following example, which consists of Listings 4-3 through 4-6, shows how to create an assembly using the traditional C++ method.
Listing 4-3 shows the header definition to the Card.h file. This file defines an enum of playing card Suits and a Card class within the namespace of Cards. Notice that the keyword public is placed in front of both the enum class and the ref class, as both need to be publicly accessible.
Listing 4-3. Card.h: Traditional Method
namespace Cards
{
public enum class Suits { Heart, Diamond, Spade, Club };
public ref class Card
{
private:
int type; Suits suit;
public:
Card(int type, Suits suit);
property int Type
{
int get();
void set(int value);
}
property Suits Suit
{
Suits get();
void set(Suits value);
}
virtual String^ ToString() override;
};
}
Listing 4-4 shows the implementation of the class’s constructor and member methods. There are a couple of things of note in this file. First is how you implement the getter and setter methods. Notice that you must include the class name and the property name before the get or set method declaration. Second is how you can override the virtual method ToString() inherited from the Object class. This allows you to use the class directly within the Console::WriteLine() method.
As you can see, there is nothing special to doing either of these. I also do a little magic to get the characters that represent the heart, diamond, spade, and club.
152 |
C H A P T E R 4 ■ A D V A N C E D C + + / C L I |
Listing 4-4. Card.cpp: Traditional Method
using namespace System;
#include "card.h" using namespace Cards;
Card::Card(int type, Suits suit)
{
Type = type; Suit = suit;
}
int Card::Type::get()
{
return type;
}
void Card::Type::set(int value)
{
type = value;
}
Suits Card::Suit::get()
{
return suit;
}
void Card::Suit::set(Suits value)
{
suit = value;
}
String^ Card::ToString()
{
String ^t;
if (Type > 1 && Type < 11) t = Type.ToString();
else if (Type == 1) t = "A";
else if (Type == 11) t = "J";
else if (Type == 12) t = "Q";
else
t = "K";
switch (Suit)
{
case Suits::Heart:
return String::Concat(t, gcnew String((Char)3, 1)); case Suits::Diamond:
return String::Concat(t, gcnew String((Char)4, 1));
C H A P T E R 4 ■ A D V A N C E D C + + / C L I |
153 |
case Suits::Club:
return String::Concat(t, gcnew String((Char)5, 1)); default: //Spade
return String::Concat(t, gcnew String((Char)6, 1));
}
}
Listing 4-5 defines a second class named Deck. Notice that you use the Card class within the class, yet you never declare it within the header file. The trick to handling this is to remember that header files are pasted wholesale into the source file during compilation. Because this is the case, you simply place the include file of Card.h before Deck.h in the Deck.cpp source file, as you will see in Listing 4-6. Thus, the Card class is pasted in first and, therefore, defined as needed before the Deck class.
Listing 4-5. Deck.h: Traditional Method
namespace Cards
{
public ref class Deck
{
array<Card^>^ deck; int curCard;
public:
Deck(void);
Card ^Deal(); void Shuffle();
};
}
Listing 4-6 shows the final source file to the mini library. Notice, as I stated previously, that Card.h is included before Deck.h. If you’re observant, you might also notice that the Random class is used. You can find this class within the .NET Framework class library.
Listing 4-6. Deck.cpp: Traditional Method
using namespace System;
#include "card.h" #include "deck.h"
using namespace Cards;
Deck::Deck(void)
{
deck = gcnew array<Card^>(52);
for (int i = 0; i < 13; i++)
{ |
|
deck[i] |
= gcnew Card(i+1, Suits::Heart); |
deck[i+13] |
= gcnew Card(i+1, Suits::Club); |
deck[i+26] |
= gcnew Card(i+1, Suits::Diamond); |
deck[i+39] |
= gcnew Card(i+1, Suits::Spade); |
} |
|
154 |
C H A P T E R 4 ■ A D V A N C E D C + + / C L I |
curCard = 0;
}
Card^ Deck::Deal()
{
if (curCard < deck->Length) return deck[curCard++];
else
return nullptr;
}
void Deck::Shuffle()
{
Random ^r = gcnew Random(); Card ^tmp;
int j;
for( int i = 0; i < deck->Length; i++ )
{
j= r->Next(deck->Length);
tmp |
= deck[j]; |
|
deck[j] = |
deck[i]; |
|
deck[i] = |
tmp; |
|
}
curCard = 0;
}
The command you need to execute to build a library assembly from the command line is a little more complex than what you have seen so far, but it is hardly rocket science. The syntax is simply as follows (without the ellipsis):
cl source1.cpp source2.cpp...sourceN.cpp /clr:safe /LD /FeOutputName.dll
The first change to the command line is that it takes a list of source file names. The next change is the /LD argument, which tells the linker to create a .dll and then, finally, the /Fe argument, which indicates the name of the .dll file to create. Notice that there is no space between the /Fe argument and the name of the file to create.
To compile the previous example, you would use
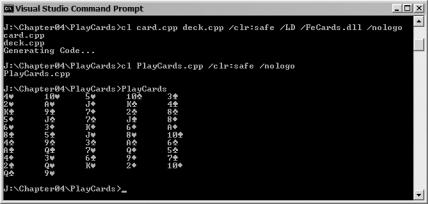
cl card.cpp deck.cpp /clr:safe /LD /FeCards.dll
Assembly Referencing
Once you place all of your library logic in an assembly, you are going to want to access it. With C++/CLI, getting access to or referencing an assembly is remarkably easy: one file copy (even this step can be eliminated) and one line of code. In fact, the command to compile the application doesn’t even change.
After you have done these two things, you can access the library classes as if they were coded directly within your application. If you are using Visual Studio 2005, then you will even have full access to the type definitions within the assembly using IntelliSense.
C H A P T E R 4 ■ A D V A N C E D C + + / C L I |
155 |
You’ll learn more about configuring access to library assemblies in Chapter 18, but the simplest method is just to place the assembly in the same directory where the final .exe file is going to be placed. Moving or copying the assembly can be done by using the simple copy.exe command or by just dragging and dropping using Windows Explorer. That’s it. There’s no registering, unregistering, GUIDs, or variants.
You’ve already covered the line that needs to be added to the source code: #using. Simply add a #using statement at the top of the source code, and voilá! The library is available as if it were coded right there in your code. You don’t even need any header files—the assembly fully describes itself to the compiler, so it doesn’t need any headers.
Listing 4-7 shows an application called PlayCards.exe that references the Cards.dll assembly that you just created. Notice that you have access to the namespace and classes, just as you would if you had coded them in the application. You can make references and handles to the classes. In fact, you can even inherit from them. You can use them just as you would any other class in the application.
Listing 4-7. PlayCards.cpp: Reference a User Assembly
#using <cards.dll>
using namespace System; using namespace Cards;
void main()
{
Deck deck;
deck.Shuffle();
Card ^card; int cnt = 0;
while ((card = deck.Deal()) != nullptr)
{
Console::Write(card->ToString()); Console::Write("\t");
cnt++;
if (cnt > 4)
{
Console::WriteLine(""); cnt = 0;
}
}
Console::WriteLine("");
}
To build this application from the command line, simply copy Cards.dll to the same directory as the source of PlayCards.cpp and then execute the same command from the command line as you always have:
cl PlayCards.cpp /clr:safe
Figure 4-1 shows a sample output of this random program.
156 |
C H A P T E R 4 ■ A D V A N C E D C + + / C L I |
Figure 4-1. Example results of PlayCards.exe
Templates
Templates are a welcome addition to C++/CLI. I personally feel that this feature’s omission contributed quite a bit to Managed Extensions for C++’s (C++/CLI’s predecessor) lackluster adoption and C#’s rapid rise as the number one language for .NET development. Without templates, there was no real difference between the two languages. (The lack of ASP.NET support by C++/CLI may in the future be another major factor. With Managed Extensions for C++, there was at least partial support, but now with C++/CLI, there is no longer even partial support for ASP.NET.)
Though often overlooked by the novice C++ programmer, templates frequently become an often-used feature as a developer’s skills in C++ improve. As a consequence of its strong ability to encourage code reusability, I am sure the same will hold true with C++/CLI.
There really isn’t much difference between C++ and C++/CLI, so a developer who has experience in templates should feel right at home with the C++/CLI implementation. The important things that an experienced developer should be aware of are that templates are verifiable (safe) and only work within a single assembly. To perform template-like functionality across assemblies requires a
.NET Framework 2.0 construct known as generics. I’ll cover generics later in this chapter.
Okay, so what are templates? Templates are used as a compile-time technique that enables a programmer to specify, with a single set of code, a complete range of related functions and/or classes. Have you ever taken a piece of code, cut and pasted it somewhere else, and then just changed the data type(s) implemented within this code? Well, that is what templates do, but without the cut and paste.
There are types of C++/CLI templates (just as in standard C++): function templates and class templates. At first glance, both types of templates look quite complicated, but once you build one or two of them, you will see just how easy they actually are.
Function Templates
Function templates provide the ability to implement the same functionality on different data types. In ancient times, developers used to implement this using #define macro directives. Unfortunately, this method was not always type-safe and it was rather complex to write, especially if the macro was large. Function templates, on the other hand, have complete type checking, and the template function is nearly identical to a standard function. Also, compile-time error messages are detailed and noted on the line in the template where the error occurs. The #define macro directives have more cryptic error messages and appear where the macro is implemented but not where it is declared.

C H A P T E R 4 ■ A D V A N C E D C + + / C L I |
157 |
To implement a template, you need to create a regular function but replace the data types for which you want to replicate the functionality with a template data type. Then you prefix the function with a template header, within which you declare this template data type:
template <class T> T min ( T a, T b)
{
return (a < b) ? a : b;
}
■Note You can use any identifier for the template class, not just T as I do in the examples.
■Note Though I only use the class operator within the template statement, you can also use typename. Both are interchangeable.
By the way, here is the same code as a #define macro directive (yes, all the brackets are needed):
#define min(a,b) ((a) < (b)) ? (a) : (b)
Then you use the template just as you would any other function:
int a = 5; int b = 6;
Console::WriteLine("The min of {0} and {1} is {2}", a, b, min(a,b));
The compiler will look at the function min and check to see if the data types are the same. If they are, it will generate an instance of a function to handle the function. For example, if a and b are int values, then code similar to the following will be generated:
int min ( int a, int b)
{
return (a < b) ? a : b;
}
Be careful, though, because the template specifies that the data type of both parameters must be the same, given that only one type is specified within the template. If you were to implement the preceding template like this:
int a = 5; double b = 6;
Console::WriteLine("The min of {0} and {1} is {2}", a, b, min(a,b));
the compiler would generate an error, as it would not be able to resolve the template type. Templates allow you to specify multiple template types. You could go wild and instead declare
the preceding template to support different data types, like this:
template <class T1, class T2> T1 min ( T1 a, T2 b)
{
return (T1)((a < b) ? a : b);
}
Then if you implemented the template using different data types, you would be fine.
Or would you? What happens if the type data types in the template could not be compared? For example, what would happen if the first data type was an int and the second a handle to String?