

Pro Visual C++-CLI And The .NET 2.0 Platform (2006) [eng]-1
.pdfC H A P T E R 1 7 ■ N E T W O R K P R O G R A M M I N G |
699 |
until the message is sent, whereas asynchronous sending does not block and continues execution of the code without stopping for the send to complete.
To send a message synchronously, you use one of the following overloaded Send() methods:
•Socket.Send (array<unsigned char>^)
•Socket.Send (array<unsigned char>^, SocketFlags)
•Socket.Send (array<unsigned char>^, int length, SocketFlags)
•Socket.Send (array<unsigned char>^, int start, int length, SocketFlags)
As you can see, each just expands upon the parameters from the other. The first parameter is the unsigned byte array of the message being sent. The first added parameter is SocketFlags (for a server it will most likely be None). Next is the length of the message being sent, and finally comes the start point within the unsigned char array (use this if you want to start sending from someplace other than the actual start of the message array).
With version 2.0 of the .NET Framework, two additional Send() methods were added, both allowing for the sending of unsigned char data within Generic ILists:
•Socket.Send (Generic IList)
•Socket.Send (Generic IList, SocketFlags)
When sending a message from a server, I usually use
array<unsigned char>^ message = Encoding::ASCII->GetBytes("Successful connection");
client->Send(message);
when the message buffer length matches the length of the data being sent (as shown here), or I use
client->Send(message, messagelength, SocketFlags::None);
when the message buffer length does not match the length of the data being sent—for example, when a generic length buffer is populated by a variable-length message.
Receive a Message
Just as when you’re sending a message, you have two ways of receiving a message: synchronous or asynchronous. I’ll cover asynchronous receive in detail later in the chapter, but the basic difference is as follows: Synchronous receiving blocks until the message is received, whereas asynchronous receiving sets up an event that waits for the message to be received and then continues on without stopping. Then when the message is finally received, the previously set up event is triggered.
The Receive() method overloads are exactly the same as the sends:
• |
int Socket.Receive (array<unsigned char>^) |
|
• |
int Socket.Receive (array<unsigned |
char>^, SocketFlags) |
• |
int Socket.Receive (array<unsigned |
char>^, int length, SocketFlags) |
• |
int Socket.Receive (array<unsigned char>^, int start, int length, SocketFlags) |
|
The first parameter is the received unsigned byte array of the message. The next parameter is SocketFlags—for a server most likely None or Peek (Peek allows you to look into the buffer without actually taking it out). Next is the length of the message to extract from the receive stream, and finally comes the start point within the receiving unsigned char array (use this if you want to place the incoming message someplace other than the actual start of the message array).
700 C H A P T E R 1 7 ■ N E T W O R K P R O G R A M M I N G
With version 2.0 of the .NET Framework, two additional Receive() methods were added, both allowing for the receiving of unsigned char data within Generic ILists:
•Socket.Receive (Generic IList)
•Socket.Receive (Generic IList, SocketFlags)
All receive methods return the number of unsigned char received or zero [0] if the connection was closed by the client. I use the zero [0] return value to my advantage as I use it to break out of my data input loops for each instance of a socket connection.
In the following simple example, since the number of unsigned chars being received is unknown (and also irrelevant), I use the following code to receive data:
if ((rcv = client->Receive(message)) == 0) break;
Normally, with more advanced servers you place the length of the following received message, formatted as an int, in the unsigned char array buf:
if (client->Receive(buf, 4, SocketFlags::Peek) > 0)
{
int length = BitConverter::ToInt32(buf, 0); buf = gcnew array<Byte>(length);
Then to actually receive the message you use a while loop:
int total = 0; int recv;
int dataLeft = length;
while (total < length) // TCP has an unprotected Message boundary
{
if ((recv = client->Receive(buf, total, dataLeft, SocketFlags::None)) == 0)
{
client->Close(); break;
}
total += recv; dataLeft -= recv;
}
Why is all of this code needed? Remember earlier I mentioned a gotcha? TCP simply sends a stream of data. There is a guarantee that the data will get to its destination and in order, but there is no guarantee that it will all get there at the same time. It is perfectly possible that half the sent message will get to the receiver process at the time the Receive() method is called. With the previous code, the Receive() method will read the rest of the message when it finally arrives. Likewise, it is possible that two messages will be received at one time. Thus, this process will allow the two messages to be split and processed separately (assuming that in your sent message you prefix the sent data with the number of bytes of data sent).
Example TCP Server
Okay, now that we have reviewed all the pieces, let’s see a complete TCP server example. Listing 17-1 is the de facto “Hello World” of network software development: the echo server. It takes in a stream of data from a client (which we will cover next), dumps it to the server console, and then sends the same message back to the client. Unlike most introductory versions of the echo, which show a server that can handle only one client at a time, I skipped ahead and have shown how to write the server so that it can process any number of concurrent (at the same time) clients.
C H A P T E R 1 7 ■ N E T W O R K P R O G R A M M I N G |
701 |
Listing 17-1. A TCP Server That Accepts Multiple Concurrent Clients
using namespace System; using namespace System::Net;
using namespace System::Net::Sockets; using namespace System::Threading; using namespace System::Text;
ref class TcpServer
{
public:
void ProcessThread(Object ^clientObj);
};
void TcpServer::ProcessThread(Object ^clientObj)
{
Socket^ client = (Socket^)clientObj;
IPEndPoint^ clientEP = (IPEndPoint^)client->RemoteEndPoint;
Console::WriteLine("Connected on IP: {0} Port: {1}", clientEP->Address, clientEP->Port);
array<unsigned char>^ msg = Encoding::ASCII->GetBytes( String::Format("Successful connection to the server on port {0}",
clientEP->Port));
client->Send(msg);
int rcv; while (true)
{
msg = gcnew array<unsigned char>(1024);
if ((rcv = client->Receive(msg)) == 0) break;
Console::WriteLine("Port[{0}] {1}",
clientEP->Port, Encoding::ASCII->GetString(msg, 0, rcv));
client->Send(msg, rcv, SocketFlags::None);
}
client->Close();
Console::WriteLine("Connection to IP: {0} Port {1} closed.", clientEP->Address, clientEP->Port);
}
void main()
{
TcpServer^ server = gcnew TcpServer();
Socket^ tcpListener = gcnew Socket(AddressFamily::InterNetwork, SocketType::Stream, ProtocolType::Tcp);
702 C H A P T E R 1 7 ■ N E T W O R K P R O G R A M M I N G
IPEndPoint^ iped = gcnew IPEndPoint(IPAddress::Any, 12345); tcpListener->Bind(iped);
tcpListener->Listen((int)SocketOptionName::MaxConnections);
while(true)
{
Console::WriteLine("Waiting for client connection."); Socket^ client = tcpListener->Accept();
Thread ^thr = gcnew Thread(
gcnew ParameterizedThreadStart(server, &TcpServer::ProcessThread)); thr->Start(client);
}
}
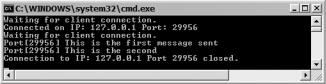
I’ve already covered every bit of this code, but I would like to point out that this code has no way of exiting unless you kill the console (or press Ctrl-C). I did this so as so as not to add add any additional complexity to the network code in the example. There are many solutions to this problem, most involving event handling of keystrokes received on the server machine, but for this example, killing the window just suited it fine. When you run TcpServer.exe, you should get something like Figure 17-1.
Figure 17-1. The TCP server in action
The TCP Client
A TCP client is simpler than a TCP server, at least when it comes to establishing a connection. The code for processing a message, on the other hand, is just as simple or complex as that of the server, since they are mirror images of each other. In other words, when the server sends a message, the client receives it, and vice versa.
Only two tasks need to be performed by the client to establish a connection to a client:
1.Create a socket.
2.Connect to a server IPEndPoint.
The process of creating a TCP client socket is the same as that for a TCP server socket:
Socket^ socket = gcnew Socket(AddressFamily::InterNetwork,
SocketType::Stream,
ProtocolType::Tcp);
Also just like a TCP server, this constructor creates a socket to a version 4 IP address that supports reliable, two-way, connection-based byte streams without duplication of data and without preservation of boundaries using the TCP protocol.
Since there is nothing new here, let’s move on.
C H A P T E R 1 7 ■ N E T W O R K P R O G R A M M I N G |
703 |
Connect to a Server IPEndPoint
Connecting to a TCP server’s IPEndPoint starts with the creation of an IPEndPoint that points to the server. Just as you do with the server, you will probably create the IPEndPoint using
IPEndPoint^ iped = gcnew IPEndPoint(IPAddress::Parse("127.0.0.1"), port);
But there is nothing stopping you from using any of the myriad of other ways available to you. Look carefully at the code. It looks the same as that for the server, but there is a difference. Instead
of the IP address pointing to the local machine where the socket resides, it points to the IP address of the remote machine where you want the connection to be made.
Once you have an IPEndPoint that points to the server, all it takes to make a connection to the server is this:
try
{
server->Connect(iped);
}
catch (SocketException^ se)
{
Console::WriteLine("Connection to server failed with error: {0}", se->Message);
return;
}
Notice that I made the call to the Connect() method within a try/catch block. The reason is that if the connection attempt fails, then a SocketException is thrown. In the previous example I immediately give up, but in your code more than likely you will capture the exception, note it somehow, and then try again.
Example TCP Client
I’m going to move on to the TCP client example as there is no new code to explore when it comes to sending and receiving messages.
Listing 17-2 is just a simple program that connects to a TCP server, receives a connection message from the server, and then proceeds to send messages (which you type in from the console) to the server. After the message is sent, the program waits for the server to send (echo) it back.
Listing 17-2. A TCP Client
using namespace System; using namespace System::Net;
using namespace System::Net::Sockets; using namespace System::Threading; using namespace System::Text;
void main()
{
Socket^ server = gcnew Socket(AddressFamily::InterNetwork, SocketType::Stream, ProtocolType::Tcp);
try
{
IPEndPoint^ iped =
gcnew IPEndPoint(IPAddress::Parse("127.0.0.1"), 12345); server->Connect(iped);
}
C H A P T E R 1 7 ■ N E T W O R K P R O G R A M M I N G |
705 |
The Disconnect() method takes one parameter, a Boolean value that when set to true allows the socket to be reused. When the parameter is set to false the Disconnect() method acts like a Close() method. Here is a snippet of code showing the Disconnect() method in action:
client->Shutdown(SocketShutdown::Both); client->Disconnect(true);
if (client->Connected)
{
Console::WriteLine("Not good I'm still connnected!");
}
else
{
try
{
IPEndPoint^ iped =
gcnew IPEndPoint(IPAddress::Parse("127.0.0.1"), 12345); server->Connect(iped);
}
catch (SocketException^ se)
{
Console::WriteLine("Connection Failed with error: {0}", se->Message); return;
}
}
In this code I also show the Connected property that, as you can see, indicates whether a socket is currently connected.
Okay, now that you are dangerous when it comes to TCP, let’s move on and take a look at connectionless sockets and UDP (User Datagram Protocol), its most common method of being implemented.
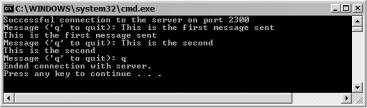
When you run TcpClient.exe, you should get something like Figure 17-2.
Figure 17-2. The TCP client in action
Connectionless Sockets
Developing connectionless sockets code is still primarily based on the client-server architecture. However, a client-server architecture need not be as strictly enforced as it is with TCP, as once a socket is open it can send to and receive from many different sockets during the course of the socket’s lifetime.
Developing connectionless sockets code using UDP takes a different mind-set than developing connected socket code with TCP. There are primarily four reasons why this is so:
706C H A P T E R 1 7 ■ N E T W O R K P R O G R A M M I N G
•Data is sent in self-contained packages instead of a stream of data.
•Network messages are not guaranteed to arrive in the same order as they were sent.
•There is no guarantee that duplicated messages won’t arrive.
•Network messages are not guaranteed to arrive at the destination.
So how does this change your mind-set? First off, since data comes in packages you don’t have to worry about the boundaries of the message being sent. In other words, when you read a UDP package, you know you have all the data that was sent for that particular package. That is a major plus in my book, as much of the code to implement TCP involves extracting data out of a stream.
But I guess there has to be a little bad with the good, because you are not guaranteed that messages will arrive in the order sent or, even worse, that messages will arrive at all. Many approaches have been developed to address these issues. Most of them involve a sequence number and either a positive or negative acknowledgment.
Personally, I have a simple approach to UDP coding. I read packages, and if the sequence number is greater than the last, I keep it and throw away the rest. How can I do this? I use UDP in only one scenario: computer games where messages come in fast and furious and if you miss one it doesn’t really matter since the next will fill you in on what you missed. For every other scenario, I use TCP. I have developed a simple implementation based on positive acknowledgments that allows a client to re-send specific messages if they did not arrive at the destination (but this is well out of the scope of this book).
What does this all mean to you? Use TCP unless order and missed packages are not significant (or you are really good at coding in UDP, in which case you are probably not reading this book).
UDP Server
There really isn’t much difference between the server and the client except that the server is waiting for packages from someplace, and a client is initiating the conversation and expecting some type of action from the server (though not necessarily a response package).
Only two tasks need to be performed by the server to create a location for a client to connect to:
1.Create a socket.
2.Bind the socket to an IPEndPoint.
The code for both of these is very similar to that for TCP.
Create a Socket
Just like with TCP, before you can do any UDP communication you need to create a socket through which the messages will flow. For a UDP connection there is only one constructor that you have to worry about:
Socket^ socket = gcnew Socket(AddressFamily::InterNetwork,
SocketType::Dgram,
ProtocolType::Udp);
This constructor creates a socket to a version 4 IP address that supports connectionless, unreliable messages (messages might be lost or duplicated, or arrive out of order) of a fixed (usually small) maximum length using the UDP protocol.
C H A P T E R 1 7 ■ N E T W O R K P R O G R A M M I N G |
707 |
Bind the Socket to an IPEndPoint
There is no difference in creating an IPEndPoint for either TCP or UDP. Because of the nature of UDP, you will probably use the IPEndPoint frequently. The reason is that you need an EndPoint class to send and receive data, and one of the easiest ways to create an EndPoint is to create an IPEndPoint and then typecast it to the EndPoint.
As you’ll recall from our earlier discussion, you will most likely use one of the following methods to create an IPEndPoint:
•IPEndPoint^ iped = gcnew IPEndPoint(IPAddress::Any, portnumber);
•IPEndPoint^ iped = gcnew IPEndPoint(IPAddress::Parse("127.0.0.1"), portnumber);
TCP and UDP have different purposes for binding to a socket. For TCP, you are creating one endpoint of a corridor between two specific endpoints. For UDP, on the other hand, you are creating a two-way door into your system from which you can communicate with any other system and any other system can communicate with your system.
All you need to know to send a package with another system is that system’s IPEndPoint and the communication protocol used by that system. The reverse is also true; for another system to communicate with your system, all it needs to know is your system’s IPEndPoint and your system’s communication protocol.
The communication protocol can be simple as the echo system (what I get, I will send back), as extremely complex as a multiplayer gaming system (passwords, multiple packet formats, system states, etc.), or anything in between.
By the way, to bind to a socket in UDP you simply call the following code:
socket->Bind(iped);
Receive a Message
One of the best aspects of UDP is that when you receive a message packet, it is the complete package. (You just have to remember that the order, the number, and even whether you get all the sent messages are always in question.)
Another good feature of the UDP receive method is that you are not restricted to only one source of messages but instead can receive a message from any UDP sender, as long as the sender knows the receiver’s IPEndPoint. Because of this, there is no need to spawn threads to handle all connections to the server. An IPEndPoint, and therefore a single thread, can handle all incoming messages from all clients.
The actual code for the ReceiveFrom() method that is used to receive messages using UDP is a bit more involved than that of the connected Receive() method, for two reasons.
First, you need to allocate a buffer to be populated by the ReceiveFrom() method. Be aware that if you specify a buffer that is too small, then the ReceiveFrom() method will fill as much data as it can in the buffer, discard all the extra unread data of the packet, and then throw a SocketException.
Second, due to the fact that the ReceiveFrom() method can get messages from any client, the method needs some way of providing the origin of the message. To accomplish this, an EndPoint is created and passed as a parameter to the ReceiveFrom() method. Then, when the ReceiveFrom() method is executed, the passed EndPoint receives the IPEndPoint of the sending client.
This may sound complex, but as you can see from the following code, it is anything but:
array<unsigned char>^ message = gcnew array<unsigned char>(1024); EndPoint^ Remote = (EndPoint^) gcnew IPEndPoint(IPAddress::Any, 0); int recv = socket->ReceiveFrom(message, Remote);