

Pro Visual C++-CLI And The .NET 2.0 Platform (2006) [eng]-1
.pdf758 C H A P T E R 1 8 ■ A S S E M B L Y P R O G R A M M I N G
Embedding Resources
One way to make sure that everything that you need to execute an assembly is available is to put everything in the assembly itself. This way, executing an assembly is as easy as double-clicking the assembly’s .exe file.
To embed resources from the command line, you use the assembly generation tool, al.exe, passing it the /embed option along with the name of the .resources file.
If you are using Visual Studio 2005, embedding resources is also fairly straightforward. In fact, if you are using .resx files as the source of your resources, you have to do nothing, because Visual Studio 2005 will automatically handle everything for you. To embed resources using name/value pair files and prebuilt .resources files is not much more difficult.
I think the easiest way to explain how to embed resources is to actually walk through the process. In the following example, you will embed Animal.resx, Color.txt (name/value pair file), and Fruit.resources into an assembly called EmbeddingResources.exe.
The first step, as with any other .NET application project, is to use the project template wizard to build the basic structure of your project. In this case, you will build a standard Console Application (.NET) project and name it EmbeddingResources. To complete this project, perform the following steps:
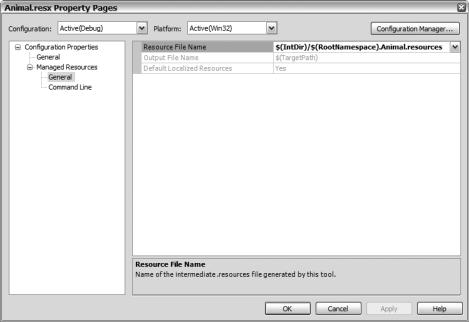
1.Add a new item of type Assembly Resource File (.resx) and name it Animal. Then add some name/value pairs, as shown in Figure 18-10.
Figure 18-10. The Animal resource file
2.Add a new item of type Text File (.txt) and name it Color. Then add the following name/value pairs:
Color1 = Blue Color2 = Red Color3 = Yellow Color4 = Green
3.Add an existing item called Fruit.resources. You will need to create this file at the command line using the ResGen tool on the name/value pair file containing the following entries:
Fruit1 = Apple Fruit2 = Orange Fruit3 = Grape Fruit4 = Lemon
C H A P T E R 1 8 ■ A S S E M B L Y P R O G R A M M I N G |
759 |
Now that you have all the resources ready, go ahead and embed them into the assembly. As I said previously, you don’t have to do anything to embed a .resx file. Personally, though, I don’t like the name that Visual Studio 2005 gives the resource when it’s embedded, so let’s change it:
1.Right-click Animal.resx in Solution Explorer and select the Properties menu item.
2.Select All Configurations from the Configuration drop-down list.
3.Change the Resource File Name entry in Managed Resources General to $(IntDir)\$(RootNamespace).Animal.resources (see Figure 18-11). This will give the resource the name EmbeddingResources.Animal. I think this is better than the default
EmbeddingResources.ResourceFiles.
Figure 18-11. Changing the generated resource name
4. Click OK.
To embed an already-created .resources file requires that you add it as an input to the assembly linker. (By the way, you don’t have to add the .resources file to Solution Explorer to get this to work— it just has to be in the project directory. I put the .resources file there so I remember that, in fact, I am embedding it.) The steps this time are a little different:
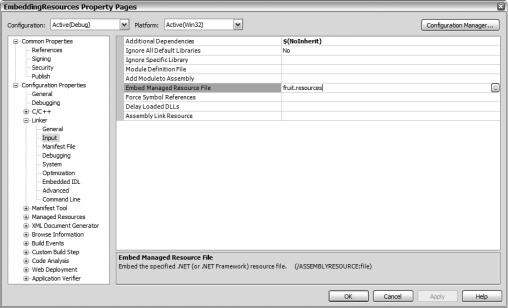
1.Right-click the EmbeddingResources project in Solution Explorer and select the Properties menu item. This will bring up a dialog box similar to the one in Figure 18-12.
760 C H A P T E R 1 8 ■ A S S E M B L Y P R O G R A M M I N G
Figure 18-12. Adding embedded resources
2.In the Linker folder, select Input.
3.Enter fruit.resources in the Embed Managed Resource File text box.
4.Click OK.
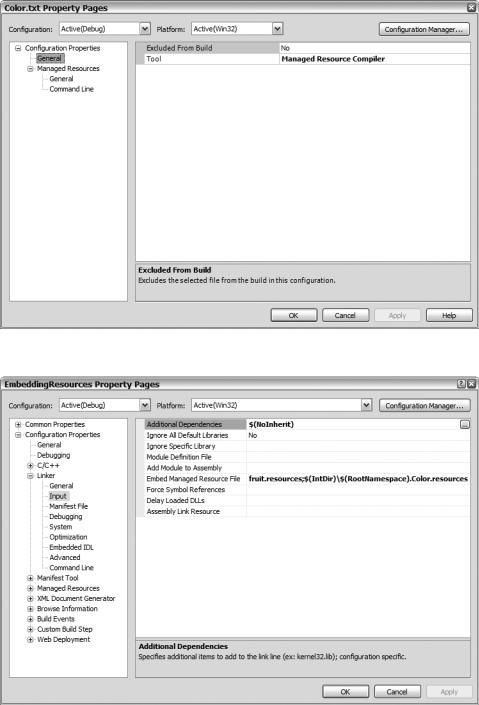
To embed the name/value pairs file Color.txt requires a combination of the steps used to add Animal.resx and fruit.resources, plus one additional step: First you change the name of the generated resource file to $(IntDir)\$(RootNamespace).Color.resources. Next, you have to change the build tool from Custom Build Tool to Managed Resource Compiler. You make this change also in the file’s properties, but this time change the Tool entry in the Configuration Properties General page (see Figure 18-13).
Finally, you add the resource to the Linker inputs using the exact same name you used previously, in this case: $(IntDir)\$(RootNamespace).Color.resources (see Figure 18-14).
When you compile the project, you will have three resources embedded into the application assembly. If you want proof, look in the assemblies manifest and you will find the following three entries:
.mresource public fruit.resources
{
}
.mresource public EmbeddingResources.Color.resources
{
}
.mresource public EmbeddingResources.Animal.resources
{
}

762 C H A P T E R 1 8 ■ A S S E M B L Y P R O G R A M M I N G
Accessing Resources
You’ve looked at creating resources and then embedding resources. Both are kind of neat, but by themselves are quite useless unless you have some way of accessing these resources within your application. Obviously, the .NET Framework provides a class to get access to the resources. In fact, depending on where the resource is stored, it may provide two ways: the ResourceReader class and the ResourceManager class.
ResourceReader Class
The ResourceReader class is the counterpart of the ResourceWriter class. It enables you to iterate through a .resources file, treating it as though it were a simple file. Just like the ResourceWriter class, the ResourceReader class is very easy to implement:
1.Open the .resources file using the ResourceReader constructor.
2.Get IDictionaryEnumerator from the ResourceReader class’s GetEnumerator() method.
3.Use the MoveNext() method to process all the entries in the .resources file.
4.Close the ResourceReader class with the Close() method.
Here is all the code you need to implement ResourceReader:
ResourceReader ^rreader = gcnew ResourceReader("filename.resources"); IDictionaryEnumerator ^denum = rreader->GetEnumerator();
while (denum->MoveNext())
{
Console::WriteLine("{0} = {1}", denum->Key, denum->Value );
}
rreader->Close();
■Caution The order in which the key/value pairs are retrieved from the assembly may not match the order in which they were written.
ResourceManager Class
Although the ResourceReader class is restricted to .resources files, the ResourceManager class gives you access to either .resources files or embedded resources. Another feature of the ResourceManager class that you will see later in this chapter is that it can access the resources in a culture-specific manner.
To create an instance of a ResourceManager class, you need to pass the name of the resource and the assembly that the resource is embedded into:
ResourceManager^ rmgr = gcnew ResourceManager("resourceName", assembly);
Along with embedded resources, it is also possible to open an instance of the ResourceManager from a .resources file using the CreateFileBasedResourceManager() static method. This method takes three parameters: the name of the .resources file without the .resources suffix, the path to the
.resources file, and the culture to mask output with. The result of this method is a pointer to a
ResourceManager:
ResourceManager^ rmgr = ResourceManager::CreateFileBasedResourceManager("resourceFilename", "",
nullptr);
C H A P T E R 1 8 ■ A S S E M B L Y P R O G R A M M I N G |
763 |
Once you have the instance of the ResourceManager, all you have to do is pass the name of the resource item you want to either the GetString() or GetObject() method to return the value of the following:
String ^Value = rmgr->GetString("Name");
Object ^Value = rmgr->GetObject("Name");
Listing 18-12 expands on the previous section’s project, EmbeddingResources. This example displays the Fruit.resources file using both the ResourceReader and ResourceManager and then continues on to display the embedded version of the Fruit resource using ResourceManager again.
Listing 18-12. EmbeddedResources Display Function
using namespace System;
using namespace System::Collections; using namespace System::Reflection; using namespace System::Resources;
void main()
{
Console::WriteLine("*** ResourceReader ***");
ResourceReader ^rreader = gcnew ResourceReader("Fruit.resources"); IDictionaryEnumerator ^denum = rreader->GetEnumerator();
while (denum->MoveNext())
{
Console::WriteLine("{0} = {1}", denum->Key, denum->Value);
}
rreader->Close();
ResourceManager ^rmgr;
Console::WriteLine("\n*** ResourceManager From File ***");
rmgr = ResourceManager::CreateFileBasedResourceManager("Fruit", "", nullptr);
Console::WriteLine(rmgr->GetString("Fruit1"));
Console::WriteLine(rmgr->GetString("Fruit2"));
Console::WriteLine(rmgr->GetString("Fruit3"));
Console::WriteLine(rmgr->GetString("Fruit4"));
Console::WriteLine("\n*** ResourceManager From Assembly ***");
Assembly ^assembly = Assembly::GetExecutingAssembly(); rmgr = gcnew ResourceManager("Fruit", assembly); Console::WriteLine(rmgr->GetObject("Fruit1")); Console::WriteLine(rmgr->GetObject("Fruit2")); Console::WriteLine(rmgr->GetObject("Fruit3")); Console::WriteLine(rmgr->GetObject("Fruit4"));
}
Notice that you can use either GetString() or GetObject() to extract a String resource item. If, on the other hand, you were extracting an Image type resource item, you would need to use the GetObject() method and then typecast it back to an Image:
Image ^img = (Image^)rmgr->GetObject("ImageName");
Figure 18-15 shows EmbeddedResources.exe in action.

764 C H A P T E R 1 8 ■ A S S E M B L Y P R O G R A M M I N G
Figure 18-15. The result of executing the EmbeddedResources program
Globalization and Localization
The terms “globalization” and “localization” are frequently confused. Often people choose one of the terms to mean both when, in fact, each has a specific meaning:
•Globalization refers to designing and developing software that supports localized user interfaces and regional data for users of multiple cultures.
•Localization refers to the translation of the application’s resources into localized versions for each culture supported by the application.
As you can see, you need both globalization and localization for an application to support multiple cultures. Basically, globalization is the underlying architecture, and localization is the actual translation. This is why the .NET Framework provides a System::Globalization namespace and not a localization one.
To globalize an application, you need to be able to specify cultural differences in things such as numbers, dates, and calendars. For example, Table 18-5 shows some number formats based on culture.
Table 18-5. Number Formats Based on Culture
Culture |
Number Format |
France (French) |
123 456 789,01 |
Germany (German) |
123.456.789,01 |
Switzerland (German) |
123’456’789.01 |
U.S. (English) |
123,456,789.01 |
|
|
Notice in Table 18-5 that there are two different ways of displaying numbers for a German culture. The Swiss have what is known as a subculture (but don’t tell the Swiss that!). This points out that to support globalization, an application must also support subcultures. Seems to me things are starting to get complex. Okay, let’s throw Chinese and Japanese character sets into the mix—now you’re talking complex!

C H A P T E R 1 8 ■ A S S E M B L Y P R O G R A M M I N G |
765 |
Fortunately, the .NET Framework has a few things up its sleeve to help support all these complexities. Don’t get me wrong: Writing globalization code isn’t for the faint of heart. It’s tough! This section will only show you where to begin in globalizing your application. Please consult the many books that have been written on the subject for further information; for example, Internationalization and Localization Using Microsoft .NET by Nick Symmonds (Apress, 2002). (Like other books suggested earlier, this one is for C#, but you should have no problem working your way through it.)
The Globalization Tools
The first line of attack for handling globalization by the .NET Framework is that it uses Unicode to support the various culture-specific encoding types you may use in your applications. Unicode allows you to support complex character sets such as Chinese and Japanese, as well as the generic ASCII character set.
The next thing the .NET Framework does is provide intelligence in its classes and structures to support multiple cultures. For example, the DateTime and String objects generate appropriate culture-specific information. To add this intelligence, the .NET Framework relies on the System:: Globalization namespace (see Table 18-6) to provide support.
Table 18-6. Common System::Globalization Namespace Classes
Class Name |
Description |
Calendar |
Specifies how to divide time into pieces (e.g., weeks, months, and years) |
CultureInfo |
Provides specific information about a culture |
DateTimeFormatInfo |
Specifies how dates and times are formatted |
NumberFormatInfo |
Specifies how numbers are formatted |
RegionInfo |
Provides information about the country and region |
TextInfo |
Specifies the properties and behaviors of the writing system |
|
|
The final thing that the .NET Framework does to help support globalization was hinted at previously when I covered resources. The .NET Framework supports culture-specific resources using the
ResourceManager class.
Culture
A culture in computer terms is a set of display preferences based on the language, beliefs, social norms, and so on (i.e., culture) of the user. How a computer processes the actual program internally does not differ based on culture. Culture only changes how the information is finally displayed. For example, adding two Int32s together using the German culture will not differ from how it is done using the French culture—the difference lies in how the final outcome is displayed.
The .NET Framework uses culture names based on RFC1766. If that means nothing to you, don’t worry. It just means the .NET Framework uses a two-letter language and a two-letter country/ region code separated by a hyphen (-) to specify a culture. It’s possible to only specify a two-letter language if the country/region isn’t significant.

766 C H A P T E R 1 8 ■ A S S E M B L Y P R O G R A M M I N G
Table 18-7 lists a very small subset of the many cultures available to you.
Table 18-7. Computer Cultures
Name |
Code |
English |
en |
English (Canada) |
en-ca |
English (United Kingdom) |
en-gb |
English (United States) |
en-us |
French |
fr |
French (Canada) |
fr-ca |
French (France) |
fr-fr |
German |
de |
German (Germany) |
de-de |
German (Switzerland) |
de-ch |
|
|
You use the System::Globalization::CultureInfo class to convert one of the codes in Table 18-7 into something that the .NET Framework understands:
CultureInfo ^cinfo = gcnew CultureInfo("en-ca");
Setting the Culture
To get globalization to work within the CLR, you need to do one of two things:
•Use a special version of the ToString() method that takes the culture as a parameter.
•Set the culture you wish to use in the thread of execution.
The first method enables you to restrict globalization only to areas of your application that you specify. The second method of changing the CultureInfo in the CurrentThread changes the culture everywhere.
For example, if you want to display a date in multiple cultural styles, you could code it as shown in Listing 18-13.
Listing 18-13. Multicultural Dates
using namespace System;
using namespace System::Globalization;
void main()
{
DateTime dt = DateTime::Now;
Console::WriteLine("en-us {0}",dt.ToString("D",gcnew CultureInfo("en-us"))); Console::WriteLine("en-gb {0}",dt.ToString("D",gcnew CultureInfo("en-gb"))); Console::WriteLine("fr-fr {0}",dt.ToString("D",gcnew CultureInfo("fr-fr"))); Console::WriteLine("de-de {0}",dt.ToString("D",gcnew CultureInfo("de-de")));
}
C H A P T E R 1 8 ■ A S S E M B L Y P R O G R A M M I N G |
767 |
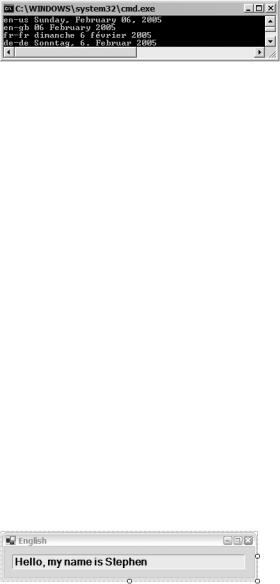
Figure 18-16 shows MulticulturalDates.exe run on December 4, 2002.
Figure 18-16. The result of executing the MulticulturalDates program
Now here comes a tricky part. There are two cultures you can set in the CurrentThread. The first is CurrentCulture, which is used by the Globalization namespace to handle culture-specific formatting. The second is CurrentUICulture, which is used by the ResourceManager to handle culture-specific resources. You may need to set one or both depending on what you are doing. Here is how you can set both to the French (France) culture:
Thread::CurrentThread->CurrentCulture = gcnew CultureInfo("fr-fr"); Thread::CurrentThread->CurrentUICulture = Thread::CurrentThread->CurrentCulture;
The Localization Tools
Once you have an application designed and coded for multiple cultures, you then have to go through the long process of localizing it for each culture you want to support. Fortunately, Visual Studio 2005 provides much of the functionality you need to localize your application if you happen to be building a Windows application. It also supplies much of the localization functionality for a console application, providing you use a minor trick.
The way in which localization works is actually very elegant. First, you create a default version of all of your display elements, placing each in a resource file. Then for every other culture, you create a satellite resource file. Within that satellite resource file are replacement elements for the default view. Thus, when the culture is changed, the ResourceManager looks into the satellite resource of that culture first for display elements. If it finds the element it wants there, then it uses it. If it doesn’t find the element it wants there, then it takes the default value.
Building a Multicultural Windows Application
The addition of localization to a Windows application is quite impressive. You really don’t see how impressive it is until you try it yourself. Let’s start off by creating a very simple Windows Form containing a single label that looks like the one in Figure 18-17.
Figure 18-17. A very simple Windows Form
When you look at the auto-generated code in the InitializeComponent() method, as shown in Listing 18-14, you see pretty standard and unimpressive code.