

Pro Visual C++-CLI And The .NET 2.0 Platform (2006) [eng]-1
.pdf748 C H A P T E R 1 8 ■ A S S E M B L Y P R O G R A M M I N G
give you a heads-up.) The reason you can be ignorant is because adding an assembly to the GAC requires you to simply drag it from your development directory and drop it on the Windows Explorer assembly directory. If you want to perform this process in a batch routine, you can use a utility called gacutil.exe to install and uninstall your assembly. To install your assembly, use
>gacutil /i <assembly name>.dll
To uninstall the assembly, use
>gacutil /u <assembly name>.dll, Version=<version number>
It is even easier to install assemblies using a setup project because the copying to the GAC is handled for you.
The Shared Assembly’s Strong Name
There is a catch to global assemblies. They require that they be signed by what is called a strong name. A strong name provides three necessary enhancements to assemblies:
•It makes the name of the assembly globally unique.
•It makes it so that no one else can steal and use the name (generally known as spoofing).
•It provides a means to verify that an assembly has not been tampered with.
The strong name provides these enhancements by adding three things to the assembly: a simple text name, a public key, and a digital signature. The combination of the simple text name and the public key guarantees the name is globally unique, as the public key is unique to the party creating the assembly, and it is assumed that the party will make the simple text assembly name unique within their own development environment.
The combination of the public key and the digital signature verifies that no spoofing or tampering occurred. It does this by adding public/private key encryption to the assembly.
■Note Public/private key encryption uses two keys as its name suggests. The private key is used to encrypt something, and the public key is used to decrypt it. What makes this combination secure is that only a corresponding public key can be used to decrypt something encrypted by the private key.
So how does public/private key encryption apply to global assemblies? Before you get all excited, you should know that an assembly is not encrypted. Instead, at compile time the compiler creates a hash signature based on the contents of the assembly and then uses the private key (of public/private encryption) to encrypt the hash signature into a digital signature. Finally, the digital signature is added to the assembly. Later, when the assembly is loaded by the CLR, the digital signature is decrypted using the public key back into the hash signature, and the hash signature is verified to make sure that the assembly is unchanged.
The reason this all works is that only the owner of the private key can create a valid digital signature that can be decrypted by the public key.
Like most things in .NET application development, what actually happens is a lot more complex than what you need to do to get it the happen. In this case, to add a strong name to an assembly requires two very simple steps. First, you create a strong name key file by typing the following statement at the command prompt:
> sn -k StrongNameFileName.snk

C H A P T E R 1 8 ■ A S S E M B L Y P R O G R A M M I N G |
749 |
Then you update [AssemblyKeyFileAttribute] in the AssemblyInfo.cpp file, which incidentally is created by all C++/CLI templates:
[assembly:AssemblyKeyFileAttribute("StrongNameFileName.snk")];
You can place the key in the project directory as the preceding example shows, or you can place it anywhere on your computer and provide a full path to the attribute.
Re-signing an Assembly
If you are security conscious, you may have seen a big problem in the preceding strong name system. If you are developing software in a team environment, everyone who needs to update the assembly must have access to the private key so that the assembly can be accessed using the same public key. This means there are a lot of potential areas for security leaks.
To remedy this, the strong name utility sn.exe has an additional option. It provides the capability for an assembly to be re-signed. This allows privileged developers a chance to sign the assembly with the company’s private key before releasing it to the public. The command you need to type at the command line is
> sn -R <assembly name> <strong key file name>
Notice this time instead of the –k option you use the –R option, stating you want to replace the key instead of create one. You also provide the utility a completed assembly and a previously created strong key file.
Signcoded Digital Signature
Nowhere in the preceding strong name process is the user of the assembly guaranteed that the creator of the strong key is a trusted source, only that it is unchanged from the time it was created.
To remedy this, you need to execute the signcode.exe wizard on your assembly to add an authentic digital certificate created by a third party. Once you have done this, the user of the assembly can find out who created the assembly and decide whether he or she wants to trust it.
■Caution You need to compile the assembly with the “final” strong name before you signcode it. The signcode.exe wizard only works with strong named assemblies. Also, re-signing a signcoded assembly invalidates its authentic digital certificate.
Versioning
Anyone who has worked with Windows for any length of time will probably be hit at least once with DLL Hell, the reason being that versioning was not very well supported in previous Windows developing environments. It was possible to swap different versions of .dlls in and out of the registry, which caused all sorts of compatibility issues. Well, with .NET this is no longer the case, as versioning is well supported.
That being said, a word of caution: The CLR ignores versioning in private assemblies. If you include a private assembly in your application’s directory structure, the CLR assumes you know what you are doing and will use that version, even if the correct version, based on version number, is in the GAC.
The .NET Framework supports a four-part version: major, minor, build, and revision. You will most frequently see version numbers written out like this: 1.2.3.4. On occasion, however, you will see them like this: 1:2:3:4. By convention, a change in the major and minor numbers means that an
750 C H A P T E R 1 8 ■ A S S E M B L Y P R O G R A M M I N G
incompatibility has been introduced, whereas a change in the build and revision numbers means compatibility has been retained. How you actually use version numbers, on the other hand, is up to you. Here is how the .NET Framework handles versioning in a nutshell: Only the global assembly
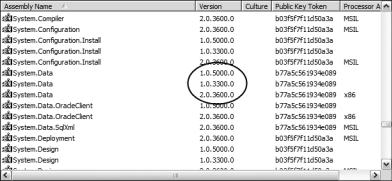
version that was referenced at compile time will work in the application. That is, all four version parts need to match. (Well, that is not quite true. You will see a way to overrule which version number to use later in this chapter.) This should not cause a problem even if there is more than one version of a shared assembly available, because multiple versions of a shared assembly can be placed without conflict into the GAC (see Figure 18-5). Okay, there might be a problem if the shared assembly with the corresponding version number is not in the GAC, as this throws a
System::IO::FileNotFoundException exception.
Figure 18-5. Multiple versions of an assembly in the GAC
Setting the Version Number
Version numbers are stored as metadata within the assembly, and to set the version number requires that you update the AssemblyVersionAttribute attribute. To make things easier for you, the Visual Studio 2005 project template wizard automatically provides a default AssemblyVersionAttribute attribute within the AssemblyInfo.cpp file.
You set the version number by simply changing the dummy value
[assembly:AssemblyVersionAttribute("1.0.*")];
to a value that makes sense in your development environment, for example:
[assembly:AssemblyVersionAttribute("3.1.2.45")];
Notice the asterisk (*) in the default version number value provided by Visual Studio 2005. This asterisk signifies that the compiler will automatically create the build and revision numbers for you. When the compiler does this, it places the number of days since January 1, 2000, in the build and the number of seconds since midnight divided by two in the revision.
Personally, I think it’s a mistake to use the auto-generated method, as the version numbers then provide no meaning. Plus, using auto-generated numbers forces you to recompile the application referencing the assembly every time you recompile the shared assembly. Auto-generated numbers aren’t so bad if the application and the shared reference share into the same solution, but they aren’t so good if the application and the shared reference share into different solutions, and even worse if different developers are developing the application and shared assembly.
C H A P T E R 1 8 ■ A S S E M B L Y P R O G R A M M I N G |
751 |
Getting the Version Number
It took me a while to figure out how to get the version number out of the assembly (but that might just be me). As I found out, though, it’s really easy to do, because it’s just a property of the name of the assembly. I think the code is easier to understand than the explanation:
Assembly ^assembly = Assembly::GetExecutingAssembly();
Version ^version = assembly->GetName()->Version;
The only tricky part is getting the currently executing assembly, which isn’t too tricky because the .NET Framework provides you with a static member to retrieve it for you.
No DLL Hell Example
Now that you’ve covered everything you need to create a shared assembly, you’ll create one. Listing 18-7 shows the source code of a very simple class library assembly containing one class and one property. The property contains the version of the assembly.
Listing 18-7. A Shared Assembly That Knows Its Version
using namespace System;
using namespace System::Reflection;
namespace SharedAssembly
{
public ref class SharedClass
{
public:
property System::Version^ Version()
{
System::Version^ get()
{
Assembly ^assembly = Assembly::GetExecutingAssembly(); return assembly->GetName()->Version;
}
}
};
}
The code is short, sweet, and offers no surprises. Listing 18-8 contains a filled-in AssemblyInfo.cpp file. To save space, all the comments have been removed.
Listing 18-8. A Standard AssemblyInfo.cpp File
using namespace System::Reflection;
using namespace System::Runtime::CompilerServices;
[assembly:AssemblyTitleAttribute("A Shared Assembly")]; [assembly:AssemblyDescriptionAttribute("An assembly that knows its version")]; [assembly:AssemblyConfigurationAttribute("Release Version")]; [assembly:AssemblyCompanyAttribute("ProCppCLI")]; [assembly:AssemblyProductAttribute("Pro C++/CLI Series")]; [assembly:AssemblyCopyrightAttribute("Copyright (C) by Stephen Fraser 2005")]; [assembly:AssemblyTrademarkAttribute("ProCppCLI is a Trademark of blah")]; [assembly:AssemblyCultureAttribute("")];

752 C H A P T E R 1 8 ■ A S S E M B L Y P R O G R A M M I N G
[assembly:AssemblyVersionAttribute("1.0.0.0")];
[assembly:AssemblyDelaySignAttribute(false)];
[assembly:AssemblyKeyFileAttribute("SharedAssembly.snk")];
[assembly:AssemblyKeyNameAttribute("")];
You saw most of the important code earlier in this chapter, so I won’t go over this in detail. I also think that most of the rest of the code is self-explanatory. Only the AssemblyCultureAttribute attribute needs to be explained, and I do that a little later in this chapter.
Of all the attributes in the preceding source file, only two attributes need to be filled in to enable an assembly to be a shared one. The first attribute is AssemblyVersionAttribute. It already has a default value but I changed it to give it more meaning to me.
The second attribute is AssemblyKeyFileAttribute, in which you place the strong key. Remember, you can either pass a full path to the attribute or use a key in the project source directory. Because I’m using a strong key file in the project source, I have to copy my key file SharedAssembly.snk into the project’s source directory.
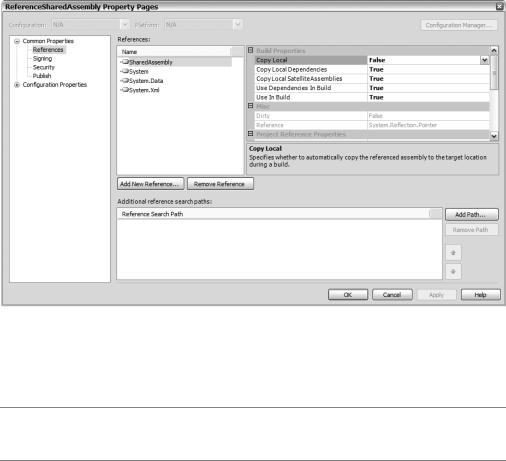
Before you compile the project, change the project’s output directory to be local to the project and not the solution. In other words, change the project’s configuration properties’ output directory to read only $(ConfigurationName) and not the default $(SolutionDir)$(ConfigurationName). The reason you want to do this is that you don’t want a copy of SharedAssembly.dll in the same directory as the application assembly referencing it, because otherwise it will be used instead of the copy in the GAC.
Now, when you compile the project, an assembly called SharedAssembly.dll is generated in the project’s Debug or Release directory, depending on which environment you’re doing the build in. This file needs to be copied to the GAC either by dragging and dropping it there or via gacutil.exe. Figure 18-6 shows what the entry in the Windows Explorer GAC display looks like.
Figure 18-6. SharedAssembly in the GAC
Now you’ll create an application assembly to reference the shared assembly (see Listing 18-9). All this application does is write out the version number of the shared assembly.
Listing 18-9. Referencing a Shared Assembly
using namespace System;
using namespace SharedAssembly;
void main()
{
SharedClass ^sa = gcnew SharedClass(); Console::WriteLine(sa->Version);
}
The code is not new, but to get this to work you need to reference the assembly SharedAssembly.dll. It is important to understand that the assembly you reference during the compile does not need to be the same as the one that you actually execute at runtime. They just have to have the same name,
754 C H A P T E R 1 8 ■ A S S E M B L Y P R O G R A M M I N G
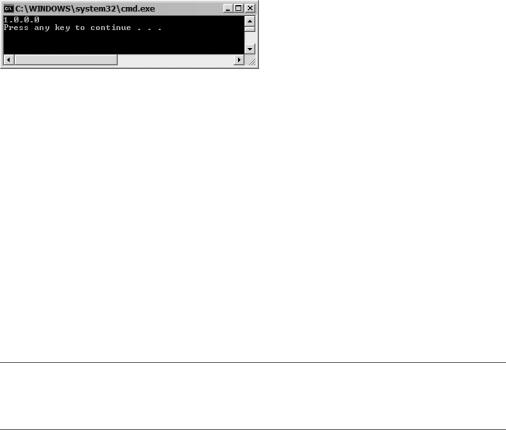
Run ReferenceSharedAssembly.exe. You should get something similar to what is shown in Figure 18-8.
Figure 18-8. The result of executing ReferenceSharedAssembly
Now let’s see what happens if you change your shared assembly and give it a new version number like this:
[assembly:AssemblyVersionAttribute("1.1.0.0")];
Recompile only the SharedAssembly project and then move the new assembly SharedAssembly.dll to the GAC. First off, notice that now there are two SharedAssembly entries in the GAC that differ by version number.
Run ReferenceSharedAssembly.exe again. (Important: Do not recompile when asked.) Nothing has changed, has it? You still get the same output. This is versioning in action. Why do you get the original version of the shared assembly? Because when you compiled the application program, you tightly bound it to version 1.0.0.0 of the shared assembly. Thus, when it executes, it can only load version 1.0.0.0.
Just for grins and giggle, delete version 1.0.0.0 from the GAC and run ReferenceSharedAssembly.exe a third time. Nice abort don’t you think? The reason the program aborts is because even though there is a copy of SharedAssembly in the GAC, it is the wrong version (1.1.0.0). ReferenceSharedAssembly.exe is tightly bound to version 1.0.0.0.
■Tip If you are like me and have your compile environment automatically compile all changed modules before executing, then the easiest way to test this is to compile only SharedAssembly and then go to the command line and run ReferenceSharedAssembly.exe from there.
Application Configuration Files
An alarm might be going off in your head right now. Does this mean that whenever you change a shared assembly, you have to keep the same version number or you have to recompile every application that uses shared assembly so that it can be accessed? How do you release a fix to a shared assembly?
The .NET Framework provides a solution to this problem by adding a configuration file to the application that specifies which assembly you want to load instead of the bound version. The application configuration file has the same name as the executable plus a suffix of .config. Therefore, for the preceding example, the application configuration file would be called ReferenceSharedAssembly.exe.config. Yes, the .exe is still in the name.
The application configuration file will look something like Listing 18-10.
C H A P T E R 1 8 ■ A S S E M B L Y P R O G R A M M I N G |
755 |
Listing 18-10. An Application Configuration File
<configuration>
<runtime>
<assemblyBinding xmlns="urn:schemas-microsoft-com:asm.v1"> <dependentAssembly>
<assemblyIdentity name="SharedAssembly" publicKeyToken="332a33ed1547b4e6" />
<bindingRedirect oldVersion="1.0.0.0" newVersion="1.1.0.0" />
</dependentAssembly>
</assemblyBinding>
</runtime>
</configuration>
The only two elements you have to worry about in the file are <assemblyIdentity> and <bindingRedirect>. <assemblyIdentity> contains the identity of the shared assembly that you want to use a different version with. Notice that all the information you need to identify the shared assembly can be found in the Windows Explorer GAC view.
Next is the key to assigning a different version to the <bindingRedirect> element. This element specifies the old version, or the version that the application assembly currently references, and then the new version that you want it to access instead. A cool feature is that the oldVersion tag can take a range:
<bindingRedirect oldVersion="1.0-1.1" newVersion="1.1.0.0" />
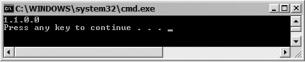
Now that you have the file created, place it in the same directory as the executable and run ReferenceSharedAssembly.exe again. (Important: Do not recompile when asked.) This time you will get the output shown in Figure 18-9.
Figure 18-9. The result of executing ReferenceSharedAssembly with an application configuration file
As a final note to application configuration files, you can also set the newVersion tag to a prior version of the assembly:
<bindingRedirect oldVersion="1.1.0.0" newVersion="1.0.0.0" />
This comes in handy when the new version is found to not be compatible and you need to fall back to a previous version.
Resources
When you finally get to the point of running your software, usually there are other things needed for it to run besides the executable. For example, you might find that you need images, icons, cursors, or, if you are going to globalize the application, a culture’s set of strings. You could fill your application directory full of a bunch of files containing these “resources.” But if you did, you would run the

C H A P T E R 1 8 ■ A S S E M B L Y P R O G R A M M I N G |
757 |
ResGen
The text file you created previously is only an intermediate file. You might think of it as a source file just like a .cpp or .h file. You need to convert it to a .resources file so that your program will be able to process it as a resource. (By the way, you could process the file as a standard string file, but then you would lose many of the resource features provided by the .NET Framework.) To convert your text file, use the .NET Framework’s ResGen.exe utility. There is not much to running the utility:
> ResGen filename.txt
When you run the preceding code, assuming that the text file consists of valid name/value pairs, you get an output file of filename.resources in the directory where you ran the utility. You can work with these files as separate entities, or you can embed them into your assembly. You will see how to do that later in this chapter.
One more thing, if you are a glutton for punishment and write resource files using .resx files, then you would use the ResGen utility to convert them into .resources files as well.
ResourceWriter
As I stated previously, adding nontext resources is not possible using name/value pair files, and the
.resx file is a bear to work with. So what are you to do if you simply need to create nontext resources (e.g., an image table)?
You can use the System::Resources::ResourceWriter class, because this class has the capability to place almost any type of data within a .resources file, so long as the total combined size of the file does not exceed 2GB. In fact, this class is what ResGen.exe uses to generate its .resources file. Why they didn’t make ResGen.exe more robust and allow other types of data types escapes me.
Using the ResourceWriter class requires you to perform only three steps:
1.Open up a .resources file using the ResourceWriter class’s constructor.
2.Add resources to the .resources file using the AddResources() method.
3.Close the .resources file using the Close() method.
Listing 18-11 presents all the code you need to add an image to a .resources file from a .jpg file.
Listing 18-11. Adding an Image to a .resources File
#using <System.Drawing.dll> // Add the reference as it's not a default
using namespace System;
using namespace System::Resources; using namespace System::Drawing;
void main()
{
ResourceWriter ^rwriter = gcnew ResourceWriter("filename.resources"); rwriter->AddResource("ImageName", Images::FromFile("Imagefile.jpg")); rwriter->Close();
}