

Pro Visual C++-CLI And The .NET 2.0 Platform (2006) [eng]-1
.pdf778 |
C H A P T E R 1 9 ■ S E C U R I T Y |
Figure 19-2. Groups in the Computer Management tool
The GenericPrincipal is an object that contains the roles of an identity that you create dynamically at runtime. Both WindowsPrincipal and GenericPrincipal share the interface IPrincipal, which again makes things easier since methods need only use the interface to handle both types of principal.
Just as with identities, you can create your own custom principals using the IPrincipal interface, though I have found that GenericPrincipal has provided all the functionality I’ve needed.
The IPrincipal interface exposes one property and one method:
•Identity is a property that contains a handle to the identity associated with the principal.
•IsInRole() takes as its parameter a role and returns a Boolean specifying if the principal has that role.
Working with Identities and Principals
Since the principal and identity objects contain very few properties and methods, they are rather easy to code. There are only a couple of things that you might find tricky.
The first thing you need to know about principals is how to get access to them. You find them using the static property CurrentPrincipal on the Thread object. Since this property returns an IPrincipal, you normally typecast it to either the WindowsPrincipal or the GenericPrincipal like this:
WindowsPrincipal ^wPrinc = (WindowsPrincipal^)Thread::CurrentPrincipal;
GenericPrincipal ^gPrinc = (GenericPrincipal^)Thread::CurrentPrincipal;
The other issue you need to be aware of is that you have to specify how principal and identity objects should be created for the application domain in which the thread is running. You do this by invoking the AppDomain::CurrentDomain->SetPrincipalPolicy() method using as its parameter the appropriate PrincipalPolicy enumeration. The default is PrincipalPolicy::UnauthenticatedPrincipal, which
C H A P T E R 1 9 ■ S E C U R I T Y |
779 |
means that the principal has its Name property set to an empty string ("") and its IsAuthenticated property set to false. What you need to set it to is PrincipalPolicy::WindowsPrincipal, which will return the current user associated with the thread along with all the groups it is in as roles. There is also PrincipalPolicy::NoPrincipal, which will cause a nullptr to be returned (not that you will need this when doing role-based security). Here is how you would code it:
AppDomain::CurrentDomain->SetPrincipalPolicy(PrincipalPolicy::WindowsPrincipal);
Why is PrincipalPolicy::UnauthenticatedPrincipal the default? I’m not sure, as it is not normally what you are looking for. Oh, and one final gotcha. You need to set PrincipalPolicy before you call the Thread::CurrentPrincipal method because the SetPrincipalPolicy() method does not change the principal’s type once it’s been created.
Listing 19-1 is a simple example that first gets the Thread’s current WindowsPrincipal and WindowsIdentity and displays their information, and then resets the CurrentThread so that it contains a dynamically created GenericPrincipal and GenericIdentity.
Listing 19-1. Getting and Setting Principals and Identities
using namespace System;
using namespace System::Security;
using namespace System::Security::Principal; using namespace System::Threading;
void main()
{
// set policy from UnauthenticatedPrincipal to WindowsPrincipal AppDomain::CurrentDomain->SetPrincipalPolicy(
|
PrincipalPolicy::WindowsPrincipal); |
// ---------------------------------------------------------------------- |
|
// Get Windows Principal and Identity |
|
// ---------------------------------------------------------------------- |
|
Console::WriteLine("Windows Principal & Identity"); |
|
Console::WriteLine("---------------------------- |
"); |
WindowsPrincipal ^wPrinc = (WindowsPrincipal^)Thread::CurrentPrincipal;
Console::WriteLine("Is an Administrator?: {0}", wPrinc->IsInRole(WindowsBuiltInRole::Administrator));
Console::WriteLine("Is a Hacker?: {0}", wPrinc->IsInRole("Hacker"));
WindowsIdentity ^wIdent = (WindowsIdentity^)wPrinc->Identity;
Console::WriteLine("\nWindows Login Name: {0}", wIdent->Name); Console::WriteLine("Authentication Type: {0}", wIdent->AuthenticationType); Console::WriteLine("Is Authenticated: {0}", wIdent->IsAuthenticated); Console::WriteLine("Is System Account: {0}", wIdent->IsSystem);
// ----------------------------------------------------------------------
// Create (Hacker) Principal and Identity
// ----------------------------------------------------------------------
Console::WriteLine("\n\nGeneric Principal & Identity"); Console::WriteLine("----------------------------");
array<String^>^ rolesArray = {"Hacker"};
780 C H A P T E R 1 9 ■ S E C U R I T Y
// Set the principal to a new generic principal. Thread::CurrentPrincipal =
gcnew GenericPrincipal(gcnew GenericIdentity("John Doe"), rolesArray);
GenericPrincipal ^gPrinc = (GenericPrincipal^)Thread::CurrentPrincipal;
Console::WriteLine("Is an Administrator?: {0}", gPrinc->IsInRole("BUILTIN\\Administrator"));
Console::WriteLine("Is a Hacker?: {0}", gPrinc->IsInRole("Hacker"));
GenericIdentity ^gIdent = (GenericIdentity^)gPrinc->Identity;
Console::WriteLine("\nUser Name: {0}", gIdent->Name); Console::WriteLine("Is Authenticated: {0}\n", gIdent->IsAuthenticated);
}
One thing you should note from Listing 19-1 is how you create a GenericPrincipal. First, you create a GenericIdentity using its constructor and then pass it along with an array of string-formatted roles to the GenericPrincipal constructor. Very simple and, I think, elegant.
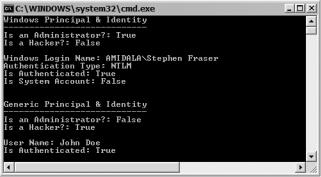
Figure 19-3 shows the result of PrincipalIdentity.exe in action. Notice that my account has administrative rights. Yours, on the other hand, may not.
Figure 19-3. The results of PrincipalIdentity.exe
You may be wondering, when would I ever need to create a GenericPrincipal? Why not just use the WindowsPrincipal? Well, you’d want to use the GenericPrincipal when you want roles not bound to Windows groups. Basically, you use them when you want roles to be authorized based on a set defined by your application and not by Windows or Active Directory groups.
Securing Your Code Using Roles
Okay, having principals and identities is all very nice, but how does that secure your code? The simple answer is that it doesn’t. You still have to add code to your program that provides this security. There are three techniques of doing this.
The first technique you have already seen (though you may not have been aware of it). You surround the code that you want restricted to specific roles with the IsInRole() method, like this:
if (wPrinc->IsInRole(WindowsBuiltInRole::Administrator))
{
// do administrative stuff
}
C H A P T E R 1 9 ■ S E C U R I T Y |
781 |
Easy enough, but to use this technique you need to get the principal of the executing thread— though as you have already seen, getting Thread::CurrentPrincipal is not difficult.
The second technique of securing your code by role is by using what is known as declarative role-based security. With this technique you declare a method with the additional attribute PrincipalPermissionAttribute that specifies which roles areallowed to execute it. (I cover other PermissionAttributes later in the chapter, and I will go into greater detail at that time.) Basically, you demand that a principal have a specified role like this:
[PrincipalPermissionAttribute(SecurityAction::Demand, Role="BUILTIN\\Administrator")]
void DeclarativeSecurity()
{
// do administrative stuff
}
The third technique is a kind of a mix of the prior two techniques, called imperative role-based security. With this technique, you demand that a principal have a specific role but you make the demand (normally) just before the secured code. This technique requires that you create an instance of a PrincipalPermission and then execute its Demand() method. I usually do this in one line like this:
(gcnew PrincipalPermission(nullptr, "BUILTIN\\Administrator"))->Demand();
But you can break it up into its parts and it works just the same.
Notice the first parameter of the PrincipalPermission is a nullptr. This parameter allows you to specify a specific principal’s name as well as a role. By passing nullptr you tell the
PrincipalPermission to use any user principal with this role. If you were to specify a principal name, then only that specific principal/role pair would be used—which means you are no longer using role-based security and instead are using principal-based (user-based) security.
One major difference between technique 1 (the IsInRole) and technique 2 (declarative) and 3 (imperative) is that if the demand fails on techniques 2 and 3 a SecurityException is thrown. In the case of technique 1, only a false condition occurs.
Listing 19-2 shows how you can implement declarative and imperative role-based security. It also changes principal and identity midstream so that you can see that both methods react a different way depending on whether the role is found on the principal.
Listing 19-2. Implementing Role-Based Security
using namespace System;
using namespace System::Security;
using namespace System::Security::Principal; using namespace System::Security::Permissions; using namespace System::Threading;
[PrincipalPermissionAttribute(SecurityAction::Demand, Role = "NotAHacker")] void DeclarativeSecurity()
{
Console::WriteLine("I'm in the Declarative Security Function");
}
void DemandSecurity()
{
(gcnew PrincipalPermission(nullptr, "NotAHacker"))->Demand();
Console::WriteLine("I'm in the Demand Security Function\n");
}
782 |
C H A P T E R 1 9 ■ S E C U R I T Y |
void main()
{
try
{
DeclarativeSecurity();
}
catch (SecurityException^)
{
Console::WriteLine("SECURITY ERROR in Declarative Security Function");
}
try
{
DemandSecurity();
}
catch (SecurityException^)
{
Console::WriteLine("SECURITY ERROR in Demand Security Function\n");
}
Console::WriteLine("Set CurrentPrincipal to John with role of NotAHacker"); array<String^>^ rolesArray = {"NotAHacker"};
Thread::CurrentPrincipal = gcnew GenericPrincipal(
gcnew GenericIdentity( "John" ), rolesArray );
try
{
DeclarativeSecurity();
}
catch (SecurityException^)
{
Console::WriteLine("SECURITY ERROR in Declarative Security Function");
}
try
{
DemandSecurity();
}
catch (SecurityException^)
{
Console::WriteLine("SECURITY ERROR in Demand Security Function");
}
}
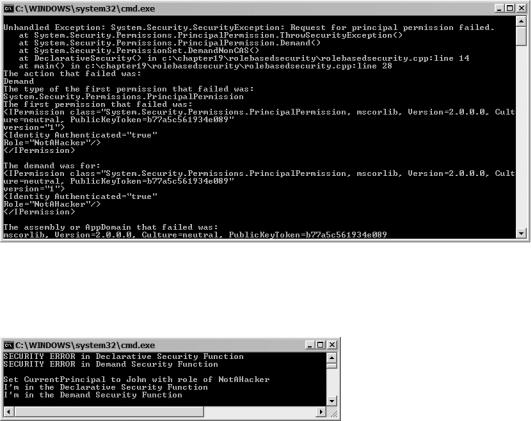
Notice the liberal use of try/catch blocks. These are needed so that the code can continue when a demand fails. If you don’t use these try/catch blocks, then you will get an exception like what is shown in Figure 19-4. Normally when you code, you want a more gracious exit to your programs, but there is nothing stopping you from letting your programs die, then and there, when a principal doesn’t have the roles needed to execute.
784 |
C H A P T E R 1 9 ■ S E C U R I T Y |
Normally, when working with code access security, you don’t deal with a single permission but instead work with permission sets. Permission sets allow you to group permissions together that simplify your coding since you don’t have to deal with each of the permissions individually.
The .NET Framework provides you with several preconfigured permission sets. The following five are the ones you will most likely come in contact with:
•FullTrust grants full access to all protected resources.
•LocalIntranet is the default permission set suitable for running code from within an enterprise.
•Internet is the default permission set suitable for running code from an unknown source.
•Execution gives permission to run but no rights to access protected resources.
•Nothing means no permissions (cannot run).
It is also fairly easy to create your own permission sets. You can do it using the Microsoft .NET Framework 2.0 Configuration tool or the command-line tool caspol.exe, but since this is a book about C++/CLI, I’ll show you how to code the creation of the permission sets directly in C++/CLI. (There are many books and Web sites that cover creating permission sets, if you insist on doing it that way. But I’m pretty sure once you see how you do it in code you’ll not have much trouble doing it with either of the aforementioned tools.)
The first step, quite logically, is to create a permission set:
PermissionSet^ permSet = gcnew PermissionSet(PermissionState::None);
Since this is a custom permission set, you start it off empty by assigning it a
PermissionState::None. If you were to assign it a PermissionState::Unrestricted, then you would in effect be giving the permission set FullTrust. You can also pass an predefined permission set, to which you can add more permissions.
Now that you have an empty permission set, all you have to do is add the permission you want to it using its AddPermission() method:
permSet->AddPermission(gcnew SecurityPermission(PermissionState::Unrestricted)); permSet->AddPermission(gcnew UIPermission(PermissionState::Unrestricted)); permSet->AddPermission(gcnew FileIOPermission(FileIOPermissionAccess::Read,
"C:\\"));
There is a minor gotcha that you have to address when starting a permission set from scratch. You need to give the permission set the rights to execute your code. You do this by adding an instance of the SecurityPermission object. You also have to allow the permission set the ability to show the user interface. This is done with the addition of an instance of the UIPermission object. You want to give both of these objects unrestricted permissions.
Now that you have the required permissions added, you will want to add the permission you specifically want to give to the permission set. In the previous code, I allow only file IO read access to the C:\ directory by adding an instance of the FileIOPermission object.
Numerous permissions are available to you. If you need to look them up, you can use the MSDN documentation. They are found in the System::Security::Permissions namespace.
Policy Statement
A policy statement is a set of rules that the CLR follows to determine what is granted permission to execute. There are four policies that you can apply policy statements to in code access security: Enterprise, Machine, User, and Application Domain. These policies are organized in a hierarchy as follows:
C H A P T E R 1 9 ■ S E C U R I T Y |
785 |
•Enterprise, or all managed code in the enterprise
•Machine, or all managed code on the machine
•User, or all managed code in processes owned by current user
•Application Domain, or all managed code within the application domain
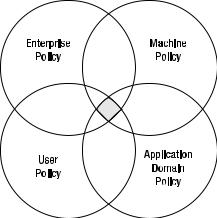
Each level of the hierarchy is more restrictive, so for example an Enterprise’s policy statement can overrule all other policy statements, while a Machine’s policy statement can overrule a User’s and an Application Domain’s policy statement. What this boils down to is that what is granted permission to execute is determined by an intersection of all the policy statements within the four code access security policies, as depicted in Figure 19-6.
Figure 19-6. Intersection of policies determining code to execute
There are two constructors available for creating a policy statement. The simpler one just takes a permission set. Continuing with our example, the constructor would look like this:
PolicyStatement^ policy = gcnew PolicyStatement(permSet);
The second constructor provides you with a little more power as it allows you to override the default method of determining what is granted permission to be executed. This constructor takes an additional parameter of type PolicyStatementAttribute:
PolicyStatement^ policy =
gcnew PolicyStatement(permSet, PolicyStatementAttribute.LevelFinal);
There are two attributes that you might want to set with this constructor:
•Exclusive means that only this policy statement (at this hierarchical level) will be used in determining what gets granted permission to execute.
•LevelFinal causes policy levels below this one to be ignored, effectively allowing a policy level to override its lower levels.
Code Groups
A code group is a logical grouping of code by means of one and only one common membership condition. That isn’t to say that the same logical grouping of code can’t be a member of more than one code group. In fact, code groups are organized in a hierarchy from “all code” to very (possibly) specific conditions. (Doesn’t this sound familiar? Hint: a roles hierarchy.) Thus, if a logical group of

786 |
C H A P T E R 1 9 ■ S E C U R I T Y |
code has evidence to support that it is a member of the lowest level of the hierarchy, then it is also a member by default of all parent code groups.
The .NET Framework provides several membership conditions for preconfigured code groups:
•All code: All code meets this condition.
•Application directory: Code in the directory or a child directory of the running application.
•Custom: Code matching a user-specified condition.
•GAC: Code that resides in the global assembly cache (GAC).
•Hash: Code with a hash that matches the given hash.
•Publisher: Code digitally signed with a specified certificate.
•Site: Code downloaded from a specified site.
•Strong Name: Code with a specified strong name and public key.
•URL: Code downloaded from a specified URL.
•Zone: Code that originates from one of five specified zones: My Computer, Internet, Local Intranet, Trusted Sites, and Untrusted Sites. (These zones are maintained within the security options of Internet Explorer.)
The process of coding membership condition is pretty easy; you just have to create an instance of it using the appropriate .NET Framework constructor. Conveniently there happens to be a class and simple constructor for each of the preconfigured code group membership conditions listed here in the System::Security::Policy namespace.
For example, if you want to create a URL membership condition you would create an instance of the UrlMembershipCondition class like this:
IMembershipCondition^ membership =
gcnew UrlMembershipCondition("http://192.168.1.102/Chapter19/*");
Now that you have both a policy and a membership condition, you can create a code group, or more accurately add to the union the current code group’s policy statement, with the policy statement of all its matching child code groups. This is done with the UnionCodeGroup class.
CodeGroup^ codeGroup = gcnew UnionCodeGroup(membership, policy);
Notice that I am creating an instance of a CodeGroup, not a UnionCodeGroup. The CodeGroup class is an abstract base class and you can’t create it directly.
The CodeGroup has a few properties and members. The few I most commonly use are shown in Table 19-1.
Table 19-1. Commonly Used CodeGroup Properties and Methods
Member |
Description |
AddChild() |
Method to add a child code group to the current code group. |
Children |
An ordered list of all child code groups. |
Description |
The description of the code group. This is what gets displayed in the |
|
Microsoft .NET Framework 2.0 Configuration tool. |
Name |
Name of the code group. You will use this to dynamically delete the |
|
code group. |
RemoveChild() |
Method to remove a child code group from the current code group. |
|
|
C H A P T E R 1 9 ■ S E C U R I T Y |
787 |
Mostly I just use Description and Name like this:
codeGroup->Description = "C:\\ ReadOnly permissions in for Application URL"; codeGroup->Name = "ReadOnly Secure Group";
But if I am building a code group hierarchy dynamically, then I would also use the child-related property and methods. You will also see the child-related members in use in a later example that shows how to remove a code group from a policy.
Okay, you now have all the parts needed to programmatically update your system’s security policy. Let’s take a look at the complete example (see Listing 19-3) and fill in the couple of holes.
Listing 19-3. Adding Your Own ReadOnly Code Group
using namespace |
System; |
using namespace |
System::Security; |
using namespace |
System::Security::Permissions; |
using namespace |
System::Security::Policy; |
void main() |
|
{ |
|
// Create a |
new permission set |
PermissionSet^ permSet = gcnew PermissionSet(PermissionState::None);
// Add permissions to the permission set. permSet->AddPermission(
gcnew SecurityPermission(PermissionState::Unrestricted)); permSet->AddPermission(gcnew UIPermission(PermissionState::Unrestricted)); permSet->AddPermission(gcnew FileIOPermission(FileIOPermissionAccess::Read,
"C:\\"));
// Create Policy Statement
PolicyStatement^ policy = gcnew PolicyStatement(permSet);
//Create Membership condition IMembershipCondition^ membership =
gcnew UrlMembershipCondition("http://192.168.1.102/Chapter19/*");
//Create Code group
CodeGroup^ codeGroup = gcnew UnionCodeGroup(membership, policy); codeGroup->Description = "C:\\ ReadOnly permission for Application URL"; codeGroup->Name = "ReadOnly Secure Group";
// Find the machine policy level
System::Collections::IEnumerator^ ph = SecurityManager::PolicyHierarchy();
while( ph->MoveNext() )
{
PolicyLevel^ pl = (PolicyLevel^)ph->Current; if( pl->Label == "Machine" )
{
// Add code group to Machine policy pl->RootCodeGroup->AddChild(codeGroup); break;
}
}