

Pro Visual C++-CLI And The .NET 2.0 Platform (2006) [eng]-1
.pdf788 |
C H A P T E R 1 9 ■ S E C U R I T Y |
// Save changes SecurityManager::SavePolicy();
Console::WriteLine("Added C:\\ ReadOnly Secure Group");
}
You’ve seen most of the code in Listing 19-3 before. What you haven’t seen is how to add the newly created code group as a child to the code group hierarchy. In the listing, I added it to the Machine policy code group. There is nothing really tricky about it. All you do is iterate through the enumeration of all policy levels looking for the Machine policy level and then simply add the new code group as a child of the Machine code group hierarchy.
Finding the enumerator for the Policy hierarchy is less obvious. As you can see, see, I found the
SecurityManager class’s static method PolicyHierarchy().
Oh… and you have to save your work with the SecurityManager class’s static method SavePolicy.
■Note I use my IP address 192.168.1.102 as the membership condition. This probably will not be the same as yours. Replace the above code with your IP. You can get it by running IPConfig.exe from the command line.
The results of the above example can be seen using the Microsoft .NET Framework 2.0 Configuration application (see Figure 19-7), which you access from your Administration tools.
Figure 19-7. Results shown in the Microsoft .NET Framework 2.0 Configuration application
Just to complete the circle, I might as well show you how to remove the code group you just added. Listing 19-4 shows how you might do it.
C H A P T E R 1 9 ■ S E C U R I T Y |
789 |
Listing 19-4. Removing Your Own ReadOnly Code Group
using namespace System;
using namespace System::Security;
using namespace System::Security::Permissions; using namespace System::Security::Policy;
void main()
{
CodeGroup^ machine;
//Iterate through policy hierarchy to get Machine Code group System::Collections::IEnumerator^ ph = SecurityManager::PolicyHierarchy(); while( ph->MoveNext() )
{
PolicyLevel^ machinePolicyLevel = (PolicyLevel^)ph->Current; if (machinePolicyLevel->Label == "Machine")
{
machine = machinePolicyLevel->RootCodeGroup; break;
}
}
//Iterate backwards removing all instances of "ReadOnly Secure Group"
for (int i = machine->Children->Count - 1; i >= 0; i--)
{
if(((CodeGroup^)machine->Children[i])->Name == "ReadOnly Secure Group")
{
machine->RemoveChild(((CodeGroup^)machine->Children[i]));
}
}
// Save changes SecurityManager::SavePolicy();
Console::WriteLine("Removed C:\\ File ReadOnly Secure Group");
}
I think the comments in Listing 19-4 pretty well explain what is happening. First you iterate through the Policy hierarchy until you come to the Machine policy. At this point, grab the Machine policy’s code group hierarchy.
The only unusual part is that you next have to iterate backward through the children of Machine’s code group during the child removal process. You need to do it backward because as you remove children the machine->Children->Count gets reduced by one as well. Because of this, you will miss one iteration through the hierarchy. This is not an issue in this example since there is only one “ReadOnly Secure Group.” However, if you happen to be removing multiple code groups that, for instance, start with “ReadOnly Secure Group,” then if the last code group is one you are supposed to delete, it will be missed.
Once you find the code group you want to remove (using the name you so conveniently added during the add process), you call the RemoveChild() method. Incidentally, this will also prune off any grandchildren.
790 |
C H A P T E R 1 9 ■ S E C U R I T Y |
Evidence
Now that you have all the code groups set up, code access security uses an evidence-based method of ultimately determining if a section of code executes.
Evidence is accumulated at the assembly level; therefore, for an assembly to be a part of a code group it must have evidence to support that it adheres to the code group’s common membership characteristic or condition. Or in other words, does the assembly originate from a specific site, URL, or zone? Does it have a matching strong name, hash, or publisher? Does it reside in the GAC or Application directory?
The confusing part is that it is still possible for an assembly to run even if it doesn’t have the evidence to support that it belongs to a required code group. The catch is that it only runs the code within the assembly that it has the permissions to run. In other words, your assembly may be able to display a UI but the functionality behind the buttons of the interface may require special permissions to run.
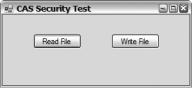
Listings 19-5 and 19-6 show this in action. We’ve shown a simple Windows application that has two buttons: one to read a file and one to write a file.
Listing 19-5. CAS Example .cpp File
#include "Form1.h"
using namespace CASSecurity;
[STAThreadAttribute]
int main(array<System::String ^> ^args)
{
//Enabling Windows XP visual effects before any controls are created Application::EnableVisualStyles();
//Create the main window and run it
Application::Run(gcnew Form1()); return 0;
}
Listing 19-6. CAS Example .h File
namespace |
CASSecurity |
{ |
|
using |
namespace System; |
using |
namespace System::ComponentModel; |
using |
namespace System::Collections; |
using |
namespace System::IO; |
using |
namespace System::Windows::Forms; |
using |
namespace System::Data; |
using |
namespace System::Drawing; |
public ref class Form1 : public System::Windows::Forms::Form
{
public:
Form1(void)
{
InitializeComponent();
}
C H A P T E R 1 9 ■ S E C U R I T Y |
791 |
protected:
~Form1()
{
if (components)
{
delete components;
}
}
private:
System::Windows::Forms::Label^ lbOutput; System::Windows::Forms::Button^ bnWriteFile; System::Windows::Forms::Button^ bnReadFile; System::ComponentModel::Container ^components;
#pragma region Windows Form Designer generated code
void InitializeComponent(void)
{
this->lbOutput = (gcnew System::Windows::Forms::Label()); this->bnWriteFile = (gcnew System::Windows::Forms::Button()); this->bnReadFile = (gcnew System::Windows::Forms::Button()); this->SuspendLayout();
//
//lbOutput
this->lbOutput->AutoSize = true;
this->lbOutput->Location = System::Drawing::Point(68, 71); this->lbOutput->Name = L"lbOutput";
this->lbOutput->Size = System::Drawing::Size(0, 13); this->lbOutput->TabIndex = 5;
//bnWriteFile
//
this->bnWriteFile->Location = System::Drawing::Point(170, 30); this->bnWriteFile->Name = L"bnWriteFile"; this->bnWriteFile->Size = System::Drawing::Size(75, 23); this->bnWriteFile->TabIndex = 4;
this->bnWriteFile->Text = L"Write File"; this->bnWriteFile->UseVisualStyleBackColor = true; this->bnWriteFile->Click +=
gcnew System::EventHandler(this, &Form1::bnWriteFile_Click);
//
//bnReadFile
this->bnReadFile->Location = System::Drawing::Point(48, 30); this->bnReadFile->Name = L"bnReadFile";
this->bnReadFile->Size = System::Drawing::Size(75, 23); this->bnReadFile->TabIndex = 3;
this->bnReadFile->Text = L"Read File"; this->bnReadFile->UseVisualStyleBackColor = true;
this->bnReadFile->Click +=
gcnew System::EventHandler(this, &Form1::bnReadFile_Click);
//Form1

C H A P T E R 1 9 ■ S E C U R I T Y |
793 |
On the other hand, if you run it as mobile code via Internet Explorer it loads the interface but the buttons when clicked throw permission exceptions.
■Caution Make sure you delete the code group generated with SetSecurity.exe (Listing 19-3) using RemoveSecurity.exe (Listing 19-4) before starting this section, or your results will not be the same.
Running this example from Internet Explorer requires a bit of prep work:
1.In Windows Explorer, right-click the directory that contains the CASSecurity.exe file and select Properties.
2.In the Properties dialog box, select the Web Sharing tab, as shown in Figure 19-9.
Figure 19-9. The Web Sharing tab in the Properties dialog box
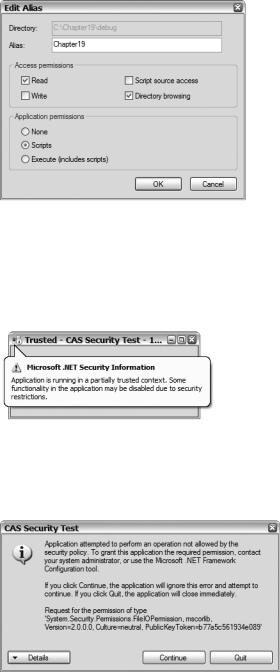
3.Select the Share this folder radio button to bring up the Edit Alias dialog box, as shown in Figure 19-10.
4.Type Chapter19 in the Alias text box.
5.Select the Directory browsing check box (optional).
6.Click OK twice.
794 |
C H A P T E R 1 9 ■ S E C U R I T Y |
Figure 19-10. The Edit Alias dialog box
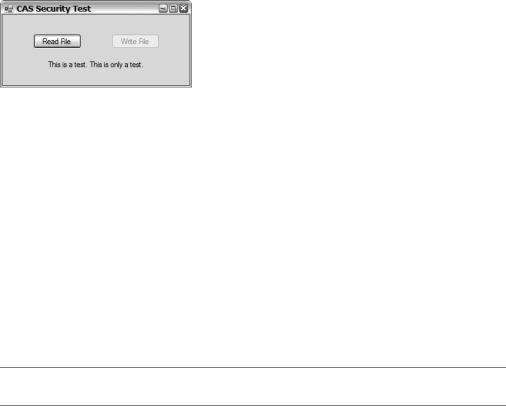
Now you can run the application from Internet Explorer. To do this, just type in IE’s address line http://192.168.1.102/Chapter19/CASSecurity.exe, substituting my IP address for your own. If you completed step 5 you can simply type in the address line http://192.168.1.102/Chapter19 and click the link to CASSecurity.exe. When you do, you’ll see the message in Figure 19-11.
Figure 19-11. Permission warning
If you ignore the warning and continue, clicking either button will result in a permission exception, as shown in Figure 19-12. Hmmm, not quite what you’re expecting, right?
Figure 19-12. Permission exception
All is not lost, thanks to all the work you have already done in creating a code group with a URL membership condition of your IP and permissions to allow reading of files off C:\.
C H A P T E R 1 9 ■ S E C U R I T Y |
795 |
Run SetSecurity.exe to add the code group you created earlier. Now when you run CASSecurity.exe from Internet Explorer, the Read File button works but the Write File button still throws an exception. Why is that?
First, the assembly CASSecurity.exe provided evidence that it originates at the URL 192.168.1.102. This satisfies the code group I wrote and the CLR allows the assembly to become a member. Now that it is a member, it has the security permissions of the code group—in this case the right to execute, show a UI, and read files from C:\. Since the code group does not have the permissions to write to C:\, the CLR stops the assembly up short when it tries to do this and throws the permissions exception.
Cool, no?
Securing Your Code Using CAS
One nice thing about the .NET Framework is that it is already configured to work with code access security. Thus, once you have set up your code groups and permission sets, you are basically done, unless you want to secure the resources and functionalities you have written yourself with code access security.
Integrating code access security within your code is done in the same way as with role-based security: using declarativeand imperative-style security. The only real difference between CAS and role-based security is that you use a declarative attribute or imperative class related to the resource or functionality you want to access instead of one related to principal permissions. For example, to declaratively secure the Registry you would use something like this:
[RegistryPermissionAttribute(SecurityAction.Demand, Unrestricted=true)] public class NeedsUnrestrictedRegistrtAccessClass
{
};
and to imperatively secure the Registry you would use
(gcnew RegistryPermission(PermissionState.Unrestricted))->Demand();
The main difference between these two styles is that declarative is evaluated during JIT compiling while imperative is evaluated at runtime.
So far you have only been implementing permission demands, but the demand is only one of the nine actions that can be taken with permissions. Here are all nine:
•Demand
•LinkDemand
•InheritanceDemand
•RequestMinumum
•RequestOptional
•RequestRefuse
•Assert
•Deny
•PermitOnly
Let’s take a look at each.

796 |
C H A P T E R 1 9 ■ S E C U R I T Y |
■Note Code access security works in conjunction with Windows user account security. Therefore, when your application has permission according to CAS to access a protected resource, if your Windows user account does not have the privilege then the application will throw a permission exception.
Demands
The most common security request type is the Demand type. They also, I think, make the most sense when implementing. Basically, the code protected by the declarative or imperative statement is demanding that the accessing code group have the permissions specified. When the code group has the permissions, the program continues to execute; if not, the CLR throws an exception.
There are three types of demands; each addresses a different process for determining whether or not the demand is successful.
Demand
You have already seen this type in action. You might not know that this form of demand ensures not only that the current code group has the demanded permission but also that all code groups down that call stack also have the required permission.
This means that all assemblies in the call stack below the current call must also have the permissions demanded, not just the one currently executing.
Be aware that the demand occurs every time the protected area is accessed because the stack might contain a different call stack. Therefore, if you call a declaratively protected method repeatedly or execute the imperative Demand method, a security check occurs each time.
One unique implementation of imperative Demand syntax is to enable and disable controls in the UI so that a user does not have the ability to click on a control that he has no privileges for. You need to add the following to the CASSecurity.exe example to implement this:
try
{
(gcnew FileIOPermission(FileIOPermissionAccess::Read, "C:\\"))->Demand();
}
catch(Exception^)
{
bnReadFile->Enabled = false;
}
try
{
(gcnew FileIOPermission(FileIOPermissionAccess::Write, "C:\\"))->Demand();
}
catch(Exception^)
{
bnWriteFile->Enabled = false;
}
I placed these lines in the Form1 constructor, but you can place them anywhere as long as they are executed before the controls are displayed. The results are shown in Figure 19-13.
C H A P T E R 1 9 ■ S E C U R I T Y |
797 |
Figure 19-13. Disabling controls due to lack of permissions
LinkDemand
The LinkDemand does not have the overhead that the Demand has. It only checks the immediate call to the permission secured area; once the check passes, no subsequent checks are made. In other words, no stack walk occurs and the check is done only once no matter how many times the call is made.
The code to implement LinkDemand is virtually the same as Demand:
[ReflectionPermissionAttribute(SecurityAction::LinkDemand, Unrestricted=true)] void LinkDemandReflectionOperation()
{
}
You need to be careful when using LinkDemand, because even though the call is faster, any code that passes the test and thus can reference your code can potentially break security by allowing malicious code to call using the authorized code.
I don’t feel the speed gain is worth this possible security problem, so I always use Demand. On the other hand, if you have complete control of the call stack then LinkDemand might work well for you.
■Note LinkDemand can only be applied to a method declaratively.
InheritanceDemand
There are two forms of InheritanceDemand. The first is as a class attribute. When used in this form, all classes that inherit from this declaratively secured class must also have the specified permissions.
[ZoneIdentityPermissionAttribute(SecurityAction::InheritanceDemand,
Zone=SecurityZone::Internet)] public ref class InheritanceDemandZoneIdentityClass
{
}
The second form is an attribute on the virtual method. In this scenario, a class must have the specified permissions of the virtual method to be able to override the virtual method.
public ref class InheritanceDemandClass
{
public:
[ZoneIdentityPermissionAttribute(SecurityAction::InheritanceDemand,
Zone=SecurityZone::Internet)] virtual void InheritanceDemandZoneIdentityMethod()
{
}
}