

Pro Visual C++-CLI And The .NET 2.0 Platform (2006) [eng]-1
.pdfC H A P T E R 1 8 ■ A S S E M B L Y P R O G R A M M I N G |
769 |
Listing 18-15. Localizable Simple Application
void InitializeComponent(void)
{
System::ComponentModel::ComponentResourceManager^ resources =
(gcnew System::ComponentModel::ComponentResourceManager(Form1::typeid)); this->lbHello = (gcnew System::Windows::Forms::Label()); this->SuspendLayout();
//
//lbHello
resources->ApplyResources(this->lbHello, L"lbHello"); this->lbHello->Name = L"lbHello";
//Form1
//
resources->ApplyResources(this, L"$this");
this->AutoScaleMode = System::Windows::Forms::AutoScaleMode::Font; this->Controls->Add(this->lbHello);
this->Name = L"Form1"; this->ResumeLayout(false);
}
Where did all the code go? Don’t panic, every aspect of the label has now become a resource. As such, it can take on any look and feel you want based on the values you place within the resource file that populates this label. At this point, all the information about the label and the form is stored in a resource file called Form1.resx. Now, instead of hard coding everything, the application at runtime dynamically applies the look and feel using the ApplyResources() method of the
ComponentResourceManager class.
Currently, the resource file only contains all the default information about the Windows Form, as I pointed out as the first part of localization.
Now you’ll add a new culture, French (France), to the form. To do this you set the form’s Language property to French (France). Scrolling up and down in the Language property’s selection displays quite a few cultures, don’t you think?
Notice any difference in the Windows Form design? Nope, me neither. Here’s the fun part: Go wild and change any property of the label, but just don’t delete it. Now toggle between the default language and the French (France) language. Notice that they retain the information specific to each culture. (Well, apparently you can’t go too wild there, as it seems a few of the properties aren’t stored in the resource file automatically. Border and background color are two that surprised me by not working.)
Go ahead and do the same for the German (Germany) culture. Notice how everything reverts to the default culture look and feel again (if you were in the French language version anyway). Whenever you start a new culture, Visual Studio 2005 reverts back to the default so that you will always have a consistent starting point to make your culture-specific changes.
Anyway, now that you’ve created a French (France) culture and German (Germany) culture, notice there’s now a Form1.fr-fr.resx and a Form1.de-DE.resx resource file added to your Solution Explorer.
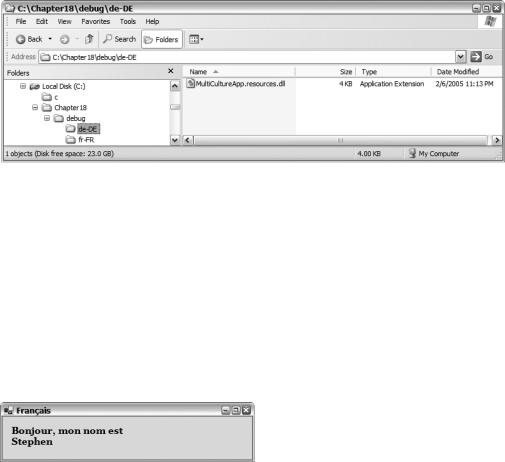
Now let’s see what happens when you compile the Windows Form application. After you compile the application, go ahead and open Windows Explorer and navigate to the directory structure where the application runs. There are now two directories, one for each culture using the culture’s RFC1766 code as a name. Also, in each directory is a file called [ApplicationName].resources.dll, as shown in Figure 18-19. These two new .dll files are your satellite assemblies.
770 C H A P T E R 1 8 ■ A S S E M B L Y P R O G R A M M I N G
Figure 18-19. The Windows Explorer view of satellite assemblies
Run your new multicultured application. You see none of your French or German stuff, right? That is because your native culture is not French (France) or German (Germany), so the ResourceManager took the default resource values and not the French or German one. (Oh, of course, if you are reading this book in France or Germany and your machine is configured for French or German, then you would see the French or German. French or German readers might try some other culture for this example.)
As I stated previously, you need to change the CurrentThread class’s CurrentUICulture to the satellite assembly’s culture you want to access. Do this by adding the following lines before you call the InitializeComponent() method:
Thread::CurrentThread->CurrentCulture = gcnew CultureInfo("fr-fr"); Thread::CurrentThread->CurrentUICulture = Thread::CurrentThread->CurrentCulture;
Figure 18-20 shows MultiCulturalApp.exe French (France) culture in action.
Figure 18-20. The result of executing the MultiCulturalApp program
Building a Multicultural Console Application
When you build an assembly that isn’t a Windows application, things aren’t quite as easy. But it doesn’t take much to fool Visual Studio 2005 into believing it’s building Windows-like satellite assemblies.
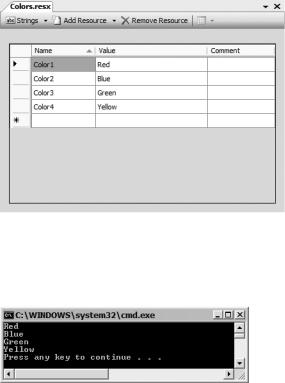
Let’s create a simple little program called MulticultureConsole (see Listing 18-16) that writes four colors stored in a resource string table.
Listing 18-16. Writing Out Four Colors from a Resource
using namespace System;
using namespace System::Reflection; using namespace System::Resources; using namespace System::Threading; using namespace System::Globalization;
C H A P T E R 1 8 ■ A S S E M B L Y P R O G R A M M I N G |
771 |
void main()
{
Assembly ^assembly = Assembly::GetExecutingAssembly(); ResourceManager ^rmgr =
gcnew ResourceManager("MulticultureConsole.Colors", assembly);
Console::WriteLine(rmgr->GetObject("Color1")); Console::WriteLine(rmgr->GetObject("Color2")); Console::WriteLine(rmgr->GetObject("Color3")); Console::WriteLine(rmgr->GetObject("Color4"));
}
Add a new item of type Assembly Resource File (.resx) and name it Colors. Then add the string resources as shown in Figure 18-21. Finally, rename the generated resource file as $(IntDir)/ $(RootNamespace).Colors.resources.
Figure 18-21. The Colors assembly resource file
When you run MulticultureConsole.exe, you should get something like Figure 18-22. There is nothing new so far.
Figure 18-22. The first result of MulticultureConsole
Now let’s make the program multicultural. The first step is to add the code to the application so that it will display based on another culture or, in other words, you globalize the application. You do this by setting the CurrentThread CurrentUICulture to something else. Let’s change it to “fr-fr” or French (France), as shown in Listing 18-17.
772 C H A P T E R 1 8 ■ A S S E M B L Y P R O G R A M M I N G
Listing 18-17. Writing Out Four Colors from a Resource Multiculturally
using namespace System;
using namespace System::Reflection; using namespace System::Resources; using namespace System::Threading; using namespace System::Globalization;
void main()
{
Assembly ^assembly = Assembly::GetExecutingAssembly(); ResourceManager ^rmgr =
gcnew ResourceManager("MulticultureConsole.Colors", assembly);
Console::WriteLine(rmgr->GetObject("Color1"));
Console::WriteLine(rmgr->GetObject("Color2"));
Console::WriteLine(rmgr->GetObject("Color3"));
Console::WriteLine(rmgr->GetObject("Color4"));
Thread::CurrentThread->CurrentUICulture = gcnew CultureInfo("fr-fr");
Console::WriteLine(rmgr->GetObject("Color1")); Console::WriteLine(rmgr->GetObject("Color2")); Console::WriteLine(rmgr->GetObject("Color3")); Console::WriteLine(rmgr->GetObject("Color4"));
}
The only new thing you did was change the CurrentUICulture. I just cut and pasted the four lines that display the colors.
Now it’s time to fool Visual Studio 2005. When Visual Studio 2005 created its resource files (which later became satellite assemblies) for the multiculture example, it did so in a very specific manner. The fortunate thing is that if you create your resource files in the same way, even in a console application, you will also get correctly built satellite assemblies.
Basically, here is how you do it. Create an assembly resource file (.resx) named WhatYouWant.resx that contains all the resource items for the default language. Also rename the auto-generated resource file as $(IntDir)/$(RootNamespace).WhatYouWant.resources. Notice that this is the same procedure you followed earlier when you embedded the standard resource file.
Now here’s the trick to add, let’s say, a French culture. Create a new assembly resource file (.resx) and name it WhatYouWant.fr-fr.resx. Add all the replacement values that you want for that culture. Then rename the auto-generated resource file as $(IntDir)/$(RootNamespace). WhatYouWant.fr-fr.resources. That’s it! Placing the culture just before the .resx and .resources files is enough to trick Visual Studio 2005 into creating a culture-specific satellite assembly.
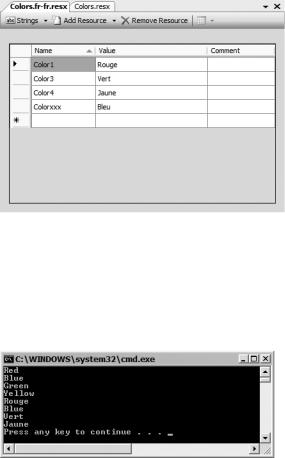
So for the previous MulticultureConsole example, create an assembly resource file (.resx) named Colors.fr-fr.resx. Then add the string resources as shown in Figure 18-23.
As you can see, once you change the culture to French, the ResourceManager looks first in the French satellite assembly for the value. Because there is no Color2, the English (default) value is written.
C H A P T E R 1 8 ■ A S S E M B L Y P R O G R A M M I N G |
773 |
Figure 18-23. French Colors assembly resource file
Notice that it is important that the names of the name/value pairs match between the default and the French resource files. Finally, rename the generated resource file as $(IntDir)/ $(RootNamespace).fr-fr.Colors.resources.
When you run the revised MulticultureConsole.exe, you should get something like Figure 18-24. There is nothing new so far.
Figure 18-24. Revised result of MulticultureConsole
Summary
In this chapter, you looked at several ways to programmatically play with the .NET Framework assembly. You started by exploring reflection and then its counterpart, attributes. You moved on to look at shared assemblies. Next, you learned how to add more to assemblies than just code using resources. You finished off the chapter by looking at globalization and localization.
Programming with assemblies, like many of the other topics covered in this book, is a weighty topic. I feel the only way to really learn how to program the assembly is to do so yourself. This chapter should have opened up many doors on how to do this.
The programming world has gone security crazy—unfortunately, justifiably so. In the next chapter, we will look at what C++/CLI and the .NET Framework have to help secure your code.

C H A P T E R 1 9 ■ S E C U R I T Y |
777 |
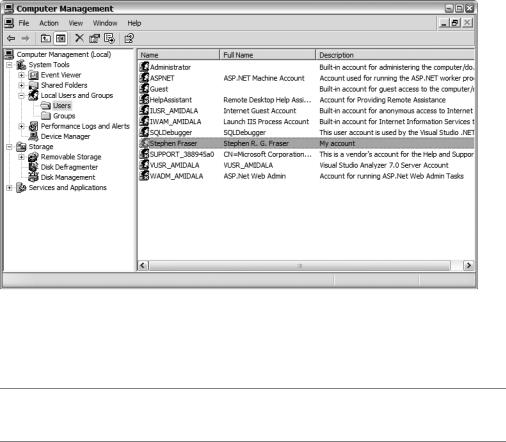
Figure 19-1. Users in the Computer Management administrative tool
The GenericIdentity, on the other hand, consists of users that you create dynamically at runtime. Both WindowsIdentity and GenericIdentity share the interface IIdentity, which makes things easier as methods need only use the interface to handle both types of identity.
■Note You can create your own custom identities using the IIdentity interface, though personally I have found that GenericIdentity has provided all the functionality I’ve needed.
The IIdentity interface exposes three simple properties:
•AuthenticationType is a string that indicates the type of authentication used by the identity object. When you are working with Windows, this value will be either Basic, Forms, Kerberos, NTLM, or Passport. (You will most likely find this value is NTLM as it is used by Windows for logon authentication on stand-alone systems.)
•IsAuthenticated is a Boolean value that represents whether the identity object has been authenticated.
•Name is, well, you know… the name associated with the identity object.
Principal
Like the identity, the .NET Framework provides two principal objects: WindowsPrincipal and GenericPrincipal. The WindowsPrincipal object more or less maps to the Windows group and is also maintained by the Computer Management tool, as shown in Figure 19-2. (Group, principal, and role are all basically the same thing when it comes to role-based security… hmmm, let’s just make things confusing, shall we?)