

Assembly Language Step by Step 1992
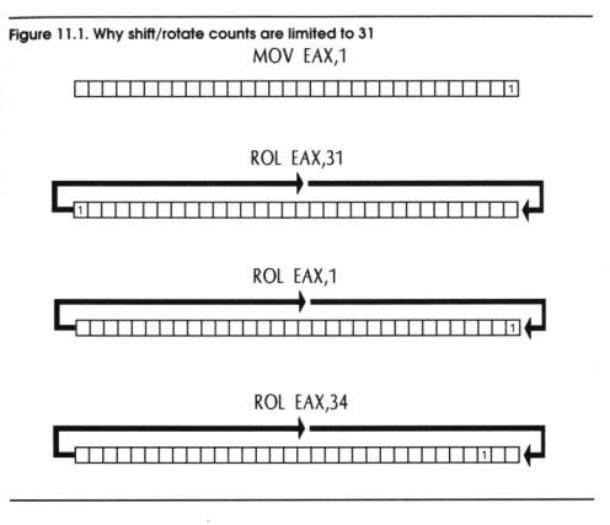
.pdfmeaningful? Or, is there some smaller rotation count that leaves the same pattern in the operand? Figure 11.1 may help things become clear. Start with a single 1 bit in the very lowest position of a 32-bit wide operand. Figure 11.1 shows this operand as EAX, which is a 32-bit register found in the 386 and 486 CPUs. (I'll return to EAX later in this chapter. I only use it here because it's a convenient 32 bits wide.) Begin rotating to the left. Rotating the 1 bit 31 times will bring that single 1-bit to the opposite end of the operand, as shown in the figure. Rotate one more time. Shazam! Your 1-bit is back where it started, and the operand now contains a pattern identical to the pattern you had when you began.
In other words, given a 32-bit operand, rotating the operand by 32 bits is the same as not rotating it at all. Rotating it by 33 bits is the same as rotating it by 1 bit. Rotating it by 34 bits is the same as rotating it by 2 bits, and so on. So there's really no purpose to rotating an operand by more bits than the operand itself is wide. Doing so just wastes time inside the CPU. This is why, on the 286 and newer processors, the shift-by count is truncated to 5 bits: the largest value expressible in 5 bits is ... 32!
An Instruction You'll Probably Never Use
Not all of the new goodies introduced with the 286 are likely to be useful to you. One new instruction in particular has always puzzled me: BOUND.
The BOUND instruction was created to provide a way to test whether or not an array index was within two legal array bounds, and to do so quickly. The testing process helps prevent software from accidentally writing outside
the bounds of the area currently being worked on, which is a major problem in advanced assembly-language work.
The BOUND instruction has a complicated set of operands that I won't try to explain here. I'll summarize its operation instead: BOUND takes the value given in its first operand and tests to see whether that operand is within the two values (the array bounds) pointed to by its second operand. If that first operand is within the bounds, everything is cool and nothing happens. (The flags are not affected.) However, if the first operand is discovered to be outside the bounds, the CPU triggers an interrupt 5. Interrupt 5 is hard baked into the silicon of the CPU. It's not something you can set, say, to interrupt 37 or 79 as needed. If an index fails BOUND'S test, it's interrupt 5, period.
This means that in order to use BOUND, you have to know how to create and install an interrupt service routine. That's OK; there's nothing hideously difficult about it once you've studied the ropes. However....
When IBM designed its original PC, somebody somewhere on the PC development team wasn't reading the fine print of Intel's documentation for the x86 family of CPUs. From the start, Intel has "reserved" a certain number of interrupts for the exclusive use of its CPUs. (Reserved means, "This is ours! Don't use it for something else?') Interrupt 5 was one of these.
Programmers don't like fine print. So one of IBM's guys needed an inter-rupt, and picked interrupt 5. He used it for the Print Screen mechanism in the original PC BIOS. When you press Shift+PrtSc on the PC keyboard, the BIOS issues an interrupt 5, and the interrupt service routine for interrupt 5 prints whatever is on the screen to your printer.
The Print Screen mechanism is in ROM, and exists in every PC and PC compatible ever built. This means that if you try to use BOUND without doing anything with the interrupt vector table, BOUND will trigger a Print Screen interrupt when a bound test fails. This, of course, is useless. You can, in fact, jigger things in an interrupt service routine to "share" an interrupt between two or more interrupting entities. It's entirely possible for both BOUND and the Print Screen mechanism to coexist in using interrupt 5. It's plenty complicated, but it can be (and has been) done.
Still, there's one final fly in the tequila. For reasons unclear to me, the BOUND instruction, when it generates an interrupt 5, pushes its own address on the stack as the interrupt return address, rather than the address of the next instruction in line.
This is best explained just by describing what happens: BOUND triggers interrupt 5. The interrupt 5 service routine takes control and does what it must. Then the service routine pops the return address from the stack...and the BOUND instruction executes again! If neither the array index nor the bounds were changed by the interrupt service routine, BOUND will fail again, and trigger another interrupt 5, and so on without end.
Whew. And yes, by being extraordinarily clever, you can get around that as well, by reaching up onto the stack and goosing the return address a little. I've long since decided, however, that BOUND simply isn't worth the bother.
But I've told this story for a specific reason. Several times in my 10-year career as a PC programmer, I've seen my machine go into a peculiar sort of endless loop. The loop consists of repeated Print Screen operations, as though someone were repeatedly pressing Shift+PrtSc. And someone was, of course: BOUND. I was accidentally executing a BOUND instruction, probably by trying to execute data as code, or by jumping into the middle of a multibyte instruction opcode. By rearranging things, I was always able to stop the problem from occurring, but it was years before I actually figured out who the culprit was.
Aren't bugs wonderful?
11.4 Moving to 32 Bits with the 386 and 486
The features that the 286 has over the 8088 are few and not outrageously useful. Mostly, the 286 had its day in the sun because (relative to an 8088) it was greased lightning. It obtains much of that relative speed by being a true 16-bit CPU, but more than that, most of its instructions also ran more quickly than the same instructions on the 8088. For example, the MOV AX,1 instruction (which moves an immediate value into a register) takes four machine (clock) cycles to execute on the 8088, but only two clock cycles on the 286. Many of the other instructions are
correspondingly faster as well.
This process of instruction speedup has continued with the advent of the 386 and 486 CPUs. The MOV AX,1 instruction takes only one clock cycle to execute on the 486! Couple that with a 486 clock speed that starts at 33 Mhz and is now more and more commonly 50 Mhz, and we're talking some serious speed here. There was also another quantum leap in processor data width, from 16 bits to 32 bits. Both the 386 and 486 process data internally in 32-bit chunks, and also move data into and out of the CPU 32 bits at a time.
The 386SX chip, as I mentioned earlier, was sort of a throwback: it is only a 16-bit CPU in terms of moving data into and out of the CPU. (It does, however, process data internally 32 bits at a time.) It's cheaper, but the 16-bit data path also slows it down considerably over its big brothers, the 386 and 486.
The Extended General-Purpose Registers
So we come at last to the question of how the 386 and 486 (including the 386SX) process data internally in 32-bit chunks. The registers we've discussed in this book so far are only 16 bits wide. We need some new registers—or at least some wider ones.
And we've got both.
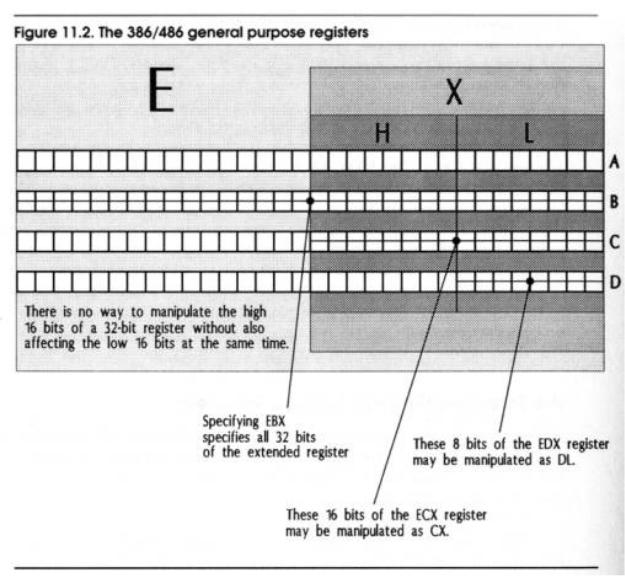
First of all, our seven familiar general-purpose registers and the stack pointer have been doubled in size, from 16 bits to 32 bits. The older 16-bit registers are still there; in fact, they're the same registers. But just as AX, BX, CX, and DX each contain a pair of 8-bit registers; so now do EAX, EBX, ECX, and EDX each contain a pair of 16-bit registers. You can still use the names AX, BX, CX, or DX, but when you do, you will only be addressing the lower 16 bits of the larger registers.
Figure 11.2 may make this a little clearer. In the 386 and 486, there are four general-purpose registers. Each is 32 bits wide. When you specify EAX, you're specifying the full 32-bit extended form of our familiar AX register. EAX contains AX, just as AX contains both AL and AH. Don't make the mistake (as some do) of thinking that there is a separate set of 16-bit registers inside the 386, in addition to the 32-bit registers. It's like a box within a box within a box, and with the 386/486 we've added an outer layer of box.
One unfortunate thing about the extended registers is that you can't sepa-rately manipulate their high 16 bits. In other words, you can separately access the low 16 bits of EAX by working with AX, and the high 16 bits of EAX will not be disturbed. You cannot, however, specify only the high 16 bits of EAX or the other extended registers. There's simply no way to name those high 16 bits as a distinct group.
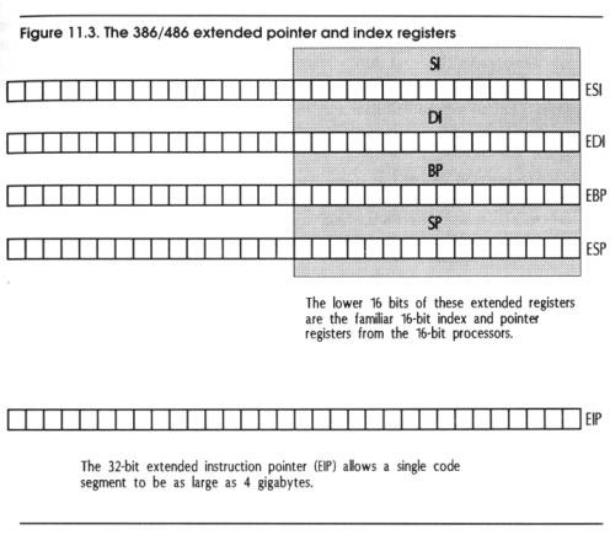
Similarly, there are extensions to SI, DI, BP, and SP. (See Figure 11.3.) Just as with the generalpurpose registers, the extended index and pointer registers contain their familiar 16-bit counterparts as their low 16 bits. ESI contains SI, EDI contains DI, and so on. Again, there is no way to separately specify the high 16 bits of the extended index and pointer registers.
More Segment Registers
The whole issue of memory segments changes drastically when you move from real mode to protected mode, so drastically that I don't have much hope of explaining it usefully in this book. This seems all the more surprising, since our
familiar segment registers don't change at all, physically, in the move from the 286 to the 386. They are still 16 bits wide, and (in real mode at least) they still work exactly the same way. Not only that, but there are two more of them.
With the 386 comes the FS and GS registers, so named (I suspect) because they follow the ES register. And, like the ES register, they are extra segment registers, allowing you to set up and retain more segments at a single time.
I hesitate (a little) at suggesting that an otherwise unused segment register can sometimes be a lifesaver when you need "just one more place" to put a value to make a fast assembly-language algorithm happen. In real mode you can do anything you want with the segment registers, including use them as general-purpose registers. (Keep in mind that the segment registers can't do everything that the general-purpose registers can do.) The problems begin when you try to run such code in protected mode, where the CPU is very fussy about what you do with segment registers. In protected mode, segment registers hold segment values and participate in memory addressing, and that's it. Do other things with them and you're asking for numerous kinds of trouble.
Using the new segment registers requires that you use their segment override prefixes, as there are no "assumed" uses of FS and GS in the 386/486 instruction set. This isn't difficult. If you're still fuzzy on the notion of segment override prefixes, glance back at Section 6.2. It's simply a
matter of putting FS: or GS: in front of a memory addressing operation:
MOV FS:[SI],AX
This instruction moves the 16-bit word at FS:SI into AX. [Scanner’s note: has he got this backward?typo?] The GS: prefix works exactly the same way.
In real mode, the FS and GS segment registers have no hidden agendas. They are truly extra segment registers, and you have to specify their use every time you use them.
Not Just in Protected Mode!
A common misconception is that the new segment registers and the 32-bit features of the 386 and 486 are available only in protected mode. Not so! There are in fact a number of instructions and special registers that can only be accessed from protected mode, but the 32-bit extended registers are not among them. EAX, EBX, ECX, EDX, ESI, EDI, and EBP are fully usable from real mode. ESP is usable, but only the lower 16 bits are meaningful unless you're in protected mode using segments larger than 64K.
Let Your Assembler Know What You Want
You should keep in mind, however, that you must tell your assembler that you want to use the extended registers and advanced CPU instructions. Otherwise, if you try to use the register name EAX, or the PUSHA instruction, the assembler will tell you it doesn't know what you're talking about.
This is actually a safety feature. Most people choose to program for the least common demoninator of the entire 80x86 series, which is the fundamental 8086/8088 instruction set that I've been discussing throughout the earlier por-tions of this book. Both MASM and TASM default to that common demoninator instruction and register set, and must be specifically told that you're "graduat-ing" to the additional features of the 286/386/486.
There are commands you can give to MASM and TASM to tell them what set of advanced assembler features you wish to use. By including these commands at the top of your assemblylanguage source-code files, you can then use the advanced features throughout the remainder of those files. These commands are summarized in Tables 11.1 and 11.2.
One thing to remember when using these assembler commands is that older versions of both assemblers may have been released before the 486 was in general use, and thus your version of MASM or TASM may be too old to understand the 486-specific commands. TASM 2.0, for example, understands the 386 but not the 486.
The versions of both assemblers current in early 1992 provide full support for the 486-specific CPU features.

___________________________________________________________________________________
Table 11.1. Using MASM and TASM in MASM mode
Command Use
286 Allows assembly of all real mode 286 instructions
386 Allows assembly of all real mode 286 and 386 instructions, and use of 32-bit register names
486 Allows assembly of all real mode 286, 386, and 486 instructions, and use of 32-bit register names
Table 11.2. Using TASM in Ideal mode
Command Use
P286N Allows assembly of all real mode 286 instructions
P386N Allows assembly of all real mode 286 and 386 instructions, and use of 32-bit register names
P486N Allows assembly of all real mode 286, 386, and 486 instructions, and use of 32-bit register names
______________________________________________________________________________
11.5 Additional 386/486 Instructions
You may be disappointed if you look for a host of marvelous new instructions in the 386 and 486 instruction set. There are new instructions there, but the most marvelous of them mostly serve the needs of operating system programming in protected mode.
Some instructions that exist in the earlier processors have been extended, with additional addressing or counting operands and modes. And there are (a few) valuable new instructions that I'll present in this section.
But the major change in the 386 and especially the 486 is that Intel has made many of the mostused instructions faster. Instruction speeds are measured by the number of ticks of the master system clock that it takes to execute a given instruction. Intel has done extensive studies of the "opcode mix" in typical applications, and has rearranged the internal structure of the newer CPUs to enable the most-used instructions to execute more quickly.
On some instructions, the process has reached its ultimate conclusion with the 486: the instructions execute in only one clock cycle. Most MOV instruction variations execute in one cycle on the 486, as do TEST, SUB, NOT, INC, ADD, CMP and many other often-used
instructions.
There's been some backsliding however: some instructions, including DIV, ENTER, LEAVE (none of which we've discussed in this book), and some others have actually gotten slower on the 486 (they take more machine cycles to execute than they did on the 386). And there are a significant number of instructions that are slower on the 386 than on the 286, including those marvelous string instructions we discussed in Chapter 10.
Why would Intel turn progress back and make an instruction slower than it once was? It's a question of chip "real estate" and a question of priorities. When Intel designs a new CPU, it decides about how many individual transistors it can successfully create on the die (the fresh, unaltered silicon chip), and then allocates them to individual instructions and other functions in order of importance.
In general, it takes more transistors to make an instruction execute quickly than it does to make an instruction execute slowly. Intel wants to make its CPUs the fastest on the market, and CPU speed is measured by executing a "mix" of instructions—that is, by executing real programs!
Some instructions appear in the mix more frequently than others, so for overall CPU speed, it pays to throw transistors at the most frequently used instructions. Ideally, all the instructions would be made to execute in one cycle, but there aren't enough transistors on the finished chip to do that. So Intel made some hard decisions, and in some cases took some transistors from a seldom-used instruction like ENTER and gave them to a more-frequently used instruction like
ADD.
This effect was most pronounced in the move from the 286 to the 386. The 486 gave back some of the speed to the seldom-used instructions, and there's every reason to expect that the process will continue until all instructions execute in a single clock cycle.
This, by the way, is the major reason that a 33 Mhz 486 seems faster than a 33 Mhz 386 ... it is! The individual instructions on the 486 execute more quickly than those of the 386, so even at identical clock rates, the 486 has a significant performance edge.
Obviously, get a 486 if you can.
Pushing and Popping All 32-Bit Registers
I presented the PUSHA and POPA instructions in the last section, and there are 32-bit equivalents available on the 386 and 486. PUSHAD pushes all of the 32-bit registers onto the stack, in this order:
EAX, ECX, EDX, EBX. ESP, EBP, ESI, EDI
Note that the value pushed for ESP is the value the stack pointer had before the first register was pushed onto the stack. The CPU makes a private copy of ESP before beginning execution of the instruction, and it is this private copy that is pushed onto the stack.
Similarly, POPAD pops the registers from the stack in reverse order:
EDI, ESI. EBP, ESP, EBX, EDX. ECX, EAX
The ESP value popped from the stack is not loaded into ESP; it's simply discarded. As I explained with PUSHA and POPA, these instructions should be used as a pair; that is, what you push with PUSHAD you should pop with POPAD.
Looking for 0 Bits with BT
Back in Section 9.3, I introduced the TEST instruction, which allows you to determine if any given bit in a byte or word is set to 1. As I explained, TEST has its limits: it's not cut out for determining when a bit is set to 0.
The 386 and 486 have an instruction that allows you to test for either 0 bits or 1 bits. The Bit Test (BT) instruction performs a very simple task: it copies the specified bit into the Carry flag CF. In other words, if the selected bit is a 1 bit, CF is set. If the selected bit is a 0 bit, CF is cleared. You can then use any of the conditional jump instructions that examine and act on the state of CF.
BT is easy to use. It takes two operands: the first one is the value containing the bit in question; the second operand is the ordinal number of the bit you want to test, starting from 0. The syntax is shown below:
BT <value containing bit>,<bit number>
Once you execute a BT instruction, you should immediately test the value in CF and branch based on its value. Here's an example:
BT AX,4 |
; Test bit 4 of AX |
JNC Quit |
; We're all done if bit 4=0 |
Note that we're branching if CF is not set; that's what JNC (Jump if Not Carry) does.
Use TEST to Test for 1-Bits!
One problem. As thankfully understandable as BT is, you must keep in mind that TEST is considerably faster than BT. If you're trying to write code that absolutely has to be fast, be aware that BT can be less than half as fast as TEST—if all you need to execute to test a bit is TEST. Remember, however, that TEST requires additional code to look for 0 bits, so if you're looking for a 0 bit, BT is faster. TEST, furthermore, is available on all 80x86 CPUs, so you needn't be concerned with safe execution.