

Assembly Language Step by Step 1992
.pdfSoftware Interrupts vs. Hardware Interrupts
Software interrupts evolved from an older mechanism that did involve some genuine
interrupting: hardware interrupts. A hardware interrupt is your CPU's mechanism for paying attention to the world outside itself.
There is a fairly complex electrical system built into your PC that allows circuit boards to send signals to the CPU. An actual metal pin on the CPU chip is moved from one voltage level to another by a circuit board device like a disk drive controller or a serial port board. Through this pin the CPU is "tapped on the shoulder" by the external device. The CPU recognizes this tap as a hardware interrupt. Like software interrupts, hardware interrupts are numbered, and for each interrupt number there is a slot reserved in the interrupt vector table. In this slot is the address of an interrupt service routine (ISR) that performs some action relevant to the device that tapped the CPU on the shoulder. For example, if the interrupt signal came from a serial port board, the CPU would then allow the serial port board to transfer a character byte from itself into the CPU.
Most properly, any routine that lies at the end of a vector address in the interrupt vector table is an ISR, but the term is usually reserved for hardware interrupt service routines. The only difference between hardware and software interrupts is the event that triggers the trip to the interrupt vector table. With a software interrupt, the triggering event is part of the software; that is, an INT instruction; with a hardware interrupt, the triggering event is an electrical signal applied to the CPU chip—without any INT instruction taking a hand in the process. The CPU itself pushes the return address on the stack when it recognizes the electrical pulse that triggers the interrupt; however, when the ISR is done, an IRET instruction sends execution home, just as it does for a software interrupt. Hardware ISRs can be (and usually are) written in assembly language. It's a difficult business, because the negotiations between the hardware and software must be done just so, or the machine may lock up or go berserk. This is no place for beginners, and I would advise you to develop some skill and obtain some considerable knowledge of your hardware setup before attempting to write a hardware ISR.
7.4 Summary: EAT.ASM on the Dissection Table
Let's recap our disassembly of EAT.ASM by putting it back together again, with commentary. I should point out that this is one way to write an assembly-language program, but it isn't the only way by any means. I'm outlining what I feel is an ideal organization for short, assembly-language programs containing less than a thousand lines or so of source code assembled and linked as one piece. The essential structure of this organization is shown in Figure 7.6. Past that thousand lines, an assembly-language program must be broken up into modules or the program will collapse into an
undecipherable black hole into which any quantity of effort may be poured without any improvement in the program. (We'll begin talking about modularizing programs in Chapter 8.)
Segment Definition and Segment Order
An assembly-language program of any usefulness must consist of at least three segments: a data segment, for variables used by the program; a stack segment, containing the program's stack; and a code segment, containing the program's machine instructions. These segments are defined using the two directives: SEGMENT, which marks the start of the segment, and ENDS which marks the end of the segment.
Each segment must have a name, and the name must be used twice in the definition of a segment: once before the SEGMENT directive and again before the ENDS directive. A segment must be named even though the name may not be referenced anywhere in the program:
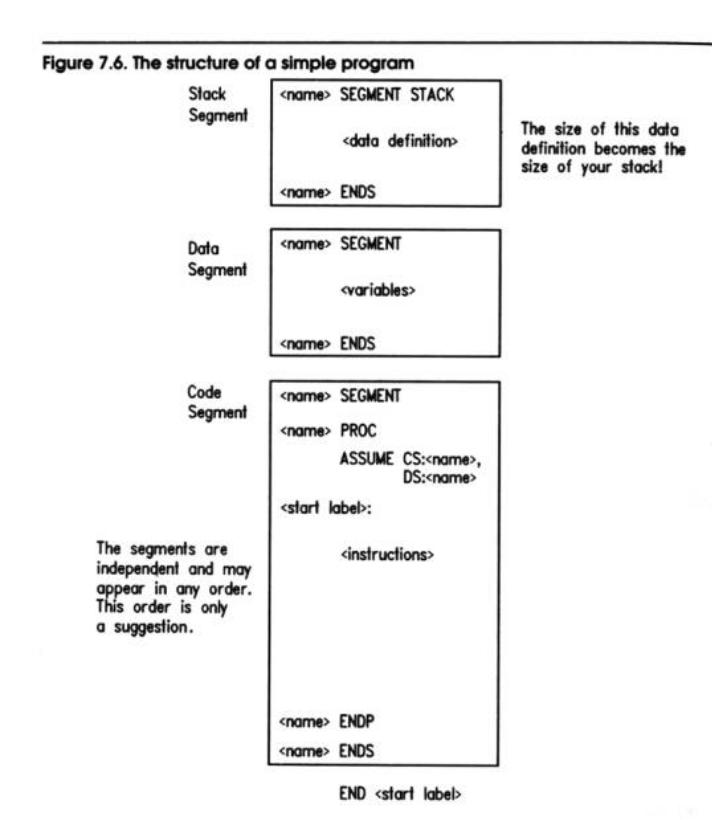
. Note that in EAT.ASM, the stack segment is named MyStack even though nothing in the program ever needs to reference MyStack by name.
The stack segment must be defined with the STACK directive following the SEGMENT directive. This definition tells DOS which segment address to load into the SS (Stack Segment) register.
The size of the stack segment is dictated by the definition of some data within the
segment. You must define enough stack space to cover any possible need the program may have, plus the needs of DOS and any interrupt service routines (including loaded TSRs) that may be active while your program is running. If you don't define enough space, you may have a stack crash, which will definitely terminate your program and very possibly crash the machine as well. Decide how much stack space you may realistically need, and allocate twice as much. Use the DB and DUP directives to allocate space.
The segments are order independent, that is, you may place the segments in any order without changing the way the segments work together, nor the way the assembler treats them. My own custom is to define the stack segment first, followed by the data segment, followed by the code segment.
Data Definitions for Variables and Stack Space
Variables and space for the stack must be allocated during assembly. The DB, DW, DD and DUP directives are the most common means to do this. DW allocates word-sized (16bit) variables, typically to contain register-sized values. DD allocates double word-sized (32-bit) variables, typically for full addresses containing both segment and offset.
These definitions have a form like the examples shown below:
MyWord |
DW 0FFFFH MyAddress DD OB8000000H |
The DB directive was designed to allocate byte-sized (8 bit) quantities like characters and register halves, but it has the special property of being able to allocate strings as well. Elements of the string may be numbers, characters, or quoted strings, separated by commas. The following are all legal DB variable definitions:
MyByte |
DB |
042H |
; Using hex notation |
|
Counter |
DB |
17 |
; |
Decimal! |
Eat1 |
DB |
"Eat at Joe's!","$" |
; |
Character string |
CRLF |
DB |
ODH,OAH,'$' |
; |
Numbers separated by commas |
If you need to allocate a variable or a buffer without specifying any initial values, use the DUP directive with a question mark (?) as the value:
MyBuffer DB 1024 DUP (?)
The question mark value simply sets memory aside but stores nothing in it. Do not put the question mark in quotation marks, or the assembler will store the question mark
character (ASCII 3FH) into every byte of the buffer.
The DUP directive can also be used to store repeated patterns into larger variables and buffers. This can make the buffers and variables easy to spot when you perform a hex dump from DEBUG:
Marked DB 10 DUP ('Zorro!!!') Table1 DB 5 DUP (02H,04H.06H,08H) DB 64 DUP ('STACK!!!')
The last example allocates space for the stack segment in EAT.ASM. Although this statement illustrates the fact that you don't have to name a buffer that simply exists to take up space (as in allocating space for the stack segment), I recommend that you name all variables and buffers.
Setting Up the Code Segment
Like any segment, the code segment must have a name, and the name must be given at the start and end of the segment definition, before the SEGMENT and ENDS directives. Although the name is unimportant and probably won't be referenced anywhere in the code, it must be there, or you will receive an assembler error.
An ASSUME directive must be included in the program. Its purpose is to tell the assembler which of the segments you have defined is to be used for the code segment, and which segment is to be used for the data segment. Unlike the stack segment, which has the directive STACK to tell the assembler what sort of segment it is, nothing in the code or data segments specifies which sort of segment they are. It isn't enough that there are variables defined in the data segment or machine instructions in the code segment. The assembler will allow you put variable definitions in the code segment and machine instructions in the data segment, regardless of whether that makes sense or not. (It may, in certain extremely advanced techniques.)
In EAT.ASM, the ASSUME directive tells the assembler that the code segment will be the segment named MyCode, and that the data segment will be named MyData.
EAT.ASM has its machine instructions grouped together in a procedure named Main with the PROC directive. This is not strictly necessary unless you have broken down your program into procedures or modules, and EAT.ASM will assemble and run correctly without the Main PROC and Main ENDP statements. I would advise you to get in the habit of placing the main program portion of any assembly-language program into a procedure called Main to help make the program more readable.
What is essential, however, is to provide a label that marks the place where program
execution is to begin. I recommend the label Start: as a convention, but the label can be any legal identifier. Whatever label you choose, mark the main program's starting point with the label and a colon. Then, place the same label minus the colon after the END directive, which marks the end of the source-code file. Placing the "start" label after the END directive tells the assembler that there is no more source code, and that the label is the point at which execution is to begin.
What EAT.ASM's Machine Instructions Do
; From the top: |
; Set up our own data segment |
address in DS |
mov AX,MyData |
||
mov DS,AX |
; Can't load seg-reg. directly |
from memory |
Before your program can access any of its variables in the data segment, it must have the segment address of the data segment in the DS register. The ASSUME directive tells the assembler to assemble any instruction referencing an identifier in the MyData segment under the assumption (hence the name of the directive) that MyData is to be a data segment. ASSUME, however, does not load the data segment address into DS!
You must do that yourself, which is the purpose of the two instructions shown above. This seemingly simple operation takes two instructions rather than one because MOV cannot move memory data directly into a segment register like DS. To load the address of memory data into a segment register, you must first load the address into one of the general-purpose registers and then load the general-purpose register into the segment register:
lea DX , Eat1 |
; Load offset of Eat1 message string into DX |
|
mov AH,09H |
; |
Select DOS service 09H: Print String |
int 21H |
; |
Call DOS |
Here's where the first real work of EAT.ASM gets done. The load effective address instruction (LEA) puts the offset address of variable Eat1 into the DX register. Keep in mind that the segment address of Eat1 is already in DS— loaded by the first two instructions in the program. MOV AH, 09H loads the number of DOS service O9H (Print String) into register half AH. The term "Print String" is a misnomer inherited from
an ancient age when video terminals were considered exotic, and strings could only be printed—on (kerchunk-kerchunkity-chunk) Teletype terminals!
Finally, INT 21H transfers control to the DOS services dispatcher by way of software interrupt 21H. The dispatcher looks in DS:DX for the address of the string variable to be displayed, and then hands control over to the Print String service routine somewhere deep within DOS. When the string is displayed, execution returns to the instruction following the INT 21H instruction, which is possible because the INT 21H instruction pushed the address of the next instruction onto the stack before it passed execution to the DOS services dispatcher. The dispatcher simply popped that return address of the stack and resumed execution at that address. Again, here is an explanation of how interrupts work: the previous block of instructions were enough to display the string "Eat at Joe's!" on your video display. DOS leaves the hardware cursor on the character following the last character of the string, however, and any subsequent display output would follow "Eat at Joe's!" immediately. You may want this, and you may not—and if you don't, it would be a good idea to return the cursor to the left margin and bump it down to the next screen line. This is what's going on here:
lea DX , CRLF mov AH, 09H int 21H
; |
Load offset of CRLF string into DX |
; |
Select DOS service 09H: Print String |
; |
Call DOS |
The CRLF variable contains the EOL marker, which includes the ASCII carriage return characters. EAT.ASM passes the string containing these two "invisible" characters to DOS in exactly the same way it passed the string "Eat at Joe's!", by loading CRLF's address into DS:DX and selecting DOS service O9H before handing control to the DOS services dispatcher through software interrupt 21H.
Finally, the job is done. Joe's has been properly advertised, and it's time to let DOS have the machine back:
mov AH,4CH |
; Terminate process DOS service |
|
mov AL,0 |
; Pass this value |
back to ERRORLEVEL |
int 21H |
; Control returns |
to DOS |
Another DOS service, 4CH (Terminate Process) handles the mechanics of courteously disentangling the machine from EAT.ASM's clutches. The Terminate Process service doesn't need the address of anything, but it will take whatever value it finds in the AL register and place it in the DOS ERRORLEVEL variable. DOS batch programs can test the value of the ERRORLEVEL variable and branch on it, as I'll demonstrate in the next
chapter.
EAT.ASM doesn't do anything worth testing in a batch program, but if ERRORLEVEL will be set anyway, it's a good idea to provide some reliable and harmless value for ERRORLEVEL to take. This is why 0 is loaded into AL prior to ending it all by the final INT 21 instruction. If you were to test ERRORLEVEL after running EAT.EXE, you would find it set to 0 in every case.
Dividing and Conquering
Using Procedures and Macros to Battle Complexity
8.1Programming in Martian >• 216
8.2Boxes Within Boxes >• 216
8.3Using BIOS Services >• 224
8.4Building External Libraries of Procedures >• 235
8.5Creating and Using Macros >• 248
8.1 Programming in Martian
There is a computer language called APL (an acronym for "A Programming Language," how clever) that has more than a little Martian in it. APL was the first computer language I learned, (on a major IBM mainframe) and when I learned it I learned a little more than just APL.
APL uses a very compact notation, with dozens of odd little symbols, each of which is capable of some astonishing power like matrix inversion. You can do more in one line of APL than you can in one line of anything else I have learned since. The combination of the strange symbol set and the compact notation make it very hard to read and remember what a line of code in APL actually does.
So it was in 1977. Having mastered (or so I thought) the whole library of symbols, I set out to write a text formatter program. The program would justify right and left, center headers, and do a few other things that we take for granted today, but which were very