

AutoCAD 2005 For Dummies (2004)
.pdf160 Part II: Let There Be Lines
You can experiment with all the grip-editing options to find out how they affect a selected object.
Because MOVE and STRETCH are the most useful grip-editing modes, I cover them more specifically.
Move it!
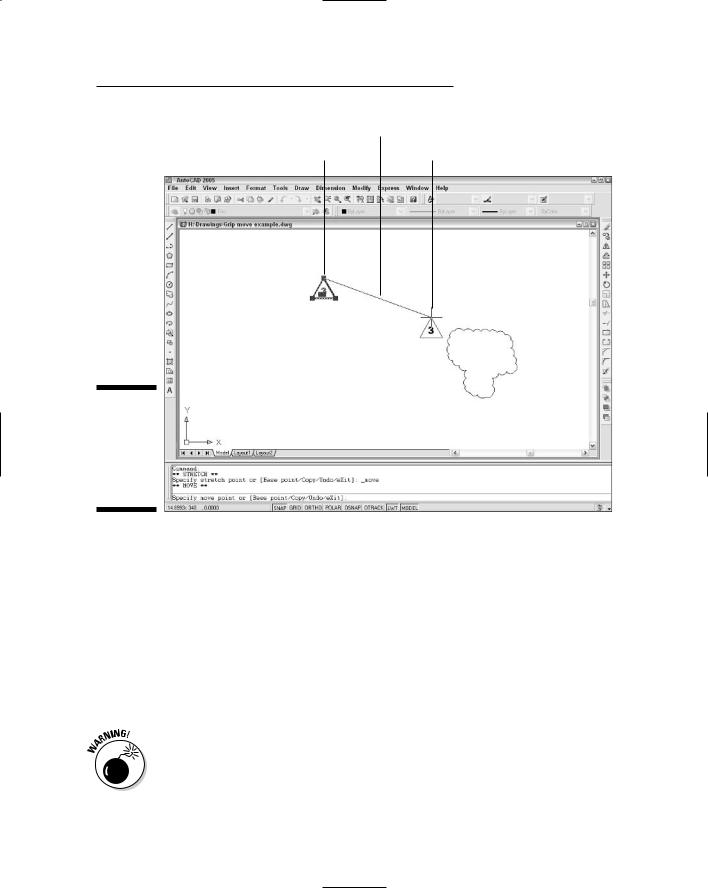
Back in the days of manual drafting, moving objects was a big pain in the eraser. You had to erase the stuff you wanted to move and redraw the objects in their new location. In the process, you usually ended up erasing parts of other stuff that you didn’t want to move and left smudged lines and piles of eraser dust everywhere. CAD does away with all the fuss and muss of moving objects, and AutoCAD grip editing is a great way to make it happen. The following steps describe how to move objects:
1.Select one or more objects.
Use any combination of the three editing modes — single object, bounding box, or crossing box — described in the section, “Grab It,” earlier in this chapter.
2.Click one of the grips to make it hot.
At this point in your editing career, it doesn’t matter which grip you click. As you become more familiar with grip editing, you’ll discover that certain grips serve as better reference points than others for particular editing operations.
3.Right-click anywhere in the drawing area and choose Move from the cursor menu.
4.Move the cursor to a different location and click.
As you move the cursor around, AutoCAD displays the tentative new positions for all the objects, as shown in Figure 6-16. After you click, the objects assume their new positions.
5.Press Esc to deselect all objects and remove all grips.
Copy, or a kinder, gentler Move
If you were paying attention during “A gripping example,” earlier in the chapter, you may have noticed while pressing the spacebar that COPY was not among the five grip-editing modes. Why not? Because every grip mode includes a copy option (as the command line prompts shown in “A gripping example,” earlier in this chapter indicate). In other words, you can STRETCH with copy, MOVE with copy, ROTATE with copy, SCALE with copy, and MIRROR with copy.
Chapter 6: Edit for Credit 161
Displacement vector
Original location |
Drag image to new location |
Figure 6-16:
Dragging objects in the middle of the MOVE grip-editing operation.
The copy option leaves the selected objects in place and does the editing operation on a new copy of the objects.
By far the most common use for the copy option is with the MOVE grip-editing mode. If you think about “MOVE with copy” for about two seconds, you’ll realize that it’s just a complicated way of saying “copy.” The following steps show how to copy objects quickly by using grip editing:
1.Select one or more objects.
2.Click any one of the grips to make it hot.
3.Right-click anywhere in the drawing area and choose Move from the cursor menu.
If you want to copy objects in the normal sense of the word “copy,” you must choose the MOVE grip-editing mode first. Otherwise, you’ll be copying with the STRETCH grip-editing mode.
4. Right-click again and choose Copy from the cursor menu.

162 Part II: Let There Be Lines
5.Move the cursor to a different location and click.
After you click, new objects appear in the new location.
6.Move the cursor to additional locations and click there if you want to make additional copies.
7.Press Esc twice — once to end the copying operation and once to deselect all objects and remove all grips.
A warm-up Stretch
In AutoCAD, stretching is the process of making objects longer or shorter. The STRETCH grip-editing operation is really a combination of stretching and compressing, but the programmers probably realized that STRETCHANDCOMPRESS didn’t exactly roll off the tongue.
The STRETCH grip-editing mode works differently than the other modes. By default, it affects only the object with the hot grip on it, not all objects with grips on them. You can override this default behavior by using the Shift key to pick multiple hot grips. Follow these steps to get acquainted with using the STRETCH grip-editing mode to stretch one or more objects:
1.Turn off ortho mode by clicking the ORTHO button on the status bar until the button appears to be pushed out and the words <Ortho off> appear on the command line.
Ortho mode forces stretch displacements to be orthogonal — that is, parallel to lines running at 0 and 90 degrees. During real editing tasks, you’ll often want to turn on ortho mode, but while you get acquainted with stretching, leaving ortho mode off makes things clearer.
2.Select several objects, including at least one line.
3.On one of the lines, click one of the endpoint grips to make it hot.
All the objects remain selected, but as you move the cursor, only the line with the hot grip changes. Figure 6-17 shows an example.
4.Click a new point for the hot endpoint grip.
The line stretches to accommodate the new endpoint location.
5.On the same line, click the midpoint grip to make it hot.
As you move the cursor, the entire line moves. Using the STRETCH gripediting mode with a line’s midpoint “stretches” the entire line to a new location.

Chapter 6: Edit for Credit 163
Original location
Displacement vector
Figure 6-17:
Dragging a line’s endpoint in the middle of the STRETCH grip-editing operation.
Drag image to new location
6.Click a new point for the hot midpoint grip.
The line moves to the new midpoint location.
7.On one of the lines, click one of the endpoint grips to make it hot.
8.Hold down the Shift key, and then click one of the endpoint grips on a different line to make it hot.
Two grips on two different lines are now hot because you held down the
Shift key and clicked the second grip.
You can create more hot grips by holding down the Shift key and clicking more grips.
9. Release the Shift key and re-pick any one of the hot grips.

164 Part II: Let There Be Lines
Releasing the Shift key signals that you’re finished making grips hot. Repicking one of the hot grips establishes it as the base point for the stretch operation (see Figure 6-18).
10.Click a new point for the grip.
All the objects with hot grips stretch based on the displacement of the grip that you clicked in Step 9.
11.Turn on ortho mode by clicking the ORTHO button on the status bar until the button appears to be pushed in and the words <Ortho on> appear on the command line. Repeat Steps 2 through 10 to see the effect of ortho mode on stretching.
For most real-world editing situations, you’ll want to turn on ortho or polar tracking mode before stretching. Ortho mode is good for all kinds of drawing and editing tasks because it enforces a nice, rectilinear orderliness on your drawing. Chapter 4 describes how to use ortho mode to draw orthogonal lines.
The hot grip used as a base point
Figure 6-18:
Stretching multiple objects with multiple hot grips.
Multiple hot grips

Chapter 6: Edit for Credit 165
Polishing those properties
When you think of editing objects, you probably think first about editing their geometry: moving, stretching, making new copies, and so on. That’s the kind of editing I cover in this chapter.
Another kind of editing is changing objects’ properties. As I describe in Chapter 4, every object in an AutoCAD drawing has a set of nongeometrical properties, including layer, color, linetype, and lineweight. Sometimes, you need to edit those properties — when you accidentally draw something on the wrong layer, for example. Three common ways of editing objects properties in AutoCAD are
The Properties palette: This is the most flexible way to edit properties. Select any object (or objects), right-click in the drawing area, and choose Properties from the cursor menu. The Properties palette displays a
tabular grid that lists the names and values of all properties. Click in the value cell to change a particular property.
Layers and Properties toolbars: Another way to change properties is to select objects and then choose from the drop-down lists (Layer, Color, and so on) on the Layers and the Properties toolbars. See Chapter 4 for more information.
Match Properties: You can use the Match Properties button on the Standard toolbar
— the button with the paintbrush on it — to paint properties from one object to another. Match Properties works similarly to the Format Painter button in Microsoft applications. Match Properties works even when the objects reside in different drawings.

166 Part II: Let There Be Lines

Chapter 7
A Zoom with a View
In This Chapter
Zooming and panning
Naming and restoring views
Zooming and panning in paper space layouts
Regenerating the display
One of the advantages of CAD over manual drawing is its capability of giving you different ways to view your drawing. You can zoom in close,
zoom out to a great distance, and pan around. In fact, not only can you zoom and pan in your drawing, but in most kinds of drawings, you must do it frequently to be able to draw, edit, and view effectively.
Technical drawings are jampacked with lines, text, and dimensions. Zooming and panning frequently enables you to see the details better, draw more confidently (because you can see what you’re doing), and edit more quickly (because object selection is easier when there aren’t a zillion objects on the screen). This chapter covers AutoCAD’s most useful display control features.
Zoom and Pan with Glass and Hand
Moving your viewpoint in to get a closer view of your drawing data is called zooming in; moving your viewpoint back to get a more expansive view is called zooming out.
Zooming in and out of your drawing is one of the big advantages that AutoCAD offers over manual drawing. You can do detailed work on tiny objects and then zoom out and move around rooms, houses, or neighborhoods from an Olympian perspective.
Panning is closely related to zooming. If you zoom in enough that some of your drawing no longer shows up on-screen, you’re going to want to pan around — move left, right, up, and down in your drawing — without zooming in and out. AutoCAD makes panning easy with scroll bars and real-time panning.

168 Part II: Let There Be Lines
Both panning and zooming change what is known as the view. The view is the current location and magnification of the AutoCAD depiction of your drawing. Each time you zoom or pan, you establish a new view. You can give a name to a specific view to make returning to that view easy, as I demonstrate later in this chapter.
Fortunately, zooming and panning in AutoCAD is as simple as it is necessary. The following steps describe how to use AutoCAD’s Zoom and Pan Realtime feature, which is easy to operate and provides a lot of flexibility:
1.Click the Zoom Realtime button (the one that looks a magnifying glass with a plus/minus sign next to it) on the Standard toolbar.
The Realtime option of the Zoom command starts. The cursor changes to a magnifying glass, and AutoCAD prompts you at the command line:
Press ESC or ENTER to exit, or right-click to display
shortcut menu.
2.Move the cursor near the middle of the screen, press and hold down the left mouse button, and drag the cursor up and down until the table almost fills the screen.
Dragging up increases the zoom magnification and dragging down decreases it.
3.Right-click in the drawing area to display the Zoom/Pan Realtime cursor menu, shown in Figure 7-1, and choose Pan from the menu that appears.
Figure 7-1:
The
Zoom/Pan
Realtime
cursor
menu.
The cursor changes to a hand.
4.Click and drag to pan the drawing in any direction.
You can use the right-click menu to toggle back and forth between Zoom and Pan as many times as you like. If you get lost, choose Zoom Original or Zoom Extents to return to a recognizable view.
5.Right-click in the drawing area and choose Exit.
The cursor returns to the normal AutoCAD crosshairs.

Chapter 7: A Zoom with a View 169
In the preceding example, you started with zooming and ended with panning. You also have the option of doing the reverse: Click the Pan Realtime button (the one showing a hand), and after you’ve panned, use the right-click menu to switch to zooming. However you start it, the important thing to realize is that Zoom and Pan Realtime is a single AutoCAD function. At any time, you can switch between panning and zooming (or switch to a related function, such as Zoom Window) by using the right-click menu.
You also can pan and zoom by using your mouse’s scroll wheel (if it has one) or the middle button of a three-button mouse:
To zoom in and out, roll the scroll wheel forward (in) or backward (out).
To zoom to the extents of your drawing, double-click the scroll wheel or the middle button.
To pan, hold down the scroll wheel or the middle button as you move the mouse.
The scroll wheel or middle mouse button zoom and pan operations described in the preceding paragraph depend on an obscure AutoCAD system variable named MBUTTONPAN. (See Chapter 2 for a description of what system variables are and how to change them.) When MBUTTONPAN is set to 1 — the default value — you can use the middle button to pan and zoom, as I describe in the preceding tip. If you change MBUTTONPAN to 0, clicking the middle mouse button displays a cursor object snap menu, as it did in older AutoCAD versions. If you’re not able to zoom or pan with your middle mouse button, set MBUTTONPAN back to 1. (With MBUTTONPAN set to 1, you use Shift+rightclick to display the cursor object snap menu.)
Realtime zooming and panning is the easiest, most interactive way to get around in your drawings. In some situations, though, this method is less efficient or precise than the old-fashioned methods, the most important of which are described in the next section.
Out of the frying pan . . .
Another way to pan in AutoCAD should be familiar from other Windows programs — the scroll bars in the drawing area. Scrolling is the same in AutoCAD as in any other Windows program; click the arrows in the right and bottom borders of the drawing window to scroll, or pan, a step at a time; or click and drag the little square “thumbs” in those borders to pan as little or as much as you want to.
Believe it or not, the realtime and scrollbar panning methods are relatively recent enhancements in AutoCAD’s long history. These methods have pretty much replaced the less-intuitive two-point method of panning in older versions of AutoCAD. If you want to see how Grandpa used to pan, enter –Pan