

VOC3_Manual
.pdfClick the name of the singer you want to use. A checkmark appears beside the active singer (3. Operation – Making VOCLAOID3 Sing -> 3-2. The Singer).
The name of the singer for the currently selected part appears in the Musical Editor title bar in brackets following the part name.
In this example the singer “Tonio(V2)” is selected for the part named “NewPart”
Step 3: Set the Initial Tempo and/or Time Signature
While you are at the beginning of the sequence – press the period [.] key on your keyboard to go there if you aren’t already – take a look at the left edge of the rulers above the Track Editor window – the top ruler indicates measure numbers, while the lower two are labeled TEMPO, and BEAT – and you will see the initial tempo and time signature settings at the beginning the TEMPO and BEAT rulers, respectively. You can double-click on either of these values to change them as required (2-3. The Track Editor Window -> 2-3-1. Rulers).
11

Step 4: Select a Part
There should only the default part, named “NewPart”, in the Track Editor VOCALOID sequence track at this point, but selecting the part you want to edit before you go and enter notes and lyrics in the Musical Editor is an important part of the VOCALOID3 workflow, and it’s a good idea to always make sure the right part is selected before you begin editing.
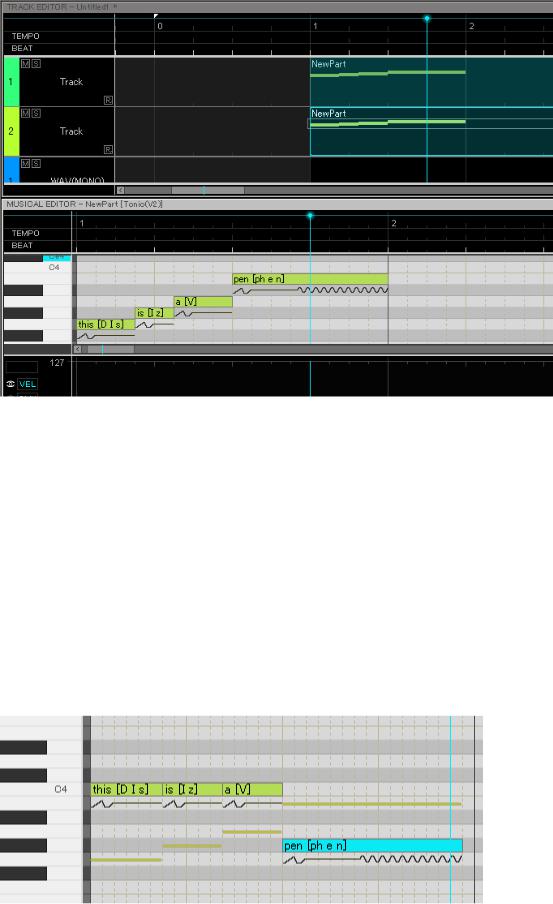
In this case, simply double-click “New Part” in the Track Editor window to select it.
Step 5: Enter the Notes
Here’s the score for our short example – only four notes so it should be easy.
Click on the pencil tool button to select it (2-2. The Tool Bars -> 2-2-1. The Edit Tool Bar).
Then, starting at measure number 1 in the Musical Editor piano-roll (you may need to drag the piano-roll window scroll bar to locate it), use the pencil tool enter the four notes so the piano roll looks like this:
12

If you have a steady hand you can freely click and drag the notes to the required length, but it’s probably easier to use the VOCALOID3 quantization and length functions, or the preset note lengths. You’ll find details on the quantize and length settings in “3-3. Entering & Editing Notes in the Musical Editor -> Quantize vs. Length”, and more detailed note-entry information in “3-3. Entering & Editing Notes in the Musical Editor”.
Step 6: Enter the Lyrics
Now let’s enter some lyrics for the four notes we just entered. To prevent accidental note entry go back to the tool buttons and select the pointer tool .
.
Now we’ll enter the phrase “This is a pen” (inside joke … don’t ask why). You should see the default lyric – “ooh” – followed by the corresponding phoneme representation in each of the notes you entered. More information on “phonemes” is provided in “3-6. Note Properties 2 – Phoneme Functions”. Double click the “ooh” in the first note to enter the lyric editing mode, then enter the first word “this” (capitalization is not required), and press [Enter] on your computer keyboard. Repeat this for the remaining three notes, entering one word per note. Your sequence should now look like this:
More information on lyric entry and editing can be found on 3-4. Entering & Editing Lyrics.
Step 7: Play – Initial Check
Now you can play back your basic track to hear how it sounds and check that the software has produced the lyrics and pronunciation you had intended. At this point only the default expression (note expression and vibrato) has been added
13

to the track. We’ll learn how to modify the expression and add dynamics a bit later.
For now move the sequence track to a position a bit before the first note in your track (you can do this by clicking briefly in the MEASURE ruler of either Musical Editor or Track Editor at the appropriate location (2-3. The Track Editor Window -> 2-3-1. Rulers), and then start playback by clicking the on-screen
transport “play” button , or by pressing the [SPACE] or [ENTER] key on your computer’s keyboard. The sequence will stop automatically when the end is reached, but you can also stop playback at any time by clicking the on-screen
transport “stop” button , or by pressing the [SPACE] or [ENTER] key on your keyboard. And remember that you can skip back to the beginning of the sequence after it is has stopped by pressing the [.] (period) key.
More information on the transport controls
is available in 2-2. The Tool Bars -> The Transport Bar. You might also find the
Start and End markers handy for playing back your sequences. Find out about them in “2-2. The Tool Bars -> 2-2-2. The Transport Tool Bar -> Show/Hide Start and End Markers.”
Step 8: Add Control Parameter
And the final touch to our first track – some parameter control. Start by selecting the “BRI” (Brightness) parameter in control menu at the left side of the control parameter area, then use the pencil tool to draw a curve as close as possible to this one:
Next select “GEN” (Gender Factor) in the control parameter selector and draw a curve as close as possible to the one shown here:
14

The control parameter is essential to the in-depth tweaking that can bring your vocal tracks to life. Find out more about it in “3-7. Expressive Control -> Editing a Control Parameter”.
Step 9: Play – Check the Results
OK, now play the track again and hear how it sounds. Better?
The actual expressive variations produced by the control parameters will depend on the VOCALOID3 library you are using, so it is not possible to accurately predict the results, but your vocal track should be sounding pretty interesting at this point. Now you can edit and tweak on your own to get a better feel for how the parameters interact with the voice. Descriptions of the voice parameters are provided in “3-2. The Singer -> Customizing the Singer’s Voice.”
Step 10: Add a Track
Although each VOCALOID3 sequence track is strictly monophonic (notes cannot overlap), a VOCALOID3 sequence can have as many as 16 separate tracks.
Add a new track to your sequence by selecting “Add Track” from the Track menu (2-1. The Menus -> 2-1-5. Track). Normally you’d need to create a new part in your new track before you can enter notes and lyrics in that track, but we’re going to copy the part from Track 1 to Track 2, so there’s no need to create a new part.
Step 11: Copy the Part from Track 1 to Create a Chorus
Here’s a quick and easy way to create a chorus. Simply click and drag the part you created in Track 1 straight down to the same location in Track 2 while holding the [CTRL] key on your keyboard. If you did this properly you should now have a copy of the Track 1 part in Track 2, like this:
15
Since the goal is to create a chorus you might want to select a different singer for the second track (if you have one). Make sure the new part that’s in Track 2 is selected (double-click it so that it is highlighted), then repeat the singer selection procedure described in “Step 2: Select a Singer”, above.
Obviously a combination of different singers is going to sound more realistic than copies of the same singer, but you could also use the same singer and simply change the singer’s vocal characteristics via the control parameter (3-7. Expressive Control -> Editing a Control Parameter). You could even create a variation of the singer in the Singer Editor (3-2. The Singer -> Customizing the
Singer’s Voice).
Next you can change the pitches of the notes to create harmonies by simply dragging the notes up or down in the Musical Editor window piano roll.
Here’s a harmony track that works with our original “This is a pen” track:
16
The original notes in Track 1 appear as thin lines in the background while the Track 2 part is selected. (When you double-click the part in the Track Editor window the notes in the previously selected part appear as thin lines in the background).
Later we’ll learn how you can adjust the second singer’s note expression, vibrato, and other parameters to give him or her some individuality while maintaining the best possible musical blend.
Step 12: Save Your Sequence
When your masterpiece is complete you’ll want to save it for posterity. Select the “Save” item from the File menu and follow the standard file save procedure (2-1. The Menus -> 2-1-1. File).
17

Reference Section
1. Overview
The VOCALOID3 Editor is comprised of four main functional components:
1.The menus and toolbars.
2.Track Editor window.
3.Musical Editor window (piano roll & control parameter area).
4.Mixer window.
The menus are always visible, but you can choose to show or hide any of the toolbars via the View menu. The Track Editor window, Musical Editor window, and Mixer window can be shown or hidden as required, depending on the type of operations you are performing.
The menus and toolbars (1) provide access to functions that affect overall operation of the VOCALOID3 editor, and that you’ll need to access while working in any of the three windows: Track Editor, Musical Editor, and Mixer. (2-1. The Menus)
The Track Editor (2) window lets you create and manage up to 16 vocaloid sequence tracks, plus one mono WAV track that’s ideal for adding effects such as
18
breath noise, and one stereo WAV track that’s most useful for instrument backing or “karaoke” tracks. (2-3. The Track Editor Window)
The Musical Editor window (3) is where you actually enter notes, lyrics, and expression data for your vocaloid sequence tracks. The control parameter editor section of the Musical Editor window is used for editing control parameters such as note velocity, pitch variations, and vocal qualities such as breathiness and opening. The control parameter editor section of the Musical Editor window is hidden by default, but you can choose to show it via the View menu. (2-4. The Piano Roll)
The Mixer window (4) provides a virtual mixing console that you can use to mix the various tracks in your sequence for optimum balance, and add VST effects as required. (2-6. The Mixer Window)
19

2. Interface Elements
This section provides brief descriptions of the various parts of the VOCALOID3 Editor interface. In some cases the descriptions provided here will be enough to allow you to use the respective functions, but for in-depth operating procedures you’ll need to read through the “3. Operation – Making VOCALOID3 Sing” section.
2-1. The Menus
2-1-1. File
With the exception of “Import” and “Export,” the items in the File menu are pretty much standard and should be intuitive to use.
New
Create a new VOCALOID3 sequence file. If you have unsaved edits when this function is selected you will be asked if you want to save the current sequence. Select [YES] to enter a name for the current sequence (if necessary) and save it before opening a new file, [NO] to discard the current sequence and open a new file, or [CANCEL] to abort the operation.
Open
Open an existing VOCALOID3 sequence file (vsqx format) or VOCALOID2 sequence file (vsq format). When you select this function you will be asked if you want to save the current sequence file if it has been edited in any way. Select [YES] to enter a name for the current sequence (if necessary) and save it before opening another file, [NO] to discard the current sequence and open a different file, or [CANCEL] to abort the operation.
20