

VOC3_Manual
.pdfOnce you have saved or discarded the current sequence the standard open-file dialog will appear, allowing you to navigate to and open the desired sequence file.
When you open the VOCALOID2 Sequence file into the VOCALOID3 program the Velocity (VEL) parameter in the control parameter area will be set at that default value automatically because of the difference between VOCALOID2’s and VOCALOID3’s Velocity function.
(Functions added to the V3.0.3)
If the installed library is different when the file is created, the following dialogue box will appear.
“New singer name” is the singer name used for playback on this computer. “Original singer name” is the set singer name by the computer originally created by this file.
Save
When saving a new file this command will open the standard save-file dialog window. To save a file, specify the location to which you want to save the file, enter the file name, and click [SAVE]. If the file has been saved previously, selecting the Save command will simply overwrite the file without opening the Save dialog window. You can save VOCALOID3 sequence file with only VSQX format but you can’t open the VSQX file in the VOCALOID2 Editor.
Save As …
Save the current sequence file using a new name, leaving the previously saved version untouched. Specify the location to which you want to save the file, enter the file name, and click [SAVE].
21

Import >
Track
This function lets you import VOCALOID3 files when you want to merge VOCALOID3 projects, as well as VOCALOID files from the original VOCALOID application, VOCALOID2 files, or SMF files (Standard MIDI Files) from other sequencers or applications. The imported MIDI data can include both note data and lyrics that can be converted to data that can be sung by VOCALOID3.
First choose the VOCALOID sequence file you want to import tracks from via the standard file selection dialog, then choose the tracks that you want to import by checking the appropriate “Select” checkboxes in the Import Track dialogue, then click [OK].
Selected tracks will be imported and placed below existing tracks in the current Track Editor window. Also when a VOCALOID sequence track is selected in the Track Editor window the selected tracks in the Import Track dialog will be imported just under that VOCALOID sequence track.
Just remember that VOCALOID3 allows up to 16 simultaneous tracks, total.
Furthermore, when importing VOCALOID3 sequence files (vsqx format) or VOCALOID 2 sequence files (vsq format), neither tempo nor beat settings will be imported with them. If you want to import with tempo included, please go to “File” menu, “Open”.
22

Part
This function lets you import a specified part (the sequence data in
VOCALOID3 tracks is contained in “parts”) from a VOCALOID3 file. First choose the VOCALOID3 sequence file you want to import parts from via the standard file selection dialog, then choose the part that you want to import by checking the appropriate “Select” buttons in the Import Part dialogue, then click [OK].
You can also use the “Position” selectors at the bottom of the dialog window to select a track and measure/beat/clock location to which to import the part. If you don’t select an import location here, the selected part will be imported to the current location of the song position marker. Only one part can be imported at a time.
23

Wave
Wave files can be imported into the WAV (MONO) and WAV (STEREO) tracks to serve as sound effects and/or backing tracks as required. Mono WAV files will automatically be imported into the WAV (MONO) track, and stereo WAV files will automatically be imported into the WAV (STEREO) track.
When you select the “Import -> Wave” function the standard file selection dialog window will appear, allowing you to select the WAV file you want to import. Then when you select a wave file an Import Wave File dialog like the one shown below will appear. Here you can choose to either copy wave file into the folder of the current VOCALOID3 sequence (“Wave file is copied in local”), or not copy the selected WAV file (“Wave file is linked”).
You can also use the “Position” selectors to specify the measure, beat, and clock in the WAV track to which the file will be imported. The current song position is the default position of the “Position” selectors here.
The available sampling rates for the WAV files are 44.1, 48 , 96kHz and the resolution is 16 bit.
Click [OK] to import the WAV file.
24
Export >
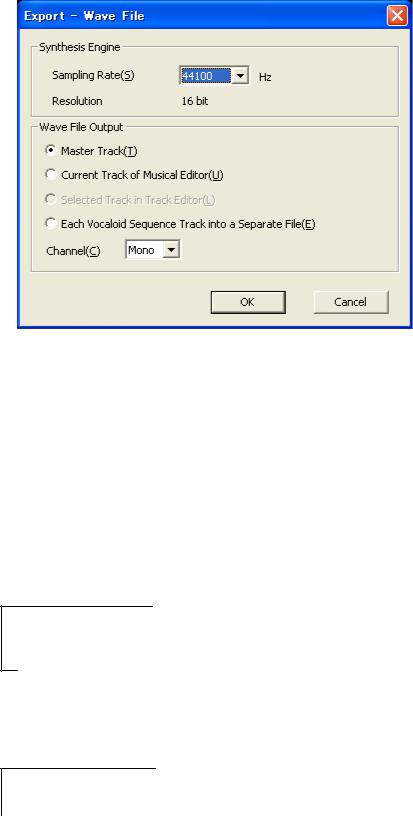
Wave
This function exports open sequence files as the standard WAV audio file format.
Synthesis Engine
Lets you designate sampling frequency. You can choose from three levels, 44100, 48000, and 96000 Hz. Furthermore, the Quantize bit rate is fixed at 16bits.
Wave File Output
Specifies details of wave file output.
“Master track” outputs all tracks mixed together in a Wave file.
“Selected track” outputs the selected track at the track editor. This item cannot be chosen if no track is selected at the track editor,
(Function added in V3.0.4)
“Track currently opened in Musical Editor” outputs all tracks with parts currently open in the Musical Editor. Unlike in the aforementioned “Selected track” option, you can use this option even when no track is selected.
When you click [OK], the standard save dialogue is displayed, you designate the file save location (where to export the file) and file name, and clicking [Save] exports the file.
(Function added in V3.0.4)
Also, the “Separate each track” function outputs all musical tracks into separate WAV files. This function is convenient when you want to import
25

multiple chorus tracks concurrently to something like DAW format. To output multiple files, you must designate an export folder. File names are automatically chosen from currently open VSQX file names and track names. When nothing is contained within a track, the corresponding track export will be abbreviated.
Furthermore, when exporting Wave files, you can export a designated range by setting start and end markers beforehand.
Recent Files
The name of the most recently created or opened file(s) will be displayed here. Simply click the name to directly open the file.
Exit
Click “Exit” to quit the VOCALOID3 Editor application. If the current sequence file has been edited in any way you will be asked if you want to save the current sequence file before quitting the application. Select [YES] to enter a name for the current sequence (if necessary) and save it before quitting, [NO] to discard the current sequence and quit, or [CANCEL] to abort the operation.
26

2-1-2. Edit
The Edit menu items are fairly standard and should be familiar to anyone who has used a word processor or other music sequencer application.
Undo
This function can be used to “undo” the last edit or operation. There is no limit to the number of edits that can be undone.
Redo
The “Redo” item will “redo” a previously undone edit or operation in most cases. There is no limit to the number of “undo” that can be redone.
Cut
Copy
Paste
The Cut, Copy and Paste editing commands are similar to the equivalent commands in most other applications, and can be used with objects in the Track Editor and Musical Editor windows. “Cut” and “Copy” will cut or copy an object you have highlighted (single-click), or a group of objects you have highlighted by clicking and dragging with the pointer tool. There are, however, a few things to keep in mind.
•When you cut/copy and then paste part, note, or control parameter data, it will be pasted at the current song position marker location.
•Please remember that overlapped notes within the same part will not play back (they will be displayed in thinly), and that any pasted control parameter data will
overwrite the existing data. Also, parts in the Track Editor window will not play back if there are any overlapped notes within the same part.
27
Delete
Deletes the currently selected data object(s).
Select All
This command will select all notes and control parameters in the currently selected sequence part so that you can edit all of them simultaneously.
Select All Events
This command will select all “events” in the currently selected sequence part (i.e. all notes with their associated expression and vibrato).
If you select “Select All Events” from the contextual menu that appears when you right-click in the control parameter area (2-5.The Control Parameter), all data for the control parameter currently being edited will be selected.
Select All Parts
This command will select all sequence and WAV parts in the current sequence.
Select All VS Parts
This command will select all VS parts in the current sequence.
Select All WAV Parts
This command will select all WAV parts in the current sequence.
Select All Parts in a Current Track
This command will select all parts in the currently selected track.
Auto Normalize Mode
When this function is turned on (checked), notes entered in the Musical Editor window piano-roll are normalized “on the fly” so that overlapping notes do not have to be located and rectified later on. If a note is entered so that it overlaps another note in the same track, the first note will be truncated to eliminate the overlap. Refer to the “Normalize Notes” item in the Job menu (2-1. The Menus -> 2-1-4. Job) for more information. This function is alternately checked (ON) or unchecked (OFF) each time it is selected.
28

2-1-3. View
The items in this menu what palettes and data types will appear or be hidden. A check mark will appear to the left of items that are currently showing.
Toolbar
This item accesses a submenu that lets you individually hide or show the Measure, Edit, and Transport toolbars. The related toolbar is showing when a check appears next to its name in this submenu. The Reset Toolbar item resets the toolbars to their default state.
Control Parameters
This command shows or hides the control parameter editor section of the Musical Editor window. The control parameters are hidden by default.
Mixer
This command shows or hides the Mixer window. The window contains mix controls for each track within the sequence as well as a master level control (2-6. The Mixer Window), including gain trim, panning, mute, solo, VST plug-ins, and effects send.
Grid Lines
Shows or hides grid lines corresponding to the currently selected grid size in the sequence track. The grid lines can serve as a useful visual guide when entering or moving notes. Also, the grid lines can be adjusted in the Track Editor window & Musical Editor window separately.
Start Marker
End Marker
These commands show or hide the start or end markers, respectively (2-2. The Tool Bars -> 2-2-2. The Transport Tool Bar -> Show/Hide Start and End
29

Markers). They are alternately checked (show marker) or unchecked (hide marker) each time they are selected.
Lyrics/Phoneme Singing Style
These commands show or hide the corresponding data objects in the sequence track. They are alternately checked (show data) or unchecked (hide data) each time they are selected.
(Functions added to the V3.0.3)
Phoneme Preferred Display
When clicking here, the normally displayed order of Lyric [Phonetic Symbol]
is displayed in this order [Phonetic Symbol] Lyric
in the note.
In this condition, you can edit the phonetic symbol by double clicking the note.
30