

VOC3_Manual
.pdf“VOCALOID Sequence” Tab
Vibrato Settings
The “Default Vibrato Length” parameters specify the length of the vibrato applied to notes as a percentage of the note length. Select one of the presets from the drop-down menu.
The “Automatic Vibrato Settings” specify whether or not vibrato will be automatically applied to entered notes. Vibrato will be applied automatically if the “Enable Automatic Vibrato” checkbox is checked. You can specify the shortest notes to which vibrato will be automatically applied (in beats) via the
“Minimum Note Length for Automatic” Drop-down menu, and the type of the vibrato that will be applied via the “Vibrato Type” drop-down menu.
41

(Functions added to the V3.0.3)
Showing notes as thin line
All of the parts not currently displayed are displayed on thin lines with “All Parts” checked by default. When clicking “Previously Selected Parts”, only the part selected immediately before will be displayed. If you want to display the multiple parts transparently when using this setting, select multiple parts using the [CTRL] key. With this it is possible to display multiple parts with thin lines.
Control Parameters
In “Color Type” you can choose the Control Parameter (such as VEL and
DYN) display color from 4 types.
The “Draw control params like V2” is an added function based on the requests from VOCALOID2 users. When drawing Control Parameters with a pen or a line, a break point is added to ensure the value outside of the drawn range isn’t changed. This is switched off in the default setting.
Song Position
“Return to Start position on Stop” is a function which returns the Song
Position back to the playback start position when playback stops.
42

“Audio Settings” Tab
Synthesis Engine
Here you have the sampling rate setting for the VOCALOID3 synthesis engine. The resolution is fixed at 16 bits. The available sampling rate settings will depend on the sound output device (normally your sound card) that you are using.
If you have more than one audio device installed you can select the one to which you want to send the VOCALOID3 output via the “Audio Device” selection menu. The “Channel” parameter lets you select stereo or mono output. The “Buffer” parameter can be used to set the audio output buffer from 100 to 500 milliseconds to match the capabilities of your computer and audio output device.
VST
When the “Reset VST effect after stopping playback” checkbox is checked, any
VST plug-in effects in use will be reset when sequence playback stops.
43

“View Settings” Tab
(Functions added to the V3.0.3)
Arrangement of Child Window
“Auto Arrangement” is a convenient function for those who want to align the
Track Editor and Musical Editor sub-windows vertically. When the main window is resized, checking “Auto Arrangement” tracks this size and automatically optimizes the sub-windows for display.
44

(Functions added to the V3.0.3)
Mixer
Checking “Floating” displays the Mixer Window separately from the
VOCALOID3 Main Window. In the default setting this is not checked. Alternatively, the menu to change this setting is displayed by right-clicking the Mixer.
Checking “Peak-hold” transmits an excessive audio signal. When clipped, the
Peak Indicator (shown below) which is displayed in red, stays on (in Hold status). Click the red Peak Indicator to release the hold status.
45

“Other Settings” Tab
Language
Specifies the language to be used in the VOCALOID3 interface. Available languages can be selected from the drop-down menu.
Pre-Send Time
In much vocal delivery a portion of the sound will appear a little before the beat. This is not syncopation, but rather to allow for the initial acoustic buildup of some sounds (“s” is a good example). In order to recreate such natural advanced sounds as realistically as possible, VOCALOID3 must send the triggering MIDI data to the VOCALOID3 synthesis engine a little earlier than a conventional synthesizer would. This is the “pre-send” time, determined by this parameter.
Waiting Time
This parameter determines the delay time before playback actually begins after the playback command is given. An error message will appear when you attempt to play the track if this parameter is not set to a value that is long enough to allow for the Pre-Send time, above, and Pre-Measure setting, below.
46

If you click “Adjust Pre-send Time” in the warning message window the presend time will automatically be adjusted (reduced) to fit within the available number of pre-measures.
Default Pre-Measure
Specifies the number of “pre-measures” before the actual sequence region in the sequence track begins. Pre-measures are indicated by negative numbers in the MEASURE ruler, and are a darker color than the playable region beginning at measure 1.
Chase Event
When this box is checked VOCALOID3 will keep track of control events that occur prior to the note(s) they are intended to be applied to, ensuring that control changes and variations are properly applied. You may want to check this box usually.
(Functions added to the V3.0.4)
Update Confirmation Timeout Period
The VOCALOID3 Editor will check for new update releases via internet connection. However, if for reasons such as connection problems it cannot complete correctly, it will wait for a maximum of 30 seconds. You can set this maximum wait time here. The timeout period can be set to 3, 10 or 30 seconds (the default). If you select “don’t check”, the update confirmation check itself will not occur.
(Functions added to the V3.0.1)
Playback Sample Sound
This is the setting related to the sample sound produced when clicking the keyboard on the left side of the sequence track and clicking and holding the note above the sequence track. When you check “Enable”, a sample sound is produced and un-checking produces no sample sound. With “Timing” you can determine the length of time you must click and hold the keyboard and note in order to hear the sample sound. With “Pre-Send Time for sample sound” you can determine the maximum length of the first consonant in the sample sound.
Mixer Floating
When checked the Mixer window will always float above the other VOCALOID3 windows. The default setting is unchecked. You will need to restart the VOCALOID3 application after changing this setting.
47
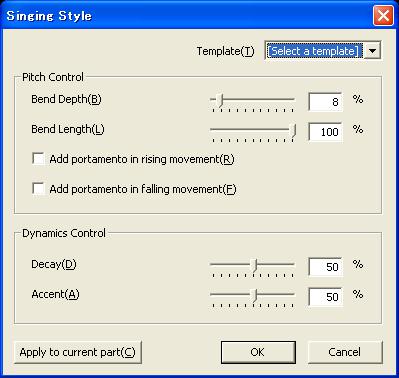
Singing Style
This window lets you specify the default expression settings for new notes entered in the sequence track. Set the parameters as required and click [OK] to make your settings the defaults. You can also click the [Apply to current part] button to apply the settings to all notes in the current part. In the latter case a confirmation window will appear. Click [Yes] to apply the expression parameters to all notes in the current part, or [No] to cancel.
Template
Load a basic expression type from the drop-down menu. The parameters settings in the window will change accordingly.
Pitch Control
Bend Depth slider (0 ~ 100%)
Bend Length slider (0 ~ 100%)
These two parameters specify the pitch variation that will occur at the beginning of the note. If both sliders are set all the way to the left (0%) no pitch variation will occur. Higher Bend Depth percentages create a pitch variation that covers a greater pitch range, and higher Bend Length percentages create longer pitch variation.
48
Add portamento in rising movement
When the pitch of a note is higher than that of the preceding note, a smooth upward “portamento” pitch slide will occur at the beginning of the note.
Add portamento in falling movement
When the pitch of a note is lower than that of the preceding note, a smooth downward “portamento” pitch slide will occur at the beginning of the note.
Dynamics Control
Decay slider (0 ~ 100%)
Accent slider (0 ~ 100%)
These two sliders specify the “shape” of the expression at the beginning of the note. Accent increases or decreases the amplitude of the expression, while Decay increases or decreases the length of the decay into the sustained portion of the note following the initial expression portion. The height of the peak on the graphic expression symbol below the note will change to approximately reflect the Accent level.
49

Active Singer Properties
This command opens the Active Singer Editor where you can use a variety of parameters to customize the sound of the singer that is active in the current sequence. Edits made here will apply only to the current sequence. To edit a singer so that the changes apply whenever that singer is selected, use the My Singer Properties command described below.
With the exception of the [Show My Singer] button, the parameters and controls available in this window are exactly the same as those in the My Singer Editor described below. Refer to My Singer Properties, below, for details.
When the [Show My Singer] button is clicked the window expands to show both the active singer(s) and the “My Singers” residing on your computer. Copy buttons ([>>>] and [<<<]) are provided so you can copy singers from one list to the other. This can be useful if, for example, you have created an active singer than you decide you want to make available for use in future sequences: simply copy the singer from the Active Singer list to the My Singer list. You can also copy
50