

VOC3_Manual
.pdfDeleting Parts
Select the part to be deleted (single-click it so that it is highlighted), then either select “Delete” from the Edit menu or press the [DELETE] key on your keyboard.
You can delete multiple parts simultaneously by first selecting them while holding the [SHIFT] key.
Importing and Manipulating Wave Files
Wave files can be imported into the WAV (MONO) and WAV (STEREO) tracks to serve as sound effects and/or backing tracks as required. Only mono WAV files can be imported into the WAV (MONO) track, and only stereo WAV files can be imported into the WAV (STEREO) track. The WAV file import procedure is described in “2-1. The Menus -> 2-1-1. File”.
Although WAV files cannot be copied or moved from track to track, they can be freely moved around and copied within the same track in the same was as the parts in the sequence tracks. They can also be shortened and lengthened by moving the right edge of parts but the left edge of WAV parts can’t be moved to the either direction. Shortening a WAV file past the end of the data it contains effective “crops” the file, and hidden portion of the file will not be played back.
81

3-2. The Singer
The singer is a vocal “entity” defined by the VOCALOID3 Library that will sing the notes and lyrics you enter. The singer can be male, female, and speak just about any language, as defined by the VOCALOID3 Library you are using. You can add singers to your VOCALOID3 Editor by installing optional voice libraries.
Selecting a Singer
When a new sequence file is created the default singer will be automatically selected for the initial default part. The default singer, and any other singers that are available for selection, will depend on the VOCALOID3 package or voice library you are using. You can change the singer for the currently selected part to any other available singer by right-clicking in the Track Editor or Sequence Track
Editor window and choosing ”Singer” from the contextual menu that appears.
This will bring up the singer menu with the available singer choices.
Click the name of the singer you want to use. A checkmark appears beside the active singer.
The name of the singer for the currently selected part appears in the Musical Editor title bar in brackets following the part name.
82

In this example the singer “Tonio(V2)” is selected for the part named “NewPart”.
Customizing the Singer’s Voice
Using the singer “as is” will produce characteristics most closely resembling the sound of the singer who created the databases you are using. You can, however, change a number of parameters to vary the voice over a fairly wide range via the My Singer Properties and Active Singer Properties editors that can be accessed via the Settings menu (2-1. The Menus -> 2-1-9. Settings). Most of the singer parameters can also be accessed via the control parameter and used to apply real-time variations that can “animate” your vocal tracks and simulate the expressive delivery of a live singer.
Refer to the “Active Singer Properties” and “My Singer Properties” descriptions in “2-1. The Menus -> 2-1-9. Settings” for details on editing, adding, and copying singers.
83

3-3. Entering & Editing Notes in the Musical Editor
Once you’ve created a part (or the program has created a default part for you when you create a new project) and selected that part for editing (double-click it in the Track Editor window), the next step is to begin entering the notes and lyrics to be “sung.”
Notes are entered at the desired locations in the VOCALOID3 Musical Editor piano roll (2-4. The Piano Roll) using the pencil tool. When the Length and
Quantize parameters are set to “off” you can use the pencil tool to enter notes of any length at any location in the part by simply clicking and dragging the notes as required at the appropriate pitches. When a Length value is selected, notes will “snap” to multiples of the specified length as they are being drawn, and when a Quantize value is selected, the attacks of the notes entered will snap to the corresponding note alignment.
The pitches of the horizontal bands in the sequence track correspond to the keys on the graphic keyboard to the left of the track. Duration can be judged by keeping an eye on the measure ruler across the top of the track, and you can turn on the grid (2-1. The Menus -> 2-1-3. View) for an even more accurate reference if required. The current position (measure:beat:clock) of your cursor is also shown by the cursor position indicator in the Cursor Position and Quantize toolbar (2-2. The Tool Bars -> 2-2-3. The Measure Tool Bar).
There’s also a “Fixed Note Length” item in the contextual menu that appears if you right-click in the sequence track area. The “Fixed Note Length” menu can also be accessed from the Settings menu (2-1. The Menus -> 2-1-9. Settings).
“Fixed Note Length” is “Off” by default, but if you select a fixed note length from the menu you can enter notes of the specified length by simply clicking briefly in the piano roll. The beginning of the note is placed at the point at which you click.
84

Enter the basic notes to be sung by your singer, leaving appropriate spaces for rests. Keep in mind, however, that notes in the same track cannot overlap.
You can continue entering notes in the Piano Roll that go beyond the end of the currently selected part in the Track Editor, but those notes won’t appear in the Track Editor window, and they won’t sound when the sequence is played back, unless you extend the length of the part in the Track Editor window so that the hidden notes are shown. You can lengthen or shorten a part by moving the cursor over the end of the part so that the red double arrow appears (the red double arrow will not appear when the eraser tool is selected), and then clicking and dragging the part to the desired length.
Deleting Notes
Notes you have entered can be individually deleted either by clicking them with the eraser tool or single-clicking with any other tool to highlight them and then pressing the [Delete] key on your computer keyboard. You can specify a range of notes to be deleted by clicking and dragging with the pointer tool to highlight all of the desired notes and then press the [Delete] key or just use the eraser tool and drag a range of notes to be deleted.
Stretching Notes
Individual notes can be stretched to make them longer (as long as doing so doesn’t cause them to overlap another note) or shorter as required. The Length setting (2-1. The Menus -> 2-1-9. Settings) determines the beats to which the note release will snap when a note is stretched. Position the cursor over the beginning or end of a note so that the red double-ended arrow stretch symbol appears
(), then click and drag the note to resize as required.
85

Moving Notes
Position the cursor over the body of a note and it will change to the hand pointer which you can use to click and drag the note to a different horizontal position (as long as it doesn’t overlap another note), or to a different pitch. You can also use this method to move a group of highlighted notes. The Quantize setting (2-1. The Menus -> 2-1-9. Settings) will determine to which beats the moved note(s) will snap.
Copying Notes
You can copy single notes or a group of highlighted notes to a different location (time and/or pitch) by grabbing and dragging with the hand pointer while holding the [Ctrl] key on your computer keyboard. As with the move operation described above, the Quantize setting (2-1. The Menus -> 2-1-9. Settings) will determine to which beats the copied note(s) will snap.
You can also use the standard edit commands – cut, paste, and copy (see 1-1. The Menus -> Edit) – to copy or cut and paste single or multiple notes. In this case the notes will be pasted to the current location of the song position marker.
Quantize vs. Length
At first the Quantize and Length functions (2-1. The Menus -> 2-1-9. Settings) may seem similar, and therefore somewhat confusing. Actually, they are very similar in that they align notes in the sequence track to the nearest specified beats, but the difference is in whether that alignment applies to the beginning (attack) or to the end (release) of the notes. The Quantize setting affects where the beginnings of the notes will be placed in the sequence track. If you want all notes you enter to fall precisely in 8th-note beats, for example, make sure that Quantize is set to 1/8. Then when you use the pencil tool to enter a note its attack will precisely snap to the nearest 8th note beat even if your aim is a little off.
The Length function, however, applies to the ends (releases) of notes. Length therefore determines the beats to which the ends of notes will snap when click- and-drag entered or stretched.
86

3-4. Entering & Editing Lyrics
The default lyric is automatically entered for each note (“Ooh” when entering
English, for example). You can then double-click on and edit the default lyric for each note to create the desired phrase. If you have selected an English singer use standard English input and editing procedure to enter English lyrics. You can press the [TAB] key to jump directly to the next note after entering the text for a note.
In some cases a single word will correspond to a single note, but in many cases words will be sung across two or even more notes, one syllable per note. In such cases simply type a hyphen following the syllable that needs to connect to a syllable on the following note.
In the above example – “She’s such a lady” – the first three words (“She’s such a”) correspond to individual notes, while “la-dy” is sung using two notes: the “la-
“ syllable on the first and the “dy” syllable on the second.
If a Japanese singer has been specified, use standard Japanese input and editing procedures to enter Japanese lyrics. Japanese can be entered using Romaji, Hiragana, or Katakana input methods. You can press the [TAB] key to jump directly to the next note after entering the text for a note.
When entering Japanese lyrics for a Japanese singer please note that any lyrics that have been entered in Romaji (Roman characters) will be sung using Japanese Katakana pronunciation.
87
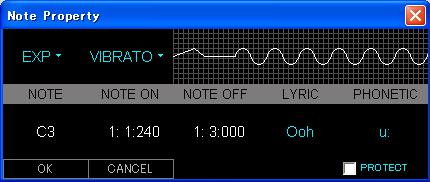
3-5. Note Properties 1 – Adding Vibrato and Expression
Vibrato and expression parameters can be conveniently accessed via the Note Property window. The Note Property window for the currently selected note in the sequence track can be opened by selecting “Note Property” from the Lyric menu. You can also right-click on the note and select “Note Property” from the contextual menu that appears.
Vibrato
Click VIBRATO in the Note Property window to open the Vibrato Property window.
An alternative method of opening the Vibrato Property window is to double-click on the vibrato section of the expression symbol under the note. If you use the latter method you only need to click the [OK] button in the Vibrato Property window to apply the changes. But if you access the Vibrato Property window via the Note Property window you will also need to click the [OK] button in the Note Property window when you have finished editing to apply the changes.
88

Vibrato Length
Sets length of vibrato. Default value of 66% sets vibrato for the last 66% of the note. If you change this to 100%, for example, vibrato will occur for the full length of the note. On the other hand a setting of 30% would apply vibrato to only the last 30% of the note.
Vibrato Type
Load a basic vibrato type from the drop-down menu. The depth and rate profiles of the selected type will appear in the Depth and Rate windows below.
89

Depth and Rate Envelopes
These graphs or “envelopes” allow you to apply real-time variation to the vibrato. You can change the depth and/or rate (speed) of the vibrato over the duration of the note.
The colored region (green) is the current profile for the corresponding vibrato parameter. The left edge of the graphs corresponds to the beginning of the vibrato, and the right edge of the graphs corresponds to the end of the vibrato. The range is from 0 (minimum) through 64 (median) to 127 (maximum). Click and drag in the graph window while the “+” cursor is showing to create linear variations as required.
Other tool options and edit functions can be selected from the contextual menu that opens when you right-click in the graph area. The Eraser tool can be clicked and dragged along a section of the graph, creating a flat segment with a value corresponding to the point at which you began dragging (dragging from left to right).
The pointer tool can be used to drag-select a section of the graph, after which you can press the [Delete] key on your computer keyboard to create a flat section in much the same was as the eraser tool – i.e. the value of the flat section is determined by the value at the leftmost edge of the selected section.
Note that the profiles cannot be edited while the “Non Vibrato” type is selected in the Load menu.
90