

99
 Setting the Display Overlays
Available Shooting Modes  p. 189
You can display vertical and horizontal grid lines, a 3:2 print area guide, or both on the LCD monitor while shooting to help check the position of your subject.
Off |
– |
|
|
|
|
Grid Lines |
Displays grid lines to divide the screen into 9 parts. Helps |
|
confirm the vertical and horizontal positioning of the subject. |
||
|
||
|
Helps confirm the print area for L-size or postcard size in 3:2 |
|
3:2 Guide |
aspect ratio*. Areas outside the printable area are grayed out. |
|
|
* Images are still recorded at the standard aspect ratio of 4:3. |
|
Both |
Displays both the grid lines and the 3:2 guide simultaneously. |
|
|
|
1 Select [Disp. Overlay].
1.Press the  button.
2.In the  menu, use the
  or
or  button to select [Disp. Overlay].
2 Make settings.
1.Use the  or
or  button to select the option.
2.Press the  button.
z Only grid lines can be configured for the  or
or  mode.
mode.
zThe grid lines and 3:2 guide will not be recorded in the image.
Functions Shooting Advanced

100
Categorizing Images Automatically
(Auto Category)
Available Shooting Modes  p. 189
If you set Auto Category to [On], images are automatically sorted into preset categories as they are recorded.
|
|
|
People |
For images shot in |
|
|
, |
|
|
|
or |
mode, or images with |
||||||
|
|
|
|
|
|
|||||||||||||
|
|
|
faces detected when [AF Frame] is set to [Face Detect]. |
|||||||||||||||
|
|
|
|
|||||||||||||||
|
|
|
|
|
|
|
|
|
|
|
|
|
|
|
|
|
|
|
|
|
|
Scenery |
For images shot in |
|
|
, |
|
, |
|
|
|
or |
|
|
mode. |
||
|
|
|
|
|
|
|
|
|
||||||||||
|
|
|
|
|
|
|
|
|
|
|
|
|
|
|
|
|
|
|
|
|
|
Events |
For images shot in |
|
, |
|
, |
, |
|
or |
mode. |
||||||
|
|
|
|
|
||||||||||||||
|
|
|
|
|
|
|
|
|
|
|
|
|
|
|
|
|
|
|
1 Select [Auto Category].
1.Press the  button.
2.In the  menu, use the
  or
or 
button to select [Auto Category].
2 Make settings.
1.Use the  or
or  button to select [On] or [Off].
2. Press the  button.
Movies are not automatically categorized, but they can be categorized using the My Category function (p. 109).
101
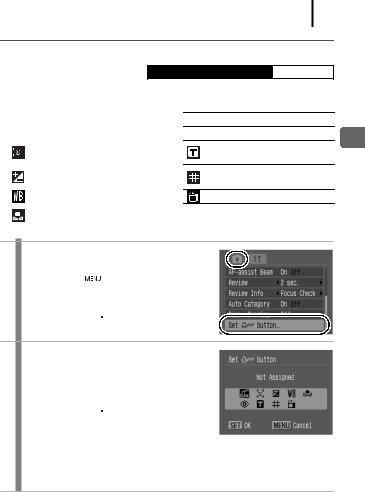
 Registering Settings to the
  Button
Available Shooting Modes  p. 189
You can register a function that you often use when shooting with the  button.
|
|
Menu Item |
Page |
|
|
|
|
Not Assigned |
– |
|
|
|
|
|
|
||
|
|
|
|
|
|
|
|
Face Select and |
p. 82 |
|
|
|
|
Track |
|
|
|
|
|
|
|
|
|
|
|
Exposure |
p. 90 |
|
|
|
|
Compensation |
|
|
|
|
|
|
|
|
|
|
|
White Balance |
p. 94 |
|
|
|
|
Custom White |
p. 95 |
|
|
|
|
Balance |
|
|
|
|
|
|
|
|
Menu Item |
Page |
|
Red-Eye Corr. |
p. 76 |
|
Digital Tele- |
p. 58 |
|
converter |
||
|
||
Disp. Overlay |
p. 99 |
|
Display Off |
p. 51 |
1 Select [Set 
 button].
1. Press the  button.
2.In the  menu, use the
  or
or  button to select [Set
 button].
3. Press the  button.
2 Make settings.
1.Use the  ,
,  ,
,  or
or  button to select the function you wish to register.
2.Press the  button.
•If  displays to the icon’s lower right,
you can register the function, but you cannot use it with some shooting modes or settings even if you press the  button.
•Pressing the MENU button completes the setting.
To Cancel the Shortcut Button:
Select  in Step 2.
Functions Shooting Advanced

102
Using the  Button
1 Press the  button.
•For  ,
,  and
and  , each time that the
  button is pressed, the settings of the registered functions are switched.
•For  ,
,  and
and  , the corresponding setup screen is displayed.
•For  , each press of the
 button records the white balance data. Since the frame does not appear at this point,
ensure that the white paper or cloth is positioned so it appears at the center of the LCD monitor and then press the 
 button. After using this function once, the white balance setting changes to
  .
.
•For  , pressing the
 button turns off the LCD monitor. The next time a button is pressed, the LCD monitor will turn back on.