


132
Configuring the Camera
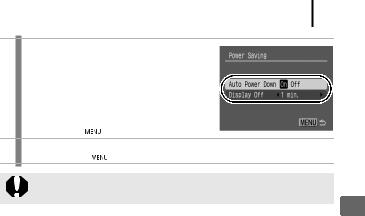
 Power Saving Function
This camera is equipped with a power saving function, which can automatically turn off the power or LCD monitor.
Auto Power Down When set to [On], the power will shut off in the following circumstances. Press the ON/OFF button again to restore power.
|
Shooting mode: Approximately 3 minutes after the last |
|
control is accessed on the camera |
|
Playback mode or when connected to a printer: |
|
Approximately 5 minutes after the last control is |
|
accessed on the camera. |
Display Off |
In shooting mode, the LCD monitor automatically turns |
|
off after the selected time if no control is accessed, |
|
regardless of the [Auto Power Down] setting. Press any |
|
button other than the ON/OFF button or change the |
|
camera orientation to turn the LCD monitor back on. |
1 Select [Power Saving].
1. Press the  button.
2. Use the  or
or  button to select the
  menu.
menu.
3. Use the  or
or  button to select [Power Saving].
4. Press the  button.
133
2 Make settings.
1. Use the  or
or  button to select an option.
2. Use the  or
or  button to make settings.
3. Press the  button.
3 Press the  button.
The power saving function will not activate during a slide show or while the camera is connected to a computer.
Camera the Configuring

134
 Formatting Memory Cards
You should always format a new memory card or one from which you wish to erase all images and other data.
Please note that formatting (initializing) a memory card erases all data, including protected images and other file types.
1 Select [Format].
1. Press the  button.
2.Use the  or
or  button to select the
 menu.
menu.
3. Use the  or
or  button to select [Format].
4. Press the  button.
2 Make settings.
1.Use the  or
or  button to select [OK].
2.Press the  button.
• To perform a low level format, use the  button to select [Low Level
Format] and the  or
or  button to add a check mark.
•You can stop formatting a memory card when [Low Level Format] is selected by pressing the FUNC./SET button. You can still use a memory card without problem when formatting is halted, but its data will be erased.
Low Level Format
We recommend you select [Low Level Format] when you think that the recording/reading speed of a memory card has dropped. A low level format may require 2 to 3 minutes with some memory cards.

135
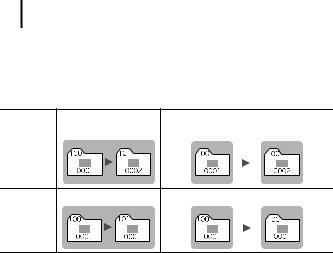
 Resetting the File Number
The images you shoot are automatically assigned file numbers. You can select how the file number is assigned.
|
A number one higher than the last one recorded is assigned |
|
to the next image. This is convenient for managing all your |
|
images together on a computer because you avoid file name |
Continuous |
duplication when changing folders or memory cards.* |
|
* When a blank memory card is used. If a memory card with recorded |
|
data is used, the 7-digit number for the last recorded folder and |
|
image is compared with the last one on the memory card, and the |
|
larger of the two is utilized as the basis for new images. |
|
The image and folder number are reset to the starting value |
|
(100-0001).* This is convenient for managing images on a |
Auto Reset |
folder-by-folder basis. |
* When a blank memory card is used. If a memory card with recorded |
|
|
data is used, the number following the 7-digit number for the last |
|
recorded folder and image on the memory card is utilized as the |
|
basis for new images. |
1 Select [File Numbering].
1. Press the  button.
2.Use the  or
or  button to select the
 menu.
menu.
3.Use the  or
or  button to select [File Numbering].
2 Make settings.
1. Use the  or
or  button to select a file numbering setting.
2. Press the  button.
Camera the Configuring
136
File and Folder Numbers
Recorded images are assigned consecutive file numbers starting with 0001 and ranging up to 9999, while folders are assigned numbers starting with 100 and ranging up to 999. Up to 2000 images can be saved into a single folder.
New Folder Created |
Memory Card Exchanged for Another |
Memory Card 1 |
Memory Card 1 Memory Card 2 |
Continuous
Memory Card 1 Memory Card 1 Memory Card 2
Auto Reset
•Images may be saved to a new folder when there is insufficient free space even if the total number of images in a folder is less than 2000 because the following types of images are always saved together into the same folder.
• Images from continuous shooting • Self-timer images (custom)
•Images cannot be played back when the folder numbers are duplicated or image numbers are duplicated within folders.
•Please refer to the Software Starter Guide for information regarding folder structures or image types.