


126
Print Settings/Transfer Settings
 Setting the DPOF Print Settings
You can select images on a memory card for printing and specify the number of print copies in advance using the camera. The settings used on the camera comply with the Digital Print Order Format (DPOF) standards. This is extremely convenient for printing on a direct print compatible printer, or for sending the images to a photo developing service that supports DPOF.
zThe specified print settings are also applied to the Print List (p. 21).
zThe output of some printers or photo developing services may not reflect the specified print settings.
zPrint settings cannot be set for movies.
zThe  icon may display for a memory card with print settings set by a different DPOF-compliant camera. These settings will be overwritten by those set by your camera.
Setting the Print Style
After setting the print style, select the images for printing. The following settings can be selected.
* Default setting
|
Standard* |
Prints one image per page. |
|
|
|
|
|
Index |
Prints the selected images together at a |
||
reduced size in an index format. |
|||
Type |
|
||
|
Both |
Prints the images in both the standard and |
|
|
index formats. |
||
|
|
||
Date (On/Off*) |
Adds the date to the print. |
||
|
|
||
File No. (On/Off*) |
Adds the file number to the print. |
||
|
|
||
Clear DPOF data (On*/Off) |
Clears all print settings after the images print. |
||
|
|
|
|

127
1 Select [Print Settings].
1.Press the  button.
2.Use the  or
or  button to select the
 menu.
menu.
3. Use the  or
or  button to select [Print Settings].
4. Press the  button.
2 Make settings.
1.Use the  or
or  button to select an option.
2.Use the  or
or  button to specify the settings.
3.Press the  button.
z The Date and File No. settings change according to the Print Type as follows.
-[Index]:
[Date] and [File No.] cannot be set to [On] at the same time.
-[Standard] or [Both]:
[Date] and [File No.] can be set to [On] at the same time, however, the printable information may vary between
printers.
zImages dated using  (Date Stamp) (p. 22) are always printed with the date, regardless of the [Date] setting. As a result, some printers may print the date twice on these images if [Date] is also set to [On].
zDates print in the style specified in [Date/Time] in the  menu (p. 51).
Settings Settings/Transfer Print
128
Single Images
When [Print Type] (p. 126) is set to [Standard] or [Both], the number of copies can be set.
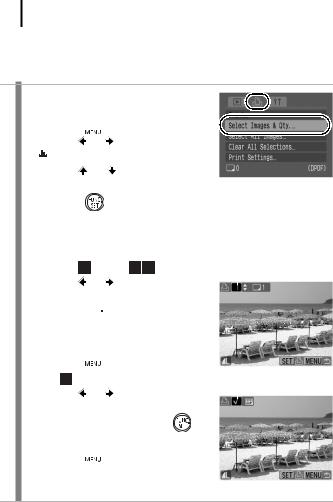
1 Select [Select Images & Qty.].
1. Press the  button.
2. |
Use the |
|
or |
button to select the |
||
|
|
|
menu. |
|
|
|
|
|
|
|
|
||
3. |
Use the |
or |
button to select |
|||
|
[Select Images & Qty.]. |
|||||
4. |
Press the |
|
button. |
|||
|
|
|
|
|||
2 Select the images. |
||||||
• Selection methods differ for the Print Type settings (p. 126).
Standard ( |
)/Both ( |
): |
Number of Print Copies |
||
1. Use the |
or |
button to select the |
|
|
|
|
|
||||
images. |
|
|
|
|
|
2.Press the  button.
3.Use the  or
or  button to select the number of print copies (up to 99).
4.Press the  button.
Index ( ): |
|
Index Print Selection |
|
1. Use the |
or |
button to select the |
|
images. |
|
|
|
2.Select and deselect with the button.
3.Press the  button.
•You can also select images in the index playback mode.
129
All the Images on a Memory Card
One copy of every image will be set to print.
1 Select [Select All Images].
1. |
Press the |
|
button. |
|||
2. |
Use the |
|
or |
button to select the |
||
|
||||||
|
|
|
menu. |
|
|
|
|
|
|
|
|
||
3. |
Use the |
or |
button to select |
|||
|
[Select All Images]. |
|||||
4. |
Press the |
|
button. |
|||
2 Select [OK].
1.Use the  or
or  button to select [OK].
2.Press the  button.
z Images are printed in order according to the file number. z A maximum of 998 images can be selected.
zWhen the camera is connected to a printer, the  button will light blue. At this time, press the
  button, confirm that [Print] is selected, and when the FUNC./SET button is pressed, printing will begin.
zSelecting [Clear All Selections] in Step 1 cancels all print settings.
Settings Settings/Transfer Print