- •Table of Contents
- •Please Read
- •Getting Started
- •Preparations
- •Shooting Still Images
- •Viewing Still Images
- •Erasing
- •Printing
- •Embedding the Date in the Image Data
- •Shooting Movies
- •Viewing Movies
- •Downloading Images to a Computer
- •System Map
- •Learning More
- •Components Guide
- •Indicators
- •Basic Operations
- •Menus and Settings
- •Information Displayed on the LCD Monitor and Menus
- •Using the LCD Monitor
- •Commonly Used Shooting Functions
- •Using the Optical Zoom
- •Using the Flash
- •Shooting Close-ups (Macro)
- •Using the Self-Timer
- •Changing the Compression (Still Images)
- •Adjusting the ISO Speed
- •Shooting Using the Mode Dial
- •Mode Dial
- •Shooting Modes for Specific Scenes
- •Shooting in the Manual Mode
- •Movie Shooting
- •Advanced Shooting Functions
- •Continuous Shooting
- •Setting the Flash
- •Selecting an AF Frame Mode
- •Selecting a Subject to Focus On (Face Select and Track)
- •Locking the Exposure Setting (AE Lock)
- •Shooting with FE Lock
- •Switching between Metering Modes
- •Adjusting the Tone (White Balance)
- •Shooting in a My Colors Mode
- •Setting the Display Overlays
- •Registering Settings to the Button
- •Playback/Erasing
- •Viewing Magnified Images
- •Check the Focus and Facial Expressions of Subjects (Focus Check Display)
- •Jumping to Images
- •Organizing Images by Category (My Category)
- •Viewing Movies
- •Rotating Images in the Display
- •Playback with Transition Effects
- •Automated Playback (Slide Shows)
- •Red-Eye Correction Function
- •Resizing Images
- •Attaching Sound Memos to Images
- •Protecting Images
- •Erasing All Images
- •Print Settings/Transfer Settings
- •Setting the DPOF Print Settings
- •Setting the DPOF Transfer Settings
- •Configuring the Camera
- •Power Saving Function
- •Formatting Memory Cards
- •Resetting the File Number
- •Creating an Image Destination (Folder)
- •Setting the Auto Rotate Function
- •Resetting Settings to Their Default Values
- •Connecting to a TV
- •Shooting/Playback Using a TV
- •Troubleshooting
- •List of Messages
- •Appendix
- •Safety Precautions
- •Preventing Malfunctions
- •Using the Power Kits (Sold Separately)
- •Using an Externally Mounted Flash (Sold Separately)
- •Replacing the Date Battery
- •Camera Care and Maintenance
- •Specifications
- •Index
- •Functions Available in Each Shooting Mode
130
Setting the DPOF Transfer Settings
You can use the camera to specify settings for images before downloading to a computer. Refer to the Software Starter Guide for instructions on how to transfer images to your computer. The settings used on the camera comply with the DPOF standards.
The icon may display for a memory card with transfer settings set by a different DPOF-compliant camera. These settings will be overwritten by those set by your camera.
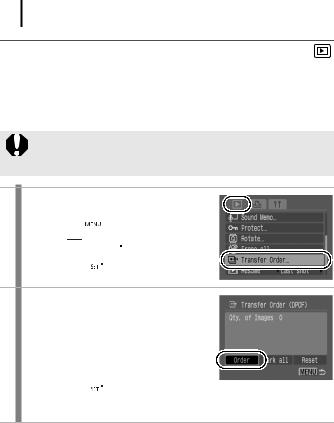
1 Select [Transfer Order].
1.Press the button.
2.In the menu, use the or button to select .
3. Press the button.
2 Select an order method.
1.Use the or button to select an order method.
Order : Select single images.
Mark all : Select all the images on a memory card. button.
• Selecting [Reset] cancels all transfer order settings.
131
Single Images |
|
3 Select an image to transfer. |
Transfer Selection |
1.Use the or button to select an image to transfer.
2.Press the button.
•Pressing the FUNC./SET button again deselects the setting.
•You can also select images in the index playback mode.
3.Press the button several times to end the setting.
Mark all
3 Execute the transfering images.
1.Use the or button to select [OK].
2.Press the button.
3. Press the button.
zImages are transferred in order according to the file number.
zA maximum of 998 images can be selected.
Settings Settings/Transfer Print