


112
 Rotating Images in the Display
Images can be rotated clockwise 90° or 270° in the display.
Original |
90° |
270° |
1 Select [Rotate].
1. Press the  button.
2.In the 

 menu, use the
  or
or  button to select
  .
.
3. Press the  button.
2 Rotate the image.
1.Use the  or
or  button to select an image to rotate.
2.Press the  button.
•Cycle through the 90°/270°/original orientations with each press of the FUNC./SET button.
•This also can be set in the index playback mode.
When images are downloaded to a computer, the orientation of images rotated by the camera will depend upon the software used to download the images.
As the orientation of an image is recorded, the image will be shown in its rotated orientation the next time it is displayed.
113
 Playback with Transition Effects
You can select the transition effect displayed when switching between images.
No transition effect.
The displayed image darkens and the next image gradually brightens until it is displayed.
Press the  button to have the previous image display from the left and the
  button to have the next image display from the right.
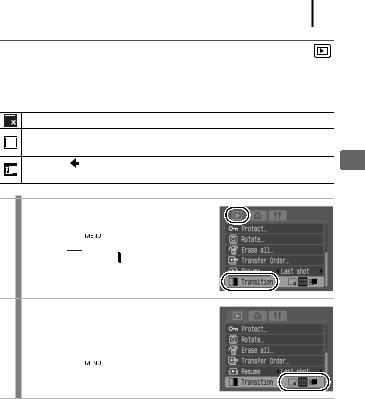
1 Select [Transition].
1.Press the  button.
2.In the 

 menu, use the
  or
or  button to select
  .
.
2 Make settings.
1.Use the  or
or  button to select a transition effect.
2.Press the  button.
Playback/Erasing

114
 Automated Playback (Slide Shows)
Use this feature to automatically play back all of the images in the memory card. The LCD monitor displays each image for approximately 3 seconds.
No transition effect.
The new image gradually brightens as it moves upward from the bottom.
The previous image moves to the left and the next image display from the right.
1 Select [Slide Show].
1. Press the  button.
2.In the 

 menu, use the
  or
or  button to select
  .
.
3.Press the  button.
2 Select an effect.
1. Use the  or
or  button to select an effect and make it active.

115
3 Play.
1. Press the  button.
•The following functions are available during slide shows.
-Pausing/resuming the slide show: Press the FUNC./SET button.
-Fast forwarding/rewinding the slide show: Press the  or
or  button (continue to hold the button to switch between images more rapidly).
-Stopping the slide show: Press the MENU button.
In single image playback mode, you can start a slide show from the current image displayed by holding the FUNC./SET button while you press the  button. Please note that if you do this while the last image shot is displayed, the slide show will start from the first image using the same date.
 Red-Eye Correction Function
You can correct red eyes in recorded images.
Red eyes may not be automatically detected in some images or the results may not turn out as you intended.
We recommend that you use [New File] to save corrected images.
Examples:
-Faces near the screen edges or faces that appear extremely small, large, dark or bright in relation to the overall image.
-Faces turned to the side or at a diagonal, or faces with a portion hidden.
Playback/Erasing

116
|
||
1 Select [Red-Eye Correction]. |
||
1. |
Press the |
button. |
2. |
In the |
menu, use the or |
|
button to select . |
|
3. |
Press the |
button. |
|
||
2 Select an image. |
||
1. |
Use the |
or button to select the |
|
image you wish to correct red eyes. |
|
2. |
Press the |
button. |
• A frame will automatically display |
||
where red-eye is detected. |
||
• If red-eye is not automatically detected, select [Add Frame] with |
||
the or |
button and press FUNC./SET button (p. 118). |
|
• To cancel the correction frame, select [Remove Frame] and |
||
press the FUNC./SET button (p. 119). |
||
|
||
3 Correct the image. |
||
1.Use the  or
or  button to select [Start].
2.Press the  button.
117
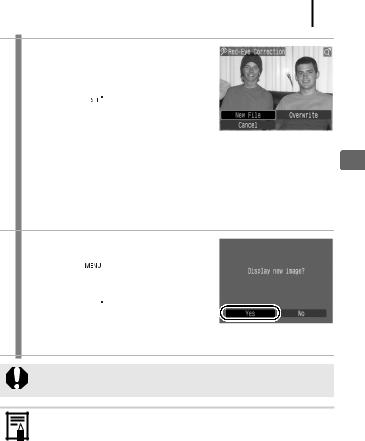
4 Save the image.
1.Use the  or
or  button to select [New File] or [Overwrite].
2.Press the  button.
•[New File]: Saved as new file with a new name. The uncorrected image is
stored. The new image is stored as the last file.
•[Overwrite]: Saved with the same file name as the uncorrected image. The uncorrected image is erased.
•When [New File] is selected, proceed to the procedure 5.
•If you wish to continue correcting another image, repeat operations from step 2.
5 Display the saved image.
1.Press the  button.
2.Use the  or
or  button to select [Yes].
3. Press the  button.
•Selecting [No] returns to the Play menu.
zRed-eye correction cannot be performed on movies.
zOverwriting cannot be performed on protected images.
zWhen there is not enough space left on the memory card, red-eye correction cannot be performed.
zAlthough you can apply red-eye correction any number of times to an image, the image quality will gradually deteriorate with each application.
zSince the correction frame will not appear automatically on images that have already been corrected once with the RedEye Correction function, use the [Add Frame] option to correct them.
Playback/Erasing

118
Add Correction Frame
1 Select [Add Frame].
1.Use the  ,
,  ,
,  or
or  button to select [Add Frame].
2.Press the  button.
• A green frame will display.
2 Adjust the position of the correction frame.
1.Use the  ,
,  ,
,  or
or  button to move the frame.
•Size of the frame can be changed with the zoom lever.
3 Add additional correction frames.
1. Press the  button.
•A correction frame is added and the frame color changes to white.
•If you wish to add additional frames, adjust the position and press the FUNC./SET button.
•Up to 35 additional frames can be added.
•To end the adding of correction frames, press the MENU button.
To correctly perform red-eye correction, take note of the following (refer to the image in step 2):
-Adjust the correction frame size so that it only surrounds the red-eye portion to be corrected.
-When there are several subjects with red-eye, be sure to add one correction frame per subject.
119
Removing Correction Frames
1 Select [Remove Frame].
1.Use the  ,
,  ,
,  or
or  button to select [Remove Frame].
2.Press the  button.
2 Adjust the position of the correction frame.
1.Use the  or
or  button to select a frame to remove.
•The selected frame will appear in green.
3 Delete the frame.
1. Press the  button.
•The selected frame will disappear.
•To continue deleting frames, repeat operations from step 2.
•When you finish deleting frames, press the MENU button.
Playback/Erasing