

Introduction to 3D Game Programming with DirectX.9.0 - F. D. Luna
.pdfxx Introduction
Figure I.1: For developing
YDirectX applications, it is best
to select the debug option so Lthat you can debug your
F DirectX applications easier.
The debug option installs bothMthe debug and retail builds of the DirectX DLLs onto your computer, whereas the retail option installs just the retail DLLs. ForAdevelopment, you want the debug DLLs, since these DLLs will outputEDirect3D-related debug information into the Visual Studio output window when the program is run in debug mode, which is obviouslyTvery useful when debugging DirectX applications. Figure I.2 shows the debug spew when a Direct3D object hasn’t been properly released.
Figure I.2: The debug spew resulting from not releasing a Direct3D resource
Note: Be aware that the debug DLLs are slower than the retail DLLs, so for shipping applications, use the retail version.
Setting Up the Development Environment
The types of projects that you will want to create for writing DirectX applications are Win32 Application projects. In VC++ 6.0 and 7.0 you will also want to specify the directory paths at which the DirectX header files and library files are located, so VC++ can find these files. The DirectX header files and library files are located at the paths D:\DXSDK\Include and D:\DXSDK\Lib, respectively.
Team-Fly®

Introduction xxi
Note: The location of the DirectX directory DXSDK on your computer may differ; it depends on the location that you specified during installation.
Typically, the DirectX SDK installation will add these paths to VC++ for you. However, in case it doesn’t, you can do it manually as follows:
In VC++ 6.0 go to the menu and select Tools>Options>Directories and enter the DirectX header file and library paths, as Figure I.3 shows.
Figure I.3: Adding the DirectX include and library paths to VC++ 6.0
In VC++ 7.0 go to the menu and select Tools>Options>Projects Folder>VC++ Directories and enter the DirectX header and library paths, as Figure I.4 shows.
Figure I.4: Adding the DirectX include and library paths to VC++ 7.0
Then, in order to build the sample programs, you will need to link the library files d3d9.lib, d3dx9.lib, and winmm.lib into your project. Note that winmm.lib isn’t a DirectX library file; it is the Windows multimedia library file, and we use for its timer functions.
In VC++ 6.0 you can specify the library files to link in by going to the menu and selecting Project>Settings>Link tab and then entering the library names, as shown in Figure I.5.

xxii Introduction
Figure I.5: Specifying the library files to link into the project in VC++ 6.0
In VC++ 7.0 you can specify the library files to link in by going to the menu and selecting Project>Properties>Linker>Input Folder and then entering the library names, as shown in Figure I.6.
Figure I.6: Specifying the library files to link into the project in VC++ 7.0
Use of the D3DX Library
Since version 7.0, DirectX has shipped with the D3DX (Direct3D Extension) library. This library provides a set of functions, classes, and interfaces that simplify common 3D graphics-related operations, such as math operations, texture and image operations, mesh operations, and shader operations (e.g., compiling and assembling). That is to say, D3DX contains many features that would be a chore to implement on your own.

Introduction xxiii
We use the D3DX library throughout this book because it allows us to focus on more interesting material. For instance, we’d rather not spend pages explaining how to load various image formats (e.g., .bmp,
.jpeg) into a Direct3D texture interface when we can do it in a single call to the D3DX function D3DXCreateTextureFromFile. In other words, D3DX makes us more productive and lets us focus more on actual content rather than spending time reinventing the wheel.
Other reasons to use D3DX:
D3DX is general and can be used with a wide range of different types of 3D applications.
D3DX is fast (at least as fast as general functionality can be).
Other developers use D3DX. Therefore, you will most likely encounter code that uses D3DX. Consequently, whether you choose to use D3DX or not, you should become familiar with it so that you can read code that uses it.
D3DX already exists and has been thoroughly tested. Furthermore, it becomes more improved and feature rich with each iteration of DirectX.
Using the DirectX SDK
Documentation and SDK Samples
Direct3D is a huge API, and we cannot hope to cover all of its details in this one book. Therefore, to obtain extended information, it is imperative that you learn how to use the DirectX SDK documentation. You can launch the C++ DirectX online documentation by executing the DirectX9_c file in the \DXSDK\Doc\DirectX9 directory, where DXSDK is the directory to which you installed DirectX.
The DirectX documentation covers just about every part of the DirectX API; therefore, it is very useful as a reference, but because the documentation doesn’t go into much depth, it isn’t the best learning tool. However, it does get better and better with every new DirectX version released.
As said, the documentation is primarily useful as a reference. Suppose you come across a DirectX-related type or function (say the function D3DXMatrixInverse) that you would like more information on. You simply do a search in the documentation index and get a description of the object type, or in this case function, as shown in Figure I.7.

xxiv Introduction
Figure I.7: A screen shot of the C++ SDK documentation viewer
Note: In this book we may direct you to the documentation for further details from time to time.
The SDK documentation also contains some introductory tutorials at the URL \DirectX9_c.chm::/directx/graphics/programmingguide/ tutorialsandsamplesandtoolsandtips/tutorials/tutorials.htm. These tutorials correspond to some of the topics in Part II of this book. Therefore, we recommend that you study these tutorials at the same time you read through that part of the book so that you can get alternative explanations and alternative examples.
We would also like to point out the available Direct3D sample programs that ship with DirectX SDK. The C++ Direct3D samples are located in the \DXSDK\Samples\C++\Direct3D directory. Each sample illustrates how to implement a particular effect in Direct3D. These samples are fairly advanced for a beginning graphics programmer, but by the end of this book you should be ready to study them. Examination of the samples is a good “next step” after finishing this book.
Code Conventions
The coding conventions for the sample code are fairly clear-cut. The only two things worth mentioning are that we prefix member variables with an underscore. For example:

Introduction xxv
class C
{
public:
// ...define public interface private:
float _x; // prefix member variables with an underscore. float _y;
float _z;
};
And global variable and function names begin with a capital letter, whereas local variable and method names begin with a lowercase letter. We find this useful for determining variable/function scope.
Error Handling
In general, we don’t do any error handling in the sample programs because we don’t want to take your attention away from the more important code that is demonstrating a particular concept or technique. In other words, we feel the sample code illustrates a concept more clearly without error-handling code. Keep this in mind if you are using any of the sample code in your own projects, as you will probably want to rework it to include error handling.
Clarity
We want to emphasize that the program samples for this book were written with clarity in mind and not performance. Thus, many of the samples may be implemented inefficiently. Keep this in mind if you are using any of the sample code in your own projects, as you may wish to rework it for better efficiency.
Sample Programs and
Additional Online Supplements
The web site for this book (www.moon-labs.com) plays an integral part in getting the most out of this book. On the web site you will find the complete source code for every one of the samples in this book. We advise readers to study the corresponding sample(s) for each chapter, either as they read through the chapter or after they have read the chapter. As a general rule, the reader should be able to implement a chapter’s sample(s) on his or her own after reading the chapter and spending some time studying the sample’s source code. In fact, a good exercise is trying to implement the samples on your own using the book and sample code as a reference.

xxvi Introduction
In addition to sample programs, the web site also contains a message board and chat program. We urge readers to communicate with each other and post questions on topics they do not understand or need clarification on. In many cases, getting alternative perspectives and explanations of a concept speeds up the time it takes to comprehend it.
Lastly, we plan to add additional program samples and tutorials to the web site on topics that we could not fit into this book for one reason or another. Also, if reader feedback indicates readers are struggling with a particular concept, additional examples and explanations may be uploaded to the web site as well.
The companion files can also be downloaded from www.wordware.com/files/dx9.

Part I
Mathematical
Prerequisites
In this prerequisite part we introduce the mathematical tools that are used throughout this book. The major theme is the discussion on vectors, matrices, and transformations, which are used in just about every sample program of this book. Planes and rays are covered as well because some applications in this book make reference to them; these sections are considered optional on a first reading.
This discussion is kept light and informal so that the material is accessible to readers with various math backgrounds. For readers desiring a more thorough and complete understanding of the topics covered here, a linear algebra course in a classroom is the best place to learn these topics thoroughly. Readers who have already studied linear algebra will find Part I a light read and can use it as a refresher if necessary.
In addition to the math explanations, we show the D3DX mathrelated classes used to model these mathematical objects and the functions used to execute a particular operation.
Objectives
To learn the geometry and algebra of vectors and their applications to 3D computer graphics
To learn about matrices, their algebra, and how we use them to transform 3D geometry
To learn how to model planes and rays algebraically and their applications to 3D graphics
To become familiar with a subset of the classes and functions provided by the D3DX library that are used for 3D math operations
1
2 Part I
Vectors in 3-Space
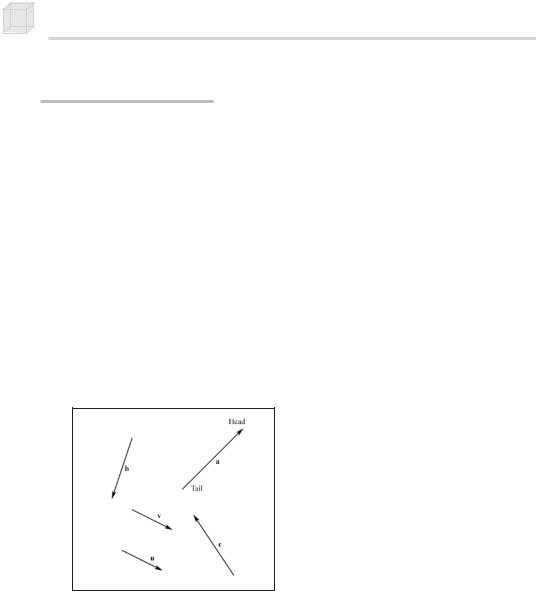
Geometrically, we represent a vector as a directed line segment, as shown in Figure 1. The two properties of vectors are their length (also known as the magnitude and the norm) and the direction in which they point. Thus, vectors are useful for modeling physical quantities that possess both a magnitude and direction. For example, in Chapter 14 we implement a particle system. We use vectors to model the velocity and acceleration of our particles. Other times in 3D computer graphics we use vectors to model directions only. For instance, we often want to know the direction in which a ray of light is traveling, the direction a polygon is facing, or the direction the camera is looking in the 3D world. Vectors provide a convenient mechanism for describing such directions in 3-space.
Since location is not a property of vectors, two vectors that have the same length and point in the same direction are considered equal, even if they are in different locations. Observe that two such vectors are parallel to each other. For example, in Figure 1, the vectors u and v are equal.
Figure 1: Free vectors defined independently of a particular coordinate system
Figure 1 shows that vectors can be discussed independently of a particular coordinate system because the vector itself (directed line segment) contains the meaningful information—the direction and magnitude.
Introducing a coordinate system does not give the vector meaning; rather the vector, which inherently contains its meaning, is simply described relative to that particular system. And as we change coordinate systems we are just describing the same vector relative to different systems.

Mathematical Prerequisites
That said, we move on to learning how we describe vectors relative to the left-handed rectangular coordinate system. Figure 2 shows a left-handed system as well as a right-handed system. The difference between the two is the directions in which the positive z-axis runs. In the left-handed system, the positive z-axis goes into the page. In the right-handed system, the positive z-axis comes out of the page.
3
P a r t I
Figure 2: On the left we have a left-handed coordinate system. Observe that the positive z-axis goes into the page. On the right we have a right-handed coordinate system. Observe that the positive z-axis comes out of the page.
Because the location of a vector doesn’t change its properties, we can translate all the vectors parallel to themselves so that their tail coincides with the origin of the coordinate system. When a vector’s tail coincides with the origin it is in standard position. Thus, when a vector is in standard position we can describe the vector by specifying the coordinates of its head point. We call these coordinates the components of a vector. Figure 3 shows the vectors from Figure 1 described in standard position.
Figure 3: Fixed vectors in standard position defined relative to a particular coordinate system. Observe that u and v now coincide with each other exactly because they were equal.
Note: Because we can describe a vector in standard position by specifying the coordinates of the vector’s head, as if we are describing a point, it is easy to confuse points and vectors. To emphasis the difference between the two, we restate the definition of a point and a vector. A point describes only a location in the coordinate system, whereas a vector describes a magnitude and a direction.