

- •About the Author
- •About the Technical Editor
- •Credits
- •Is This Book for You?
- •Software Versions
- •Conventions This Book Uses
- •What the Icons Mean
- •How This Book Is Organized
- •How to Use This Book
- •What’s on the Companion CD
- •What Is Excel Good For?
- •What’s New in Excel 2010?
- •Moving around a Worksheet
- •Introducing the Ribbon
- •Using Shortcut Menus
- •Customizing Your Quick Access Toolbar
- •Working with Dialog Boxes
- •Using the Task Pane
- •Creating Your First Excel Worksheet
- •Entering Text and Values into Your Worksheets
- •Entering Dates and Times into Your Worksheets
- •Modifying Cell Contents
- •Applying Number Formatting
- •Controlling the Worksheet View
- •Working with Rows and Columns
- •Understanding Cells and Ranges
- •Copying or Moving Ranges
- •Using Names to Work with Ranges
- •Adding Comments to Cells
- •What Is a Table?
- •Creating a Table
- •Changing the Look of a Table
- •Working with Tables
- •Getting to Know the Formatting Tools
- •Changing Text Alignment
- •Using Colors and Shading
- •Adding Borders and Lines
- •Adding a Background Image to a Worksheet
- •Using Named Styles for Easier Formatting
- •Understanding Document Themes
- •Creating a New Workbook
- •Opening an Existing Workbook
- •Saving a Workbook
- •Using AutoRecover
- •Specifying a Password
- •Organizing Your Files
- •Other Workbook Info Options
- •Closing Workbooks
- •Safeguarding Your Work
- •Excel File Compatibility
- •Exploring Excel Templates
- •Understanding Custom Excel Templates
- •Printing with One Click
- •Changing Your Page View
- •Adjusting Common Page Setup Settings
- •Adding a Header or Footer to Your Reports
- •Copying Page Setup Settings across Sheets
- •Preventing Certain Cells from Being Printed
- •Preventing Objects from Being Printed
- •Creating Custom Views of Your Worksheet
- •Understanding Formula Basics
- •Entering Formulas into Your Worksheets
- •Editing Formulas
- •Using Cell References in Formulas
- •Using Formulas in Tables
- •Correcting Common Formula Errors
- •Using Advanced Naming Techniques
- •Tips for Working with Formulas
- •A Few Words about Text
- •Text Functions
- •Advanced Text Formulas
- •Date-Related Worksheet Functions
- •Time-Related Functions
- •Basic Counting Formulas
- •Advanced Counting Formulas
- •Summing Formulas
- •Conditional Sums Using a Single Criterion
- •Conditional Sums Using Multiple Criteria
- •Introducing Lookup Formulas
- •Functions Relevant to Lookups
- •Basic Lookup Formulas
- •Specialized Lookup Formulas
- •The Time Value of Money
- •Loan Calculations
- •Investment Calculations
- •Depreciation Calculations
- •Understanding Array Formulas
- •Understanding the Dimensions of an Array
- •Naming Array Constants
- •Working with Array Formulas
- •Using Multicell Array Formulas
- •Using Single-Cell Array Formulas
- •Working with Multicell Array Formulas
- •What Is a Chart?
- •Understanding How Excel Handles Charts
- •Creating a Chart
- •Working with Charts
- •Understanding Chart Types
- •Learning More
- •Selecting Chart Elements
- •User Interface Choices for Modifying Chart Elements
- •Modifying the Chart Area
- •Modifying the Plot Area
- •Working with Chart Titles
- •Working with a Legend
- •Working with Gridlines
- •Modifying the Axes
- •Working with Data Series
- •Creating Chart Templates
- •Learning Some Chart-Making Tricks
- •About Conditional Formatting
- •Specifying Conditional Formatting
- •Conditional Formats That Use Graphics
- •Creating Formula-Based Rules
- •Working with Conditional Formats
- •Sparkline Types
- •Creating Sparklines
- •Customizing Sparklines
- •Specifying a Date Axis
- •Auto-Updating Sparklines
- •Displaying a Sparkline for a Dynamic Range
- •Using Shapes
- •Using SmartArt
- •Using WordArt
- •Working with Other Graphic Types
- •Using the Equation Editor
- •Customizing the Ribbon
- •About Number Formatting
- •Creating a Custom Number Format
- •Custom Number Format Examples
- •About Data Validation
- •Specifying Validation Criteria
- •Types of Validation Criteria You Can Apply
- •Creating a Drop-Down List
- •Using Formulas for Data Validation Rules
- •Understanding Cell References
- •Data Validation Formula Examples
- •Introducing Worksheet Outlines
- •Creating an Outline
- •Working with Outlines
- •Linking Workbooks
- •Creating External Reference Formulas
- •Working with External Reference Formulas
- •Consolidating Worksheets
- •Understanding the Different Web Formats
- •Opening an HTML File
- •Working with Hyperlinks
- •Using Web Queries
- •Other Internet-Related Features
- •Copying and Pasting
- •Copying from Excel to Word
- •Embedding Objects in a Worksheet
- •Using Excel on a Network
- •Understanding File Reservations
- •Sharing Workbooks
- •Tracking Workbook Changes
- •Types of Protection
- •Protecting a Worksheet
- •Protecting a Workbook
- •VB Project Protection
- •Related Topics
- •Using Excel Auditing Tools
- •Searching and Replacing
- •Spell Checking Your Worksheets
- •Using AutoCorrect
- •Understanding External Database Files
- •Importing Access Tables
- •Retrieving Data with Query: An Example
- •Working with Data Returned by Query
- •Using Query without the Wizard
- •Learning More about Query
- •About Pivot Tables
- •Creating a Pivot Table
- •More Pivot Table Examples
- •Learning More
- •Working with Non-Numeric Data
- •Grouping Pivot Table Items
- •Creating a Frequency Distribution
- •Filtering Pivot Tables with Slicers
- •Referencing Cells within a Pivot Table
- •Creating Pivot Charts
- •Another Pivot Table Example
- •Producing a Report with a Pivot Table
- •A What-If Example
- •Types of What-If Analyses
- •Manual What-If Analysis
- •Creating Data Tables
- •Using Scenario Manager
- •What-If Analysis, in Reverse
- •Single-Cell Goal Seeking
- •Introducing Solver
- •Solver Examples
- •Installing the Analysis ToolPak Add-in
- •Using the Analysis Tools
- •Introducing the Analysis ToolPak Tools
- •Introducing VBA Macros
- •Displaying the Developer Tab
- •About Macro Security
- •Saving Workbooks That Contain Macros
- •Two Types of VBA Macros
- •Creating VBA Macros
- •Learning More
- •Overview of VBA Functions
- •An Introductory Example
- •About Function Procedures
- •Executing Function Procedures
- •Function Procedure Arguments
- •Debugging Custom Functions
- •Inserting Custom Functions
- •Learning More
- •Why Create UserForms?
- •UserForm Alternatives
- •Creating UserForms: An Overview
- •A UserForm Example
- •Another UserForm Example
- •More on Creating UserForms
- •Learning More
- •Why Use Controls on a Worksheet?
- •Using Controls
- •Reviewing the Available ActiveX Controls
- •Understanding Events
- •Entering Event-Handler VBA Code
- •Using Workbook-Level Events
- •Working with Worksheet Events
- •Using Non-Object Events
- •Working with Ranges
- •Working with Workbooks
- •Working with Charts
- •VBA Speed Tips
- •What Is an Add-In?
- •Working with Add-Ins
- •Why Create Add-Ins?
- •Creating Add-Ins
- •An Add-In Example
- •System Requirements
- •Using the CD
- •What’s on the CD
- •Troubleshooting
- •The Excel Help System
- •Microsoft Technical Support
- •Internet Newsgroups
- •Internet Web sites
- •End-User License Agreement
Chapter 39: Introducing Visual Basic for Applications
Two Types of VBA Macros
Before getting into the details of creating macros, you need to understand a key distinction. A VBA macro (also known as a procedure) can be one of two types: a Sub or a Function. The next two sections discuss the difference.
VBA Sub procedures
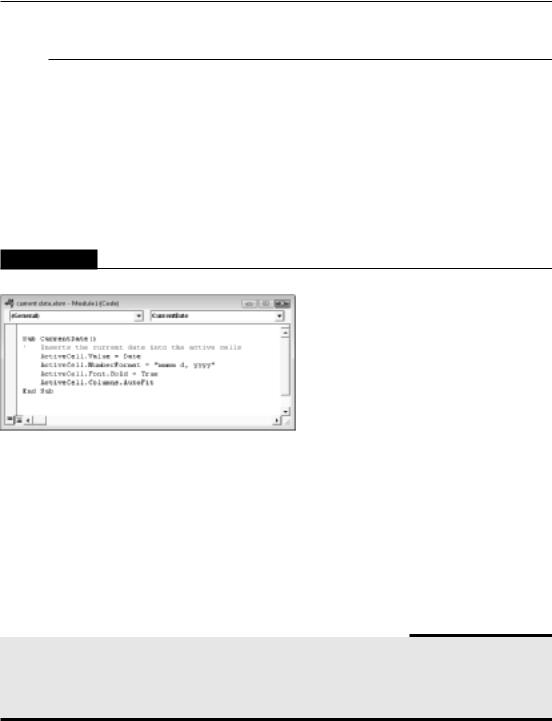
You can think of a Sub procedure as a new command that either the user or another macro can execute. You can have any number of Sub procedures in an Excel workbook. Figure 39.5 shows a simple VBA Sub procedure. When this code is executed, VBA inserts the current date into the active cell, applies a number format, makes the cell bold, and then adjusts the column width.
FIGURE 39.5
A simple VBA procedure.
On the CD
A workbook that contains this macro is available on the companion CD-ROM. It also includes a button that makes it easy to execute the macro. The file is named current date.xlsm.
Sub procedures always start with the keyword Sub, the macro’s name (every macro must have a unique name), and then a pair of parentheses. (The parentheses are required; they’re empty unless the procedure uses one or more arguments.) The End Sub statement signals the end of the procedure. The lines in between comprise the procedure’s code.
What’s New in the Visual Basic Editor?
In a word, nothing. Beginning with Excel 2007, Microsoft made many changes to Excel. However, the VB Editor has remained untouched. The VBA language has been updated to accommodate the new Excel features, but the VB Editor has no new features, and the toolbars and menus work exactly like they always have.
799

Part VI: Programming Excel with VBA
The CurrentDate macro also includes a comment. Comments are simply notes to yourself, and they’re ignored by VBA. A comment line begins with an apostrophe. You can also put a comment in the same line as a statement. In other words, when VBA encounters an apostrophe, it ignores the rest of the text in the line.
You execute a VBA Sub procedure in any of the following ways:
•Choose Developer Code Macros to display the Macro dialog box. Select the procedure name from the list and then click Run. You can also access the Macro dialog box by pressing Alt+F8.
•Press the procedure’s shortcut key combination (if it has one).
•If the VB Editor is active, move the cursor anywhere within the code and press F5.
•Execute the procedure by calling it from another VBA procedure.
VBA functions
The second type of VBA procedure is a function. A function always returns a single value (just as a worksheet function always returns a single value). A VBA function can be executed by other VBA procedures or used in worksheet formulas, just as you would use Excel’s built-in worksheet functions.
Figure 39.6 shows a custom worksheet function. This function is named CubeRoot, and it requires a single argument. CubeRoot calculates the cube root of its argument. A Function procedure looks much like a Sub procedure. Notice, however, that function procedures begin with the keyword Function and end with an End Function statement.
On the CD
A workbook that contains this function is available on the companion CD-ROM. The file is named cube root
.xlsm.
FIGURE 39.6
This VBA function returns the cube root of its argument.
800

Chapter 39: Introducing Visual Basic for Applications
Cross-Reference
Creating VBA functions that you use in worksheet formulas can simplify your formulas and enable you to perform calculations that otherwise may be impossible. Chapter 40 discusses VBA functions in greater detail. n
Some Definitions
If you’re new to VBA, you may be overwhelmed by the terminology. I’ve put together some key definitions to help you keep the terms straight. These terms cover VBA and UserForms (custom dialog boxes) — two important elements that are used to customize Excel:
•Code: VBA instructions that are produced in a module sheet when you record a macro. You also can enter VBA code manually.
•Controls: Objects on a UserForm (or in a worksheet) that you manipulate. Examples include buttons, check boxes, and list boxes.
•Function: One of two types of VBA macros that you can create. (The other is a Sub procedure.) A function returns a single value. You can use VBA functions in other VBA macros or in your worksheets.
•Macro: A set of VBA instructions performed automatically.
•Method: An action taken on an object. For example, applying the Clear method to a Range object erases the contents and formatting of the cells.
•Module: A container for VBA code.
•Object: An element that you manipulate with VBA. Examples include ranges, charts, drawing objects, and so on.
•Procedure: Another name for a macro. A VBA procedure can be a Sub procedure or a Function procedure.
•Property: A particular aspect of an object. For example, a Range object has properties, such as Height, Style, and Name.
•Sub procedure: One of two types of Visual Basic macros that you can create. The other is a function.
•UserForm: A container that holds controls for a custom dialog box and holds VBA code to manipulate the controls. (Chapters 41 and 42 explain UserForms in depth.)
•VBA: Visual Basic for Applications. The macro language that is available in Excel, as well as in the other applications in Microsoft Office.
•VB Editor: The window (separate from Excel) that you use to create VBA macros and UserForms. Use Alt+F11 to toggle between Excel and the VB Editor.
801

Part VI: Programming Excel with VBA
Creating VBA Macros
Excel provides two ways to create macros:
•Turn on the macro recorder and record your actions.
•Enter the code directly into a VBA module.
The following sections describe these methods.
Recording VBA macros
In this section, I describe the basic steps that you take to record a VBA macro. In most cases, you can record your actions as a macro and then simply replay the macro; you needn’t look at the code that’s automatically generated. If simply recording and playing back macros is as far as you go with VBA, you don’t need to be concerned with the language itself (although a basic understanding of how things work doesn’t do any harm).
Recording your actions to create VBA code: The basics
The Excel macro recorder translates your actions into VBA code. To start the macro recorder, choose Developer Code Record Macro (or, click the Record Macro icon on the left side of the status bar). Excel displays the Record Macro dialog box, shown in Figure 39.7.
FIGURE 39.7
The Record Macro dialog box.
The Record Macro dialog box presents several options:
•Macro Name: The name of the macro. Excel proposes generic names, such as Macro1, Macro2, and so on.
•Shortcut Key: You can specify a key combination that executes the macro. The key combination always uses the Ctrl key. You can also press Shift when you enter a letter. For example, pressing Shift while you enter the letter H makes the shortcut key combination Ctrl+Shift+H.
802

Chapter 39: Introducing Visual Basic for Applications
Warning
Shortcut keys assigned to macros take precedence over built-in shortcut keys. For example, if you assign Ctrl+S to a macro, then you cannot use the key combination to save your workbook. n
•Store Macro In: The location for the macro. Your choices are the current workbook, your Personal Macro Workbook (See “Storing macros in your Personal Macro Workbook,” later in this chapter), or a new workbook.
•Description: A description of the macro (optional).
To begin recording your actions, click OK; your actions within Excel are converted to VBA code. When you finish recording the macro, choose Developer Code Stop Recording. Or, you can click the Stop Recording button on the status bar. This button replaces the Start Recording button while your macro is being recorded.
Note
Recording your actions always results in a new Sub procedure. You can’t create a Function procedure by using the macro recorder. Function procedures must be created manually. n
Recording a macro: A simple example
This example demonstrates how to record a very simple macro that inserts your name in the active cell.
To create the macro, start with a new workbook and follow these steps:
1. Activate an empty cell.
Note
Select the cell to be formatted before you start recording your macro. This step is important. If you select a cell while the macro recorder is turned on, the actual cell that you select will be recorded into the macro. In such a case, the macro would always format that particular cell, and it would not be a general-purpose macro. n
2.Choose Developer Code Record Macro. Excel displays the Record Macro dialog box. (Refer to Figure 39.7.)
3.Enter a new single-word name for the macro, to replace the default Macro1 name. A good name is MyName.
4.Assign this macro to the shortcut key Ctrl+Shift+N by entering an uppercase N in the Shortcut Key field.
5.Click OK to close the Record Macro dialog box and begin recording your actions.
6.Type your name into the selected cell and then press Enter.
7.Choose Developer Code Stop Recording (or click the Stop Recording button on the status bar).
803

Part VI: Programming Excel with VBA
Examining the macro
The macro was recorded in a new module named Module1. To view the code in this module, you must activate the VB Editor. You can activate the VB Editor in either of two ways:
•Press Alt+F11.
•Choose Developer Code Visual Basic.
In the VB Editor, the Project window displays a list of all open workbooks and add-ins. This list is displayed as a tree diagram, which you can expand or collapse. The code that you recorded previously is stored in Module1 in the current workbook. When you double-click Module1, the code in the module appears in the Code window.
Figure 39.8 shows the recorded macro, as displayed in the Code window.
FIGURE 39.8
The MyName procedure was generated by the Excel macro recorder.
The macro should look something like this (with your name substituted for mine, of course):
Sub MyName()
‘
‘MyName Macro
‘Keyboard Shortcut: Ctrl+Shift+N
ActiveCell.FormulaR1C1 = “John Walkenbach” End Sub
The macro recorded is a Sub procedure that is named MyName. The statements tell Excel what to do when the macro is executed.
804
Chapter 39: Introducing Visual Basic for Applications
Notice that Excel inserted some comments at the top of the procedure. These comments are some of the information that appeared in the Record Macro dialog box. These comment lines (which begin with an apostrophe) aren’t really necessary, and deleting them has no effect on how the macro runs. If you ignore the comments, you’ll see that this procedure has only one VBA statement:
ActiveCell.FormulaR1C1 = “John Walkenbach”
This single statement causes the name you typed while recording the macro to be inserted into the active cell. The FormulaR1C1 part is a property of the Range object — but I’m getting ahead of myself.
Testing the macro
Before you recorded this macro, you set an option that assigned the macro to the Ctrl+Shift+N shortcut key combination. To test the macro, return to Excel by using either of the following methods:
•Press Alt+F11.
•Click the View Microsoft Excel button on the VB Editor toolbar.
When Excel is active, activate a worksheet. (It can be in the workbook that contains the VBA module or in any other workbook.) Select a cell and press Ctrl+Shift+N. The macro immediately enters your name into the cell.
Editing the macro
After you record a macro, you can make changes to it (although you must know what you’re doing). For example, assume that you want your name to be bold. You could re-record the macro, but this modification is simple, so editing the code is more efficient. Press Alt+F11 to activate the VB Editor window. Then activate Module1 and insert the following statement before the End Sub statement:
ActiveCell.Font.Bold = True
The edited macro appears as follows:
Sub MyName()
‘
‘MyName Macro
‘Keyboard Shortcut: Ctrl+Shift+N
ActiveCell.FormulaR1C1 = “John Walkenbach” ActiveCell.Font.Bold = True
End Sub
Test this new macro, and you see that it performs as it should.
805

Part VI: Programming Excel with VBA
Another example
This example demonstrates how to record a time-stamp macro that inserts the current date and time into the active cell.
To create the macro, follow these steps:
1.Activate an empty cell.
2.Choose Developer Code Record Macro. Excel displays the Record Macro dialog box.
3.Enter a new single-word name for the macro, to replace the default Macro1 name. A good name is TimeStamp.
4.Assign this macro to the shortcut key Ctrl+Shift+T by entering an uppercase T in the Shortcut Key field.
5.Click OK to close the Record Macro dialog box.
6.Enter this formula into the selected cell:
=NOW()
7.With the date cell selected, click the Copy button (or press Ctrl+C) to copy the cell to the Clipboard.
8.Choose Home Clipboard Paste Values (V). This step replaces the formula with static text so that the data and time do not update when the worksheet is calculated.
9.Press Esc(ape) to cancel Copy mode.
10.Choose Developer Code Stop Recording (or click the Stop Recording button on the status bar).
Running the macro
Activate an empty cell and press Ctrl+Shift+T to execute the macro. There’s a pretty good chance that the macro won’t work!
The VBA code that is recorded in this macro depends upon a setting on the Advanced tab of the Excel Options dialog box: namely, after Pressing Enter, Move Selection. If this setting is enabled, the recorded macro won’t work as intended because the active cell was changed when you pressed Enter. Even if you reactivated the date cell while recording (in Step 7), the macro still fails.
Examining the macro
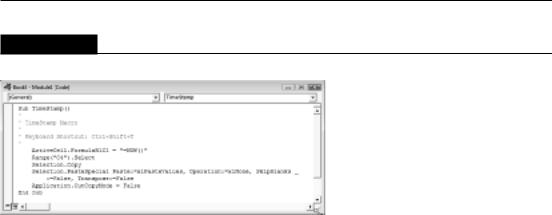
Activate the VB Editor and take a look at the recorded code. Figure 39.9 shows the recorded macro, as displayed in the Code window.
The procedure has five statements. The first inserts the NOW() formula into the active cell. The second statement selects cell C4 — an action I performed because the cell pointer moved to the next cell after I entered the formula.
806
Chapter 39: Introducing Visual Basic for Applications
FIGURE 39.9
The TimeStamp procedure was generated by the Excel macro recorder.
The third statement copies the cell. The fourth statement, which is displayed on two lines (the underscore character means that the statement continues on the next line), pastes the Clipboard contents (as a value) to the current selection. The fourth statement cancels the moving border around the selected range.
The problem is that the macro is hard-coded to select cell C4. If you execute the macro when a different cell is active, the code always selects cell C4. This is not what you intended, and it causes the macro to fail.
Note
You’ll also notice that the macro recorded some actions that you didn’t make. For example, it specified several options for the PasteSpecial operation. Recording actions that you don’t specifically make is just a byproduct of the method that Excel uses to translate actions into code. n
Re-recording the macro
You can fix the macro in several ways. If you understand VBA, you can edit the code so it works properly. Or, you can re-record the macro using relative references.
Delete the existing TimeStamp procedure, and re-record it. Before you start recording, click the Use Relative References command in the Code group of the Developer tab. This control is a toggle, and it’s turned off by default.
Figure 39.10 shows the new macro, recorded with relative references in effect.
807

Part VI: Programming Excel with VBA
FIGURE 39.10
This TimeStamp macro works correctly.
Testing the macro
When Excel is active, activate a worksheet. (It can be in the workbook that contains the VBA module or in any other workbook.) Select a cell and press Ctrl+Shift+T. The macro immediately enters the current date and time into the cell. You may need to widen the column to see the date and time. To widen the column automatically, just add this statement to the end of the macro (before the End Sub statement):
ActiveCell.EntireColumn.AutoFit
More about recording VBA macros
If you followed along with the preceding examples, you should have a better feel for how to record macros — and also a good feel for problems that might occur with even simple macros. If you find the VBA code confusing, don’t worry. You don’t really have to be concerned with it as long as the macro that you record works correctly. If the macro doesn’t work, rerecording the macro rather than editing the code often is easier.
A good way to learn about what gets recorded is to set up your screen so that you can see the code that is being generated in the VB Editor windows. To do so, make sure that the Excel window isn’t maximized; then arrange the Excel window and the VB Editor window so both are visible. While you’re recording your actions, make sure that the VB Editor window is displaying the module in which the code is being recorded. (You may have to double-click the module name in the Project window.)
Tip
If you do a lot of work with VBA, consider adding a second monitor to your system. Then you can display Excel on one monitor and the VB Editor on the other. n
Absolute versus relative recording
If you’re going to work with recorded macros, you need to understand the concept of relative versus absolute recording modes. In a previous example in this chapter, I showed how even a simple macro could fail because of an incorrect recording mode.
808

Chapter 39: Introducing Visual Basic for Applications
Normally, when you record a macro, Excel stores exact references to the cells that you select. (That is, it performs absolute recording.) If you select the range B1:B10 while you’re recording a macro, for example, Excel records this selection as
Range(“B1:B10”).Select
This VBA statement means exactly what it says: “Select the cells in the range B1:B10.” When you invoke the macro that contains this statement, the same cells are always selected, regardless of where the active cell is located.
Look in the Developer Code group of the Ribbon for Use Relative References. When you click this control, Excel changes its recording mode from absolute (the default) to relative. When recording in relative mode, selecting a range of cells is translated differently, depending on where the active cell is located. For example, if you’re recording in relative mode and cell A1 is active, selecting the range B1:B10 generates the following statement:
ActiveCell.Offset(0, 1).Range(“A1:A10”).Select
This statement can be translated as “From the active cell, move 0 rows down and 1 column right, and then treat this new cell as if it were cell A1. Now select what would be A1:A10.” In other words, a macro that is recorded in relative mode starts out by using the active cell as its base and then stores relative references to this cell. As a result, you get different results, depending on the location of the active cell. When you replay this macro, the cells that are selected depend on the active cell. This macro selects a range that is 10 rows by 1 column, offset from the active cell by 0 rows and 1 column.
When Excel is recording in relative mode, the Use Relative Reference control appears depressed. To return to absolute recording, click the Use Relative Reference control again (and it displays its normal, undepressed state).
Storing macros in your Personal Macro Workbook
Most user-created macros are designed for use in a specific workbook, but you may want to use some macros in all your work. You can store these general-purpose macros in the Personal Macro Workbook so that they’re always available to you. The Personal Macro Workbook is loaded whenever you start Excel. This file, named personal.xlsb, doesn’t exist until you record a macro, using Personal Macro Workbook as the destination.
Note
The Personal Macro Workbook normally is in a hidden window (to keep it out of the way). n
To record the macro in your Personal Macro Workbook, select the Personal Macro Workbook option in the Record Macro dialog box before you start recording. This option is in the Store Macro In drop-down box.
809
Part VI: Programming Excel with VBA
If you store macros in the Personal Macro Workbook, you don’t have to remember to open the Personal Macro Workbook when you load a workbook that uses macros. When you want to exit, Excel asks whether you want to save changes to the Personal Macro Workbook.
Assigning a macro to a shortcut key
When you begin recording a macro, the Record Macro dialog box gives you an opportunity to provide a shortcut key for the macro. Here’s what to do if you’d like to change the shortcut key or provide a shortcut key for a macro that doesn’t have one:
1.Choose Developer Code Macros (or press Alt+F8) to display the Macro dialog box.
2.In the Macro dialog box, select the macro name from the list.
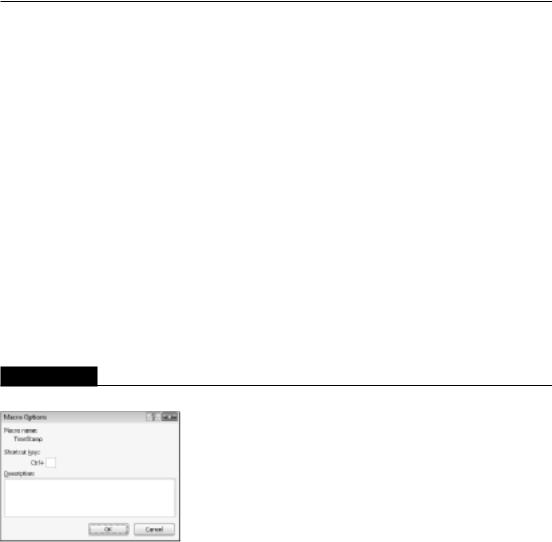
3.Click the Options button, and Excel displays its Macro Options dialog box. See Figure 39.11.
4.Specify the shortcut key. Use a single letter (for a Ctrl+letter shortcut), or press Shift and enter an uppercase letter (for a Ctrl+Shift+letter shortcut).
5.Click OK to return to the Macro dialog box.
6.Click Cancel to close the Macro dialog box.
FIGURE 39.11
Use the Macro Options dialog box to add or change a shortcut key for a macro.
Assigning a macro to a button
After you record a macro and test it, you may want to assign the macro to a button placed in a worksheet. You can follow these steps to do so:
1.If the macro is a general-purpose macro that you plan to use in more than one workbook, make sure that the macro is stored in your Personal Macro Workbook.
2.Choose Developer Controls Insert and then click the Button control from the Form Controls section (see Figure 39.12). Move your mouse pointer over the icons, and you see a ToolTip that describes the control.
810

Chapter 39: Introducing Visual Basic for Applications
3.Draw the button on the worksheet. Excel displays the Assign Macro dialog box.
4.In the Assign Macro dialog box, select the macro from the list.
5.Click OK to close the Assign Macro dialog box.
6.(Optional) Change the text that appears on the button to make it descriptive; rightclick the button, choose Edit Text from the shortcut menu, and make your changes.
After performing these steps, clicking the button executes the assigned macro.
FIGURE 39.12
Adding a button to a worksheet so that it can be used to execute a macro.
Tip
You can also assign a macro to a button on your Quick Access toolbar. Right-click the Quick Access toolbar and choose Customize Quick Access Toolbar from the shortcut menu. On the Quick Access Toolbar tab of the Excel Options dialog box that appears, select Macros from the drop-down list on the left. Then select your macro and click the Add button. To change the icon, click the Modify button. n
Writing VBA code
As demonstrated in the preceding sections, the easiest way to create a simple macro is to record your actions. To develop more complex macros, however, you have to enter the VBA code manually — in other words, write a program. To save time, you can often combine recording with manual code entry.
Before you can begin writing VBA code, you must have a good understanding of such topics as objects, properties, and methods. And it doesn’t hurt to be familiar with common programming constructs, such as looping and If-Then statements.
This section is an introduction to VBA programming, which is essential if you want to write (rather than record) VBA macros. It isn’t intended to be a complete instructional guide. My book Excel 2010 Power Programming with VBA (Wiley) covers all aspects of VBA and advanced spreadsheet application development.
811

Part VI: Programming Excel with VBA
VBA Coding Tips
When you enter code in a module sheet, you’re free to use indenting and blank lines to make the code more readable. In fact, this is an excellent habit.
After you enter a line of code (by pressing Enter), it’s evaluated for syntax errors. If none are found, the line of code is reformatted, and colors are added to keywords and identifiers. This automatic reformatting adds consistent spaces (before and after an equal sign, for example) and removes extra spaces that aren’t needed. If a syntax error is found, you receive a pop-up message, and the line is displayed in a different color (red, by default). You need to correct your error before you can execute the macro.
A single statement can be as long as you need. However, you may want to break the statement into two or more lines. To do so, insert a space followed by an underscore (_). The following code, although written as two lines, is actually a single VBA statement:
Sheets(“Sheet1”).Range(“B1”).Value = _
Sheets(“Sheet1”).Range(“A1”).Value
You can insert comments freely into your VBA code. The comment indicator is an apostrophe single quote character (‘). Any text that follows a single quote is ignored. A comment can be a line by itself, or it can be inserted after a statement. The following examples show two comments:
‘ Assign the values to the variables Rate = .085 ‘Rate as of November 16
The basics: Entering and editing code
Before you can enter code, you must insert a VBA module into the workbook. If the workbook already has a VBA module, you can use the existing module sheet for your new code.
Use the following steps to insert a new VBA module:
1.Press Alt+F11 to activate the VB Editor window. The Project window displays a list of all open workbooks and add-ins.
2.In the Project window, locate and select the workbook you’re working in.
3.Choose Insert Module. VBA inserts a new (empty) module into the workbook and displays it in the Code window.
A VBA module, which is displayed in a separate window, works like a text editor. You can move through the sheet, select text, insert, copy, cut, paste, and so on.
How VBA works
VBA is by far the most complex feature in Excel, and you can easily get overwhelmed. To set the stage for the details of VBA, here is a concise summary of how VBA works:
812

Chapter 39: Introducing Visual Basic for Applications
•You perform actions in VBA by writing (or recording) code in a VBA module sheet and then executing the macro in any one of various ways. VBA modules are stored in an Excel workbook, and a workbook can hold any number of VBA modules. To view or edit a VBA module, you must activate the VB Editor window. (Press Alt+F11 to toggle between Excel and the VB Editor window.)
•A VBA module consists of procedures. A procedure is basically computer code that performs some action. The following is an example of a simple Sub procedure called ShowSum, which adds 1 + 1 and displays the result:
Sub ShowSum() Sum = 1 + 1
MsgBox “The answer is “ & Sum End Sub
•A VBA module also can store function procedures. A function procedure performs calculations and returns a single value. A function can be called from another VBA procedure or can even be used in a worksheet formula. Here’s an example of a function named AddTwo. (It adds two values, which are supplied as arguments.)
Function AddTwo(arg1, arg2) AddTwo = arg1 + arg2
End Function
•VBA manipulates objects. Excel provides more than 100 classes of objects that you can manipulate. Examples of objects include a workbook, a worksheet, a range on a worksheet, a chart, and a rectangle shape.
•Objects are arranged in a hierarchy and can act as containers for other objects. For example, Excel itself is an object called Application, and it contains other objects, such as Workbook objects. The Workbook object can contain other objects, such as Worksheet objects and Chart objects. A Worksheet object can contain objects such as Range objects, PivotTable objects, and so on. The arrangement of all these objects is referred to as an object model.
•Objects that are alike form a collection. For example, the Worksheets collection consists of all worksheets in a particular workbook. The ChartObjects collection consists of all ChartObjects on a worksheet. Collections are objects in themselves.
•You refer to an object in your VBA code by specifying its position in the object hierarchy, using a period as a separator.
For example, you can refer to a workbook named Book1.xlsx as
Application.Workbooks(“Book1.xlsx”)
This expression refers to the Book1.xlsx workbook in the Workbooks collection. The Workbooks collection is contained in the Application object (that is, Excel). Extending this to another level, you can refer to Sheet1 in Book1 as follows:
Application.Workbooks(“Book1.xlsx”).Worksheets(“Sheet1”)
813

Part VI: Programming Excel with VBA
You can take it to still another level and refer to a specific cell as follows:
Application.Workbooks(“Book1.xlsx”).Worksheets(“Sheet1”). _
Range(“A1”)
•If you omit specific references, Excel uses the active objects. If Book1.xlsx is the active workbook, the preceding reference can be simplified as follows:
Worksheets(“Sheet1”).Range(“A1”)
If you know that Sheet1 is the active sheet, you can simplify the reference even more:
Range(“A1”)
•Objects have properties. A property can be thought of as a setting for an object. For example, a Range object has properties, such as Value and Address. A Chart object has properties such as HasTitle and Type. You can use VBA both to determine object properties and to change them.
•You refer to properties by combining the object with the property, separated by a period. For example, you can refer to the value in cell A1 on Sheet1 as follows:
Worksheets(“Sheet1”).Range(“A1”).Value
•You can assign values to variables. To assign the value in cell A1 on Sheet1 to a variable called Interest, use the following VBA statement:
Interest = Worksheets(“Sheet1”).Range(“A1”).Value
•Objects have methods. A method is an action that is performed with the object. For example, one of the methods for a Range object is ClearContents. This method clears the contents of the range.
•You specify methods by combining the object with the method, separated by a period. For example, to clear the contents of range A1:C12, use the following statement:
Worksheets(“Sheet1”).Range(“A1:C12”).ClearContents
•VBA also includes all the constructs of modern programming languages, including variables, arrays, looping, and so on.
The preceding describes VBA in a nutshell. Now you just have to learn the details, some of which are covered in the rest of this chapter.
Objects and collections
VBA is an object-oriented language, which means that it manipulates objects, such as Ranges, Charts, Shapes, and so on. These objects are arranged in a hierarchy. The Application object (which is Excel) contains other objects. For example, the Application object contains a number of objects, including the following:
•AddIns (a collection of AddIn objects)
•Windows (a collection of Window objects)
•Workbooks (a collection of Workbook objects)
814
Chapter 39: Introducing Visual Basic for Applications
Most of these objects can contain other objects. For example, a Workbook object can contain the following objects:
•Charts (a collection of Chart sheet objects)
•Names (a collection of Name objects)
•Styles (a collection of Style objects)
•Windows (a collection of Window objects in the workbook)
•Worksheets (a collection of Worksheet objects)
Each of these objects, in turn, can contain other objects. A Worksheet object, for example, can contain the following objects:
•ChartObjects (a collection of all ChartObject objects)
•PageSetup (an object that stores printing information)
•PivotTables (a collection of all PivotTable objects)
A collection consists of all like objects. For example, the collection of all Workbook objects is known as the Workbooks collection. You can refer to an individual object in a collection by using an index number or a name. For example, if a workbook has three worksheets (named Sheet1, Sheet2, and Sheet3), you can refer to the first object in the Worksheets collection in either of these ways:
Worksheets(1)
Worksheets(“Sheet1”)
Properties
The objects that you work with have properties, which you can think of as attributes of the objects. For example, a Range object has properties, such as Column, Row, Width, and Value. A Chart object has properties, such as Legend, ChartTitle, and so on. ChartTitle is also an object, with properties such as Font, Orientation, and Text. Excel has many objects, and each has its own set of properties. You can write VBA code to do the following:
•Examine an object’s current property setting and take some action based on it.
•Change an object’s property setting.
You refer to a property in your VBA code by placing a period (a dot) and the property name after the object’s name. For example, the following VBA statement sets the Value property of a range named frequency to 15. (That is, the statement causes the number 15 to appear in the range’s cells.)
Range(“frequency”).Value = 15
Some properties are read-only, which means that you can examine the property, but you can’t change the property. For a single-cell Range object, the Row and Column properties are read-only
815

Part VI: Programming Excel with VBA
properties: You can determine where a cell is located (in which row and column), but you can’t change the cell’s location by changing these properties.
A Range object also has a Formula property, which is not read-only; that is, you can insert a formula into a cell by changing its Formula property. The following statement inserts a formula into cell A12 by changing the cell’s Formula property:
Range(“A12”).Formula = “=SUM(A1:A10)”
Note
Contrary to what you may think, Excel doesn’t have a Cell object. When you want to manipulate a single cell, you use the Range object (with only one cell in it). n
At the top of the object hierarchy is the Application object, which is actually Excel, the program. The Application object has several useful properties:
•Application.ActiveWorkbook: Returns the active workbook (a Workbook object) in Excel.
•Application.ActiveSheet: Returns the active sheet (a Sheet object) of the active workbook.
•Application.ActiveCell: Returns the active cell (a Range object) object of the active window.
•Application.Selection: Returns the object that is currently selected in the active window of the Application object. This can be a Range, a Chart, a Shape, or some other selectable object.
You also should understand that properties can return objects. In fact, that’s exactly what the preceding examples do. The result of Application.ActiveCell, for example, is a Range object. Therefore, you can access properties by using a statement such as the following:
Application.ActiveCell.Font.Size = 15
In this case, the ActiveCell property returns a Range object. The Font property returns a Font object, which is contained in the Range object. Size is a property of the Font object. The preceding statement sets the Size property to 15 — that is, it causes the font in the currently selected cell to have a size of 15 points (pt).
Tip
Because Application properties are so commonly used, you can omit the object qualifier (Application).
For example, to get the row of the active cell, you can use a statement such as the following:
ActiveCell.Row
In many cases, you can refer to the same object in a number of different ways. Assume that you have a workbook named Sales.xlsx and it’s the only workbook open. Furthermore, assume
816

Chapter 39: Introducing Visual Basic for Applications
that this workbook has one worksheet, named Summary. Your VBA code can refer to the Summary sheet in any of the following ways:
Workbooks(“Sales.xlsx”).Worksheets(“Summary”)
Workbooks(1).Worksheets(1)
Workbooks(1).Sheets(1)
Application.ActiveWorkbook.ActiveSheet
ActiveWorkbook.ActiveSheet
ActiveSheet
The method that you use is determined by how much you know about the workspace. For example, if more than one workbook is open, the second or third method is not reliable. If you want to work with the active sheet (whatever it may be), any of the last three methods would work. To be absolutely sure that you’re referring to a specific sheet on a specific workbook, the first method is your best choice.
Methods
Objects also have methods. You can think of a method as an action taken with an object. For example, Range objects have a Clear method. The following VBA statement clears a Range, an action that is equivalent to selecting the Range and then choosing Home Editing Clear Clear All:
Range(“A1:C12”).Clear
In VBA code, methods look like properties because they are connected to the object with a “dot.” However, methods and properties are different concepts.
Variables
Like all programming languages, VBA enables you to work with variables. In VBA (unlike in some languages), you don’t need to declare variables explicitly before you use them in your code (although doing so is definitely a good practice).
Note
If your VBA module contains an Option Explicit statement at the top of the module, then you must declare all variables in the module. Undeclared variables will result in a compile error, and your procedures will not run. n
In the following example, the value in cell A1 on Sheet1 is assigned to a variable named Rate:
Rate = Worksheets(“Sheet1”).Range(“A1”).Value
You then can work with the variable Rate in other parts of your VBA code. Note that the variable Rate is not a named range, which means that you can’t use it as such in a worksheet formula.
817

Part VI: Programming Excel with VBA
Controlling execution
VBA uses many constructs that are found in most other programming languages. These constructs are used to control the flow of execution. This section introduces a few of the more common programming constructs.
The If-Then construct
One of the most important control structures in VBA is the If-Then construct, which gives your applications decision-making capability. The basic syntax of the If-Then structure is as follows:
If condition Then statements [Else elsestatements]
In plain English, if a condition is true, then a group of statement will be executed. If you include the Else clause, then another group of statements will be executed if the condition is not true.
The following is an example (which doesn’t use the optional Else clause). This procedure checks the active cell. If it contains a negative value, the cell’s color is changed to red. Otherwise, nothing happens.
Sub CheckCell()
If ActiveCell.Value < 0 Then ActiveCell.Font.ColorIndex = 3
End Sub
For-Next loops
You can use a For-Next loop to execute one or more statements a number of times. Here’s an example of a For-Next loop:
Sub SumSquared()
Total = 0
For Num = 1 To 10
Total = Total + (Num ^ 2)
Next Num
MsgBox Total
End Sub
This example has one statement between the For statement and the Next statement. This single statement is executed 10 times. The variable Num takes on successive values of 1, 2, 3, and so on, up to 10. The variable Total stores the sum of Num squared, added to the previous value of Total. The result is a value that represents the sum of the first 10 integers squared. This result is displayed in a message box.
The With-End With construct
Another construct that you encounter if you record macros is the With-End With construct. This is a shortcut way of dealing with several properties or methods of the same object. The following is an example:
Sub AlignCells()
With Selection
.HorizontalAlignment = xlCenter
818

Chapter 39: Introducing Visual Basic for Applications
.VerticalAlignment = xlCenter
.WrapText = False
.Orientation = xlHorizontal End With
End Sub
The following macro performs exactly the same operations but doesn’t use the With-End With construct:
Sub AlignCells()
Selection.HorizontalAlignment = xlCenter
Selection.VerticalAlignment = xlCenter
Selection.WrapText = False
Selection.Orientation = xlHorizontal
End Sub
The Select Case construct
The Select Case construct is useful for choosing among two or more options. The following example demonstrates the use of a Select Case construct. In this example, the active cell is checked. If its value is less than 0, it’s colored red. If it’s equal to 0, it’s colored blue. If the value is greater than 0, it’s colored black.
Sub CheckCell()
Select Case ActiveCell.Value
Case Is < 0
ActiveCell.Font.Color = vbRed
Case 0
ActiveCell.Font.Color = vbBlue
Case Is > 0
ActiveCell.Font.Color = vbBlack
End Select
End Sub
Any number of statements can go below each Case statement, and they all get executed if the case is true.
A macro that can’t be recorded
The following is a VBA macro that can’t be recorded because it uses programming concepts that must be entered manually. This macro creates a list of all formulas on the active sheet. The list is stored on a new worksheet.
Sub ListFormulas()
‘Create a range object
Set InputRange = ActiveSheet.UsedRange
‘Add a new sheet
Set OutputSheet = Worksheets.Add
‘Variable for the output row OutputRow = 1
‘Loop through the range
819

Part VI: Programming Excel with VBA
For Each cell In InputRange
If cell.HasFormula Then
OutputSheet.Cells(OutputRow, 1) = “’” & cell.Address
OutputSheet.Cells(OutputRow, 2) = “’” & cell.Formula
OutputRow = OutputRow + 1
End If
Next cell
End Sub
On the CD
A workbook that contains this example is available on the companion CD-ROM. The file is named list formulas.xlsm.
Although this macro may look complicated, it’s fairly simple when you break it down. Here’s how it works:
1.The macro creates an object variable named InputRange. This variable corresponds to the used range on the active sheet (avoiding the need to check every cell).
2.It then adds a new worksheet and assigns the worksheet to an object variable named OutputSheet. The OutputRow variable is set to 1. This variable is incremented later on.
3.The For-Next loop examines each cell in the InputRange. If the cell has a formula, the cell’s address and formula are written to the OutputSheet. The OutputRow variable is also incremented.
Figure 39.13 shows the result of running this macro — a handy list of all formulas in the worksheet.
FIGURE 39.13
The ListFormulas macro creates a list of all formulas in a worksheet.
820